編輯:Android資訊
本文由碼農網 – 小峰原創翻譯,轉載請看清文末的轉載要求,歡迎參與我們的付費投稿計劃!
為了創建具有視覺魅力的app,顯示圖像是必須的。學會在你的Android app上高效地顯示位圖,而不是放棄性能。
當工作於開發視覺魅力的app時,顯示圖像是必須的。問題是,Android操作系統不能很好地處理圖像解碼,從而迫使開發者要小心某些任務以避免搞亂性能。
Google寫了一個有關於高效顯示位圖的完整指南,我們可以按照這個指南來理解和解決在顯示位圖時Android操作系統的主要缺陷。

按照Google的指南,我們可以列出一些我們在Android apps上顯示圖像時遇到的主要問題。
無論視圖大小,Android總是解碼並全尺寸/大小顯示圖像。因為這個原因,所以如果你試圖加載一個大圖像,那就很容易使你的設備出現outOfMemoryError。
為了避免這種情況,正如Google所說的那樣,我們應該使用BitmapFactory 解碼圖像,為inSampleSize 參數設置一個值。圖象尺寸由inSampleSize劃分,減少存儲器的使用量。
public static Bitmap decodeSampledBitmapFromResource(Resources res, int resId,
        int reqWidth, int reqHeight) {

    // First decode with inJustDecodeBounds=true to check dimensions
    final BitmapFactory.Options options = new BitmapFactory.Options();
    options.inJustDecodeBounds = true;
    BitmapFactory.decodeResource(res, resId, options);

    // Calculate inSampleSize
    options.inSampleSize = calculateInSampleSize(options, reqWidth, reqHeight);

    // Decode bitmap with inSampleSize set
    options.inJustDecodeBounds = false;
    return BitmapFactory.decodeResource(res, resId, options);
}
你可以手動設置inSampleSize,或使用顯示器的尺寸計算。
public static int calculateInSampleSize(
            BitmapFactory.Options options, int reqWidth, int reqHeight) {
    // Raw height and width of image
    final int height = options.outHeight;
    final int width = options.outWidth;
    int inSampleSize = 1;

    if (height > reqHeight || width > reqWidth) {

        final int halfHeight = height / 2;
        final int halfWidth = width / 2;

        // Calculate the largest inSampleSize value that is a power of 2 and keeps both
        // height and width larger than the requested height and width.
        while ((halfHeight / inSampleSize) >= reqHeight
                && (halfWidth / inSampleSize) >= reqWidth) {
            inSampleSize *= 2;
        }
    }

    return inSampleSize;
}
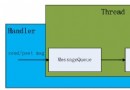
即使在使用BitmapFactory時,圖像解碼在UI線程上完成。這可以凍結app,並導致ANR(“Application Not Responding應用程序沒有響應”)警報。
這個容易解決,你只需要將解碼過程放到工作線程上。一種方法是使用異步任務,正如Google指導中解釋的那樣:
class BitmapWorkerTask extends AsyncTask<Integer, Void, Bitmap> {
    private final WeakReference<ImageView> imageViewReference;
    private int data = 0;

    public BitmapWorkerTask(ImageView imageView) {
        // Use a WeakReference to ensure the ImageView can be garbage collected
        imageViewReference = new WeakReference<ImageView>(imageView);
    }

    // Decode image in background.
    @Override
    protected Bitmap doInBackground(Integer... params) {
        data = params[0];
        return decodeSampledBitmapFromResource(getResources(), data, 100, 100));
    }

    // Once complete, see if ImageView is still around and set bitmap.
    @Override
    protected void onPostExecute(Bitmap bitmap) {
        if (imageViewReference != null && bitmap != null) {
            final ImageView imageView = imageViewReference.get();
            if (imageView != null) {
                imageView.setImageBitmap(bitmap);
            }
        }
    }
}
每當對圖像進行解碼並放置在一個視圖中的時候,Android操作系統默認重復整個渲染過程,浪費了寶貴的設備存儲器。如果你打算在不同的地方展示相同的圖像,或因為app生命周期或行為要多次重新加載,那麼這可能會特別煩人。
為了避免占用過多的內存,推薦使用內存和磁盤緩存。接下來,我們將看到這些緩存之間的主要區別,以及為什麼同時使用兩者有用的原因。代碼在這裡顯示的話太復雜了,所以請自行參閱Google指南的位圖緩存部分以了解如何實現內存和磁盤的緩存。
每個緩存都有其優點和缺點,因此最好的做法是兩者皆用,並從首先可用的地方讀取,通過內存緩存開始。
不知道你有沒有注意到,正如我在本文開頭所述,在Android app上顯示圖片真的很讓人頭疼。絕非看上去那麼簡單。
為了避免在每個項目中重復這些任務,我開發了一個100%免費又開源的Android庫,EpicBitmapRenderer 。你可以在EpicBitmapRenderer GitHub repo選擇它,或在EpicBitmapRenderer網站了解更多。
EpicBitmapRenderer 易於使用,並在每個圖像解碼操作中自動化了所有這些惱人的任務,這樣你就可以專注於app開發。
你只需要添加增加EpicBitmapRenderer 依賴在你的Gradle上(查看其他構建工具的替代品,看看EpicBitmapRenderer文檔的導入庫部分)。
compile 'com.isaacrf.epicbitmaprenderer:epicbitmaprenderer:1.0'
在EpicBitmapRenderer 中解碼圖像是很容易的:只需要調用所需的解碼方法並管理結果。看看下面這個例子,我們從URL獲取圖片並顯示於ImageVIew上。
//Sample 3: Decode Bitmap from URL (Async)
EpicBitmapRenderer.decodeBitmapFromUrl(
        "http://isaacrf.com/wp-content/themes/Workality-Lite-child/images/IsaacRF.png",
        200, 200,
        new OnBitmapRendered() {
            @Override
            public void onBitmapRendered(Bitmap bitmap) {
                //Display rendered Bitmap when ready
                ImageView imgView = findViewById(R.id.imgSampleDecodeUrl);
                imgView.setImageBitmap(bitmap);
            }
        },
        new OnBitmapRenderFailed() {
            @Override
            public void onBitmapRenderFailed(Exception e) {
                //Take actions if Bitmap fails to render
                Toast.makeText(MainActivity.this,
                          "Failed to load Bitmap from URL",
                          Toast.LENGTH_SHORT).show();
            }
        });
這篇文章以及任何相關的源代碼和文件,遵循 The Creative Commons Attribution-Share Alike 3.0 Unported License的授權許可。
 加快Android編譯速度的技巧總結
對於Android開發者而言,隨著工程不斷的壯大,Android項目的編譯時間也逐漸變長,即便是有時候添加一行代碼也需要等待好久才能看見期待的效果。之前加快And
 17 位谷歌 Android 開發專家是如何看待 Kotlin 的?
Google 已經多次表達過他們不反對 Kotlin 的使用,只要 Kotlin 編譯器依然生成有效的字節碼,那麼 Google 就不會阻止任何人使用它。 但很多
 Android 中如何計算 App 的啟動時間?
之前有人在知乎提問: “怎麼計算apk的啟動時間?” : 利用python或者直接用adb命令怎麼計算apk的啟動時間呢?就是計算從點擊圖標到apk完全啟動所
 自己封裝雙緩存管理框架 Android 庫
一、概述 Android開發中,網絡請求是很重要的一部分,而緩存網絡請求來的圖片或者響應結果字符串或者結果流,既可以省流量,同時也可以幫助我們解決無網或弱網情況