編輯:Android資訊
Android中的任何一個布局、任何一個控件其實都是直接或間接繼承自View實現的,當然也包括我們在平時開發中所寫的各種炫酷的自定義控件了,所以學習View的工作原理對於我們來說顯得格外重要,本篇博客,我們將一起深入學習Android中View的工作原理。
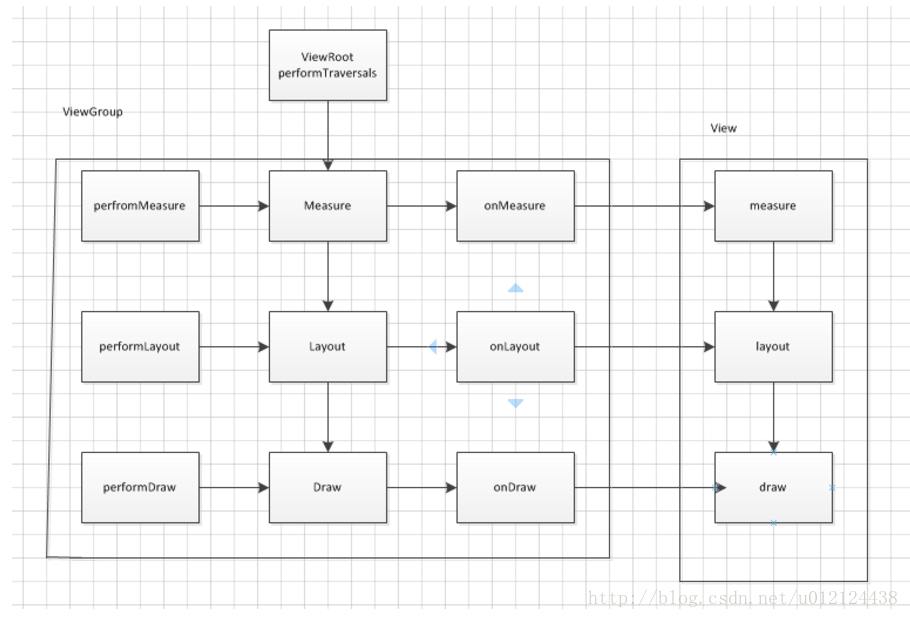
1.ViewRoot對應於ViewRootImpl類,是連接WindowManager和DecorView的紐帶,View的三大流程均是通過ViewRoot來完成的。在ActivityThread中,當Activity對象被創建完畢後,會將DecorView添加到Window中,同時會創建ViewRootImpl對象,並將ViewRootImpl對象和DecorView建立關聯。
2.View的繪制流程從ViewRoot的performTraversals開始,經過measure、layout和draw三個過程才可以把一個View繪制出來,其中measure用來測量View的寬高,layout用來確定View在父容器中的放置位置,而draw則負責將View繪制到屏幕上。
3.performTraversals會依次調用performMeasure、performLayout和performDraw三個方法,這三個方法分別完成頂級View的measure、layout和draw這三大流程。其中performMeasure中會調用measure方法,在measure方法中又會調用onMeasure方法,在onMeasure方法中則會對所有子元素進行measure過程,這樣就完成了一次measure過程;子元素會重復父容器的measure過程,如此反復完成了整個View數的遍歷。
measure過程決定了View的寬/高,完成後可通過getMeasuredWidth/getMeasureHeight方法來獲取View測量後的寬/高。Layout過程決定了View的四個頂點的坐標和實際View的寬高,完成後可通過getTop、getBotton、getLeft和getRight拿到View的四個定點坐標。Draw過程決定了View的顯示,完成後View的內容才能呈現到屏幕上。
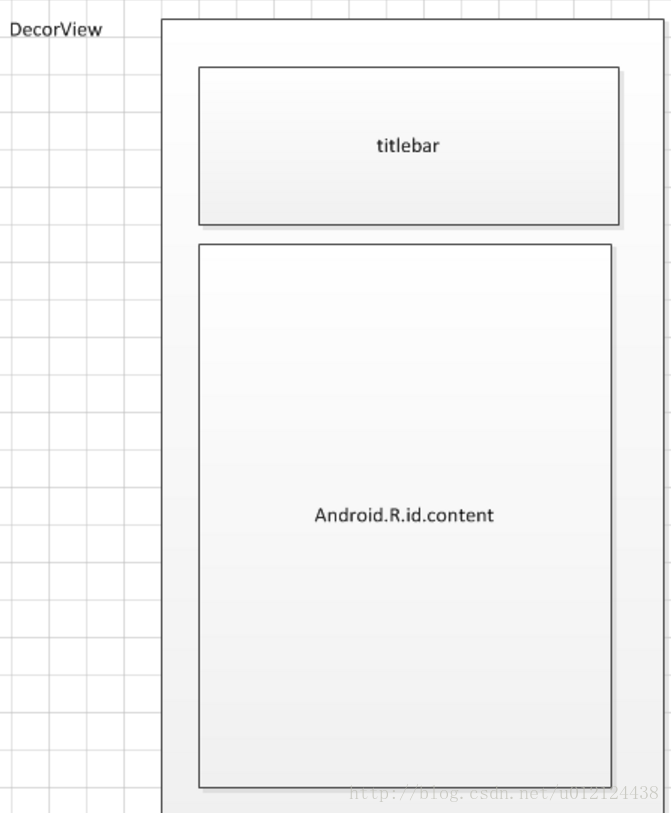
DecorView作為頂級View,一般情況下它內部包含了一個豎直方向的LinearLayout,裡面分為兩個部分(具體情況和Android版本和主題有關),上面是標題欄,下面是內容欄。在Activity通過setContextView所設置的布局文件其實就是被加載到內容欄之中的。
//獲取內容欄
ViewGroup content = findViewById(R.android.id.content);
//獲取我們設置的Viewcontext.getChildAt(0);
DecorView其實是一個FrameLayout,View層的事件都先經過DecorView,然後才傳給我們的View。
1.MeasureSpec很大程度上決定一個View的尺寸規格,測量過程中,系統會將View的layoutParams根據父容器所施加的規則轉換成對應的MeasureSpec,再根據這個measureSpec來測量出View的寬/高。
2.MeasureSpec代表一個32位的int值,高2位為SpecMode,低30位為SpecSize,SpecMode是指測量模式,SpecSize是指在某種測量模式下的規格大小。
MpecMode有三類;
1.UNSPECIFIED 父容器不對View進行任何限制,要多大給多大,一般用於系統內部
2.EXACTLY 父容器檢測到View所需要的精確大小,這時候View的最終大小就是SpecSize所指定的值,對應LayoutParams中的match_parent和具體數值這兩種模式。
3.AT_MOST 父容器指定了一個可用大小即SpecSize,View的大小不能大於這個值,不同View實現不同,對應LayoutParams中的wrap_content。
當View采用固定寬/高的時候,不管父容器的MeasureSpec的是什麼,View的MeasureSpec都是精確模式兵其大小遵循Layoutparams的大小。 當View的寬/高是match_parent時,如果他的父容器的模式是精確模式,那View也是精確模式並且大小是父容器的剩余空間;如果父容器是最大模式,那麼View也是最大模式並且起大小不會超過父容器的剩余空間。 當View的寬/高是wrap_content時,不管父容器的模式是精確還是最大化,View的模式總是最大化並且不能超過父容器的剩余空間。
對於DecorView,它的MeasureSpec由Window的尺寸和其自身的LayoutParams來共同確定,對於普通的View,其MeasureSpec由父容器的MeasureSpec和自身的Layoutparams來共同確定。
對於 DecorView,在ViewRootImpl源碼中的measureHierarchy有如下一段代碼:
.........
if (baseSize != 0 && desiredWindowWidth > baseSize) {
                childWidthMeasureSpec = getRootMeasureSpec(baseSize, lp.width);
                childHeightMeasureSpec = getRootMeasureSpec(desiredWindowHeight, lp.height);
                performMeasure(childWidthMeasureSpec, childHeightMeasureSpec);
                if (DEBUG_DIALOG) Log.v(TAG, "Window " + mView + ": measured ("
                        + host.getMeasuredWidth() + "," + host.getMeasuredHeight() + ")");
                if ((host.getMeasuredWidthAndState()&View.MEASURED_STATE_TOO_SMALL) == 0) {
                    goodMeasure = true;
.........
我們查看一下getRootMeasureSpec方法的源碼:
 private static int getRootMeasureSpec(int windowSize, int rootDimension) {
        int measureSpec;
        switch (rootDimension) {

        case ViewGroup.LayoutParams.MATCH_PARENT:
            // Window can't resize. Force root view to be windowSize.
            measureSpec = MeasureSpec.makeMeasureSpec(windowSize, MeasureSpec.EXACTLY);
            break;
        case ViewGroup.LayoutParams.WRAP_CONTENT:
            // Window can resize. Set max size for root view.
            measureSpec = MeasureSpec.makeMeasureSpec(windowSize, MeasureSpec.AT_MOST);
            break;
        default:
            // Window wants to be an exact size. Force root view to be that size.
            measureSpec = MeasureSpec.makeMeasureSpec(rootDimension, MeasureSpec.EXACTLY);
            break;
        }
        return measureSpec;
    }
從上面的代碼中就可以很容理解DecorView的MeasureSpec是如何產生的,rootDimension就是DecorView自身的LayoutParams,然後會根據這個值進行判斷
LayoutParams.MATCH_PARENT:DecorView的MeasureSpec被賦值為精確模式,DecorView的大小就是Window的大小
ViewGroup.LayoutParams.WRAP_CONTENT:DecorView的MeasureSpec被賦值為最大模式,DecorView的大小不定,但是不能超過Window的大小
默認情況:DecorView的MeasureSpec被賦值為精確模式,DecorView的大小為自身LayoutParams設置的值,也就是rootDimension
接著是對於普通的View,也就是布局中的View,它的Measure過程由ViewGroup傳遞而來,其中有一個方法是measureChildWithMargins
protected void measureChildWithMargins(View child,
            int parentWidthMeasureSpec, int widthUsed,
            int parentHeightMeasureSpec, int heightUsed) {
        final MarginLayoutParams lp = (MarginLayoutParams) child.getLayoutParams();

        final int childWidthMeasureSpec = getChildMeasureSpec(parentWidthMeasureSpec,
                mPaddingLeft + mPaddingRight + lp.leftMargin + lp.rightMargin
                        + widthUsed, lp.width);
        final int childHeightMeasureSpec = getChildMeasureSpec(parentHeightMeasureSpec,
                mPaddingTop + mPaddingBottom + lp.topMargin + lp.bottomMargin
                        + heightUsed, lp.height);

        child.measure(childWidthMeasureSpec, childHeightMeasureSpec);
    }
在對子view進行measure之前會先調用getChildMeasureSpec方法來獲取子view的MeasureSpec,從這段代碼就可以看出來子view的MeasureSpec的確定與父容器的MeasureSpec(parentWidthMeasureSpec)還有自身的LayoutParams(lp.height和lp.width),還有View自己的Margin和Padding有關
接下來查看getChildMeasureSpec方法源碼:
public static int getChildMeasureSpec(int spec, int padding, int childDimension) {
        int specMode = MeasureSpec.getMode(spec);
        int specSize = MeasureSpec.getSize(spec);

        int size = Math.max(0, specSize - padding);

        int resultSize = 0;
        int resultMode = 0;

        switch (specMode) {
        // Parent has imposed an exact size on us
        case MeasureSpec.EXACTLY:
            if (childDimension >= 0) {
                resultSize = childDimension;
                resultMode = MeasureSpec.EXACTLY;
            } else if (childDimension == LayoutParams.MATCH_PARENT) {
                // Child wants to be our size. So be it.
                resultSize = size;
                resultMode = MeasureSpec.EXACTLY;
            } else if (childDimension == LayoutParams.WRAP_CONTENT) {
                // Child wants to determine its own size. It can't be
                // bigger than us.
                resultSize = size;
                resultMode = MeasureSpec.AT_MOST;
            }
            break;

        // Parent has imposed a maximum size on us
        case MeasureSpec.AT_MOST:
            if (childDimension >= 0) {
                // Child wants a specific size... so be it
                resultSize = childDimension;
                resultMode = MeasureSpec.EXACTLY;
            } else if (childDimension == LayoutParams.MATCH_PARENT) {
                // Child wants to be our size, but our size is not fixed.
                // Constrain child to not be bigger than us.
                resultSize = size;
                resultMode = MeasureSpec.AT_MOST;
            } else if (childDimension == LayoutParams.WRAP_CONTENT) {
                // Child wants to determine its own size. It can't be
                // bigger than us.
                resultSize = size;
                resultMode = MeasureSpec.AT_MOST;
            }
            break;

        // Parent asked to see how big we want to be
        case MeasureSpec.UNSPECIFIED:
            if (childDimension >= 0) {
                // Child wants a specific size... let him have it
                resultSize = childDimension;
                resultMode = MeasureSpec.EXACTLY;
            } else if (childDimension == LayoutParams.MATCH_PARENT) {
                // Child wants to be our size... find out how big it should
                // be
                resultSize = View.sUseZeroUnspecifiedMeasureSpec ? 0 : size;
                resultMode = MeasureSpec.UNSPECIFIED;
            } else if (childDimension == LayoutParams.WRAP_CONTENT) {
                // Child wants to determine its own size.... find out how
                // big it should be
                resultSize = View.sUseZeroUnspecifiedMeasureSpec ? 0 : size;
                resultMode = MeasureSpec.UNSPECIFIED;
            }
            break;
        }
        return MeasureSpec.makeMeasureSpec(resultSize, resultMode);
    }
這裡參數中的padding是指父容器的padding,這裡是父容器所占用的空間,所以子view能使用的空間要減去這個padding的值。同時這個方法內部其實就是根據父容器的MeasureSpec結合子view的LayoutParams來確定子view的MeasureSpec
measure的過程
如果只是一個View,那麼通過measure方法就完成了其測量的過程,如果是一個ViewGroup,除了測量自身外,還會調用子孩子的measure方法
1.View的measure過程
View的measure過程由其measure方法完成,其中有下面一段內容
.........
int cacheIndex = (mPrivateFlags & PFLAG_FORCE_LAYOUT) == PFLAG_FORCE_LAYOUT ? -1 :
                    mMeasureCache.indexOfKey(key);
            if (cacheIndex < 0 || sIgnoreMeasureCache) {
                // measure ourselves, this should set the measured dimension flag back
                onMeasure(widthMeasureSpec, heightMeasureSpec);
                mPrivateFlags3 &= ~PFLAG3_MEASURE_NEEDED_BEFORE_LAYOUT;
            } else {
                long value = mMeasureCache.valueAt(cacheIndex);
                // Casting a long to int drops the high 32 bits, no mask needed
                setMeasuredDimensionRaw((int) (value >> 32), (int) value);
                mPrivateFlags3 |= PFLAG3_MEASURE_NEEDED_BEFORE_LAYOUT;
            }
.........
可以知道View的measure方法內,其實調用了自身的onMeasure方法
protected void onMeasure(int widthMeasureSpec, int heightMeasureSpec) {
        setMeasuredDimension(getDefaultSize(getSuggestedMinimumWidth(), widthMeasureSpec),
                getDefaultSize(getSuggestedMinimumHeight(), heightMeasureSpec));
}
//裡面有一個getDefaultSize方法
public static int getDefaultSize(int size, int measureSpec) {
        int result = size;
        int specMode = MeasureSpec.getMode(measureSpec);
        int specSize = MeasureSpec.getSize(measureSpec);

        switch (specMode) {
        case MeasureSpec.UNSPECIFIED:
            result = size;
            break;
        case MeasureSpec.AT_MOST:
        case MeasureSpec.EXACTLY:
            result = specSize;
            break;
        }
        return result;
    }
一般我們只需要看MeasureSpec.AT_MOST和MeasureSpec.EXACTLY兩種情況,這兩種情況返回的result其實都是measureSpec中取得的specSize,這個specSize就是View測量後的大小,這裡之所以是View測量後的大小,是因為View的最終大小是在layout階段確定的,所以要加已區分,一般情況下View測量大小和最終大小是一樣的。
UNSPECIFIED情況下,result的值就是getSuggestedMinimumWidth()方法和getSuggestedMinimumHeight()返回的值,查看這兩個方法
protected int getSuggestedMinimumWidth() {
        return (mBackground == null) ? mMinWidth : max(mMinWidth, mBackground.getMinimumWidth());
    }

protected int getSuggestedMinimumHeight() {
        return (mBackground == null) ? mMinHeight : max(mMinHeight, mBackground.getMinimumHeight());

}
從getSuggestedMinimumWidth代碼可以看出,如果View沒有設置背景,那麼寬度就為mMinWidth,這個值對應android:minWidth這個屬性所設定的值,如果View設置了背景,則為max(mMinWidth, mBackground.getMinimumWidth())
public int getMinimumWidth() {
        final int intrinsicWidth = getIntrinsicWidth();
        return intrinsicWidth > 0 ? intrinsicWidth : 0;
    }
查看mBackground.getMinimumWidth()方法,它其實是Drawable的方法,如果intrinsicHeight也就是原始的寬度不為0,就返回它,如果為0,就返回0。
從View的getDefaultSize方法可以得出結論:View的寬高由specSize決定,如果我們通過繼承View來自定義控件需要重寫onMeasure方法,並設置WRAP_CONTENT時的大小,否則在布局中使用WRAP_CONTENT相當於使用MATCH_PARENT
原因:因為View在布局中使用WRAP_CONTENT就相當於specMode為AT_MOST,而這種情況下,result = specSize,這個specSize的大小為parentSize, parentSize就是父容器目前可用的大小,也就是父容器當前剩余空間的大小,那這時候和在布局中使用MATCH_PARENT效果是一樣的
所以在AT_MOST模式下,我們一般都會給View設定默認的內部寬高,並在WRAP_CONTENT時設置此寬高即可。
可以通過查看TextView、ImageView的源碼,可以得知在WRAP_CONTENT下,onMeasure方法均做了特殊的處理,下面是TextView的onMeasure中的一段內容
if (widthMode == MeasureSpec.AT_MOST) {
                width = Math.min(widthSize, width);
            }
2.ViewGroup的measure流程
ViewGroup是一個抽象類,它沒有重寫View的onMeasure方法,而是自己提供了一個measureChildren方法
protected void measureChildren(int widthMeasureSpec, int heightMeasureSpec) {
        final int size = mChildrenCount;
        final View[] children = mChildren;
        for (int i = 0; i < size; ++i) {
            final View child = children[i];
            if ((child.mViewFlags & VISIBILITY_MASK) != GONE) {
                measureChild(child, widthMeasureSpec, heightMeasureSpec);
            }
        }
    }
裡面會對子元素進行遍歷,然後調用measureChild方法去測量每一個子元素的寬高
protected void measureChild(View child, int parentWidthMeasureSpec,
            int parentHeightMeasureSpec) {
        final LayoutParams lp = child.getLayoutParams();

        final int childWidthMeasureSpec = getChildMeasureSpec(parentWidthMeasureSpec,
                mPaddingLeft + mPaddingRight, lp.width);
        final int childHeightMeasureSpec = getChildMeasureSpec(parentHeightMeasureSpec,
                mPaddingTop + mPaddingBottom, lp.height);

        child.measure(childWidthMeasureSpec, childHeightMeasureSpec);
}
在對子view進行measure之前會先調用getChildMeasureSpec方法來獲取子孩子的MeasureSpec,從這段代碼就可以看出來子view的MeasureSpec的確定與父容器的MeasureSpec(parentWidthMeasureSpec和parentHeightMeasureSpec)還有自身的LayoutParams(lp.height和lp.width),還有View自己的Margin和Padding有關,最後就是調用子view的measure方法
ViewGroup並沒有去定義測量的具體過程,這是因為ViewGroup是一個抽象類,其onMeasure方法需要各個子類去實現,因為每個ViewGroup的實現類,例如LinearLayout,RelativeLayout等的布局方式都是不同的,所以不可能一概而論的來寫onMeasure方法。
接下來分析LinearLayout的onMeasure方法:
protected void onMeasure(int widthMeasureSpec, int heightMeasureSpec) {
        if (mOrientation == VERTICAL) {
            measureVertical(widthMeasureSpec, heightMeasureSpec);
        } else {
            measureHorizontal(widthMeasureSpec, heightMeasureSpec);
        }
}
查看measureVertical方法
// See how tall everyone is. Also remember max width.
        for (int i = 0; i < count; ++i) {
            final View child = getVirtualChildAt(i);

            if (child == null) {
                mTotalLength += measureNullChild(i);
                continue;
            }

            if (child.getVisibility() == View.GONE) {
               i += getChildrenSkipCount(child, i);
               continue;
            }

            if (hasDividerBeforeChildAt(i)) {
                mTotalLength += mDividerHeight;
            }

            LinearLayout.LayoutParams lp = (LinearLayout.LayoutParams) child.getLayoutParams();

            totalWeight += lp.weight;

            if (heightMode == MeasureSpec.EXACTLY && lp.height == 0 && lp.weight > 0) {
                // Optimization: don't bother measuring children who are going to use
                // leftover space. These views will get measured again down below if
                // there is any leftover space.
                final int totalLength = mTotalLength;
                mTotalLength = Math.max(totalLength, totalLength + lp.topMargin + lp.bottomMargin);
                skippedMeasure = true;
            } else {
                int oldHeight = Integer.MIN_VALUE;

                if (lp.height == 0 && lp.weight > 0) {
                    // heightMode is either UNSPECIFIED or AT_MOST, and this
                    // child wanted to stretch to fill available space.
                    // Translate that to WRAP_CONTENT so that it does not end up
                    // with a height of 0
                    oldHeight = 0;
                    lp.height = LayoutParams.WRAP_CONTENT;
                }

                // Determine how big this child would like to be. If this or
                // previous children have given a weight, then we allow it to
                // use all available space (and we will shrink things later
                // if needed).
                measureChildBeforeLayout(
                       child, i, widthMeasureSpec, 0, heightMeasureSpec,
                       totalWeight == 0 ? mTotalLength : 0);

                if (oldHeight != Integer.MIN_VALUE) {
                   lp.height = oldHeight;
                }

                final int childHeight = child.getMeasuredHeight();
                final int totalLength = mTotalLength;
                mTotalLength = Math.max(totalLength, totalLength + childHeight + lp.topMargin +
                       lp.bottomMargin + getNextLocationOffset(child));

                if (useLargestChild) {
                    largestChildHeight = Math.max(childHeight, largestChildHeight);
                }
            }

            /**
             * If applicable, compute the additional offset to the child's baseline
             * we'll need later when asked {@link #getBaseline}.
             */
            if ((baselineChildIndex >= 0) && (baselineChildIndex == i + 1)) {
               mBaselineChildTop = mTotalLength;
            }

            // if we are trying to use a child index for our baseline, the above
            // book keeping only works if there are no children above it with
            // weight.  fail fast to aid the developer.
            if (i < baselineChildIndex && lp.weight > 0) {
                throw new RuntimeException("A child of LinearLayout with index "
                        + "less than mBaselineAlignedChildIndex has weight > 0, which "
                        + "won't work.  Either remove the weight, or don't set "
                        + "mBaselineAlignedChildIndex.");
            }

            boolean matchWidthLocally = false;
            if (widthMode != MeasureSpec.EXACTLY && lp.width == LayoutParams.MATCH_PARENT) {
                // The width of the linear layout will scale, and at least one
                // child said it wanted to match our width. Set a flag
                // indicating that we need to remeasure at least that view when
                // we know our width.
                matchWidth = true;
                matchWidthLocally = true;
            }

            final int margin = lp.leftMargin + lp.rightMargin;
            final int measuredWidth = child.getMeasuredWidth() + margin;
            maxWidth = Math.max(maxWidth, measuredWidth);
            childState = combineMeasuredStates(childState, child.getMeasuredState());

            allFillParent = allFillParent && lp.width == LayoutParams.MATCH_PARENT;
            if (lp.weight > 0) {
                /*
                 * Widths of weighted Views are bogus if we end up
                 * remeasuring, so keep them separate.
                 */
                weightedMaxWidth = Math.max(weightedMaxWidth,
                        matchWidthLocally ? margin : measuredWidth);
            } else {
                alternativeMaxWidth = Math.max(alternativeMaxWidth,
                        matchWidthLocally ? margin : measuredWidth);
            }

            i += getChildrenSkipCount(child, i);
        }
遍歷子元素,調用他們的measureChildBeforeLayout方法,這個方法內會測量子孩子的寬高,並且有一個mTotalLength來記錄LinearLayout 在豎直方向的初步高度,每測量一次子元素,mTotalLength都會增加,增加部分包括子元素的高度以及子元素豎直方向的margin
void measureChildBeforeLayout(View child, int childIndex,
            int widthMeasureSpec, int totalWidth, int heightMeasureSpec,
            int totalHeight) {
        measureChildWithMargins(child, widthMeasureSpec, totalWidth,
                heightMeasureSpec, totalHeight);
    }
裡面調用了child.measure方法,也就是子孩子的measure方法
protected void measureChildWithMargins(View child,
            int parentWidthMeasureSpec, int widthUsed,
            int parentHeightMeasureSpec, int heightUsed) {
        final MarginLayoutParams lp = (MarginLayoutParams) child.getLayoutParams();

        final int childWidthMeasureSpec = getChildMeasureSpec(parentWidthMeasureSpec,
                mPaddingLeft + mPaddingRight + lp.leftMargin + lp.rightMargin
                        + widthUsed, lp.width);
        final int childHeightMeasureSpec = getChildMeasureSpec(parentHeightMeasureSpec,
                mPaddingTop + mPaddingBottom + lp.topMargin + lp.bottomMargin
                        + heightUsed, lp.height);

        child.measure(childWidthMeasureSpec, childHeightMeasureSpec);
}
當子元素測量完畢後,LinearLayout會測量自身的大小,對於豎直的LinearLayout,它在水平方向上的測量過程,遵循View的測量過程,在豎直方向上,如果采用的是match_parent或者具體的數值,那麼它的測量過程和View的一致,即高度為specSize;如果它的布局中高度采用wrap_content,那麼高度是子元素所占用的高度總和,但這個和不能超過父容器的剩余空間,當然還要考慮padding,豎直方向的結論可以從下面代碼得知:
public static int resolveSizeAndState(int size, int measureSpec, int childMeasuredState) {
        final int specMode = MeasureSpec.getMode(measureSpec);
        final int specSize = MeasureSpec.getSize(measureSpec);
        final int result;
        switch (specMode) {
            case MeasureSpec.AT_MOST:
                if (specSize < size) {
                    result = specSize | MEASURED_STATE_TOO_SMALL;
                } else {
                    result = size;
                }
                break;
            case MeasureSpec.EXACTLY:
                result = specSize;
                break;
            case MeasureSpec.UNSPECIFIED:
            default:
                result = size;
        }
        return result | (childMeasuredState & MEASURED_STATE_MASK);
}
有時候onMeasure中拿到的測量寬高可能是不准確的,比較好的習慣是在onLayout中去獲取View的測量寬高和最終寬高
在Activity中,在onCreate,onStart,onResume中均無法正確獲得View的寬高信息,這是因為measure和Activity的生命周期是不同步的,所以很可能View沒有測量完畢,獲得的寬高是0.
measure總結
1.measure過程主要就是從頂層父View向子View遞歸調用view.measure方法(measure中又回調onMeasure方法)的過程。具體measure核心主要有如下幾點:
2.MeasureSpec(View的內部類)測量規格為int型,值由高2位規格模式specMode和低30位具體尺寸specSize組成。其中specMode只有三種值:
MeasureSpec.EXACTLY //確定模式,父View希望子View的大小是確定的,由specSize決定;
MeasureSpec.AT_MOST //最多模式,父View希望子View的大小最多是specSize指定的值;
MeasureSpec.UNSPECIFIED //未指定模式,父View完全依據子View的設計值來決定;
3.View的measure方法是final的,不允許重載,View子類只能重載onMeasure來完成自己的測量邏輯。
4.最頂層DecorView測量時的MeasureSpec是由ViewRootImpl中getRootMeasureSpec方法確定的(LayoutParams寬高參數均為MATCH_PARENT,specMode是EXACTLY,specSize為物理屏幕大小)。
5.ViewGroup類提供了measureChild,measureChild和measureChildWithMargins方法,簡化了父子View的尺寸計算。
6.只要是ViewGroup的子類就必須要求LayoutParams繼承子MarginLayoutParams,否則無法使用layout_margin參數。
7.View的布局大小由父View和子View共同決定。
8.使用View的getMeasuredWidth()和getMeasuredHeight()方法來獲取View測量的寬高,必須保證這兩個方法在onMeasure流程之後被調用才能返回有效值。
layout的過程
ViewGroup的位置確定後,它在onLayout中會遍歷所有的子元素並調用子元素layout方法,子元素layout方法中又會調用onLayout方法,View的layout方法確定自身的位置,而onLayout方法方法確定子孩子的位置
public void layout(int l, int t, int r, int b) {
        if ((mPrivateFlags3 & PFLAG3_MEASURE_NEEDED_BEFORE_LAYOUT) != 0) {
            onMeasure(mOldWidthMeasureSpec, mOldHeightMeasureSpec);
            mPrivateFlags3 &= ~PFLAG3_MEASURE_NEEDED_BEFORE_LAYOUT;
        }

        int oldL = mLeft;
        int oldT = mTop;
        int oldB = mBottom;
        int oldR = mRight;

        boolean changed = isLayoutModeOptical(mParent) ?
                setOpticalFrame(l, t, r, b) : setFrame(l, t, r, b);

        if (changed || (mPrivateFlags & PFLAG_LAYOUT_REQUIRED) == PFLAG_LAYOUT_REQUIRED) {
            onLayout(changed, l, t, r, b);
            mPrivateFlags &= ~PFLAG_LAYOUT_REQUIRED;

            ListenerInfo li = mListenerInfo;
            if (li != null && li.mOnLayoutChangeListeners != null) {
                ArrayList<OnLayoutChangeListener> listenersCopy =
                        (ArrayList<OnLayoutChangeListener>)li.mOnLayoutChangeListeners.clone();
                int numListeners = listenersCopy.size();
                for (int i = 0; i < numListeners; ++i) {
                    listenersCopy.get(i).onLayoutChange(this, l, t, r, b, oldL, oldT, oldR, oldB);
                }
            }
        }

        mPrivateFlags &= ~PFLAG_FORCE_LAYOUT;
        mPrivateFlags3 |= PFLAG3_IS_LAID_OUT;
}
layout方法的大致流程如下:首先會通過setFrame方法來確定mLeft;mTop;mBottom;
mRight;只要這四個點一旦確定,那麼View在父容器中的位置就確定了,接著會調用onLayout方法,該方法目的是父容器來確定子元素的位置,無論是View還是ViewGroup都沒有實現onLayout方法,我們查看LinearLayout的onLayout方法
@Override
    protected void onLayout(boolean changed, int l, int t, int r, int b) {
        if (mOrientation == VERTICAL) {
            layoutVertical(l, t, r, b);
        } else {
            layoutHorizontal(l, t, r, b);
        }
}
查看layoutVertical中關鍵代碼
for (int i = 0; i < count; i++) {
            final View child = getVirtualChildAt(i);
            if (child == null) {
                childTop += measureNullChild(i);
            } else if (child.getVisibility() != GONE) {
                final int childWidth = child.getMeasuredWidth();
                final int childHeight = child.getMeasuredHeight();

                final LinearLayout.LayoutParams lp =
                        (LinearLayout.LayoutParams) child.getLayoutParams();

                int gravity = lp.gravity;
                if (gravity < 0) {
                    gravity = minorGravity;
                }
                final int layoutDirection = getLayoutDirection();
                final int absoluteGravity = Gravity.getAbsoluteGravity(gravity, layoutDirection);
                switch (absoluteGravity & Gravity.HORIZONTAL_GRAVITY_MASK) {
                    case Gravity.CENTER_HORIZONTAL:
                        childLeft = paddingLeft + ((childSpace - childWidth) / 2)
                                + lp.leftMargin - lp.rightMargin;
                        break;

                    case Gravity.RIGHT:
                        childLeft = childRight - childWidth - lp.rightMargin;
                        break;

                    case Gravity.LEFT:
                    default:
                        childLeft = paddingLeft + lp.leftMargin;
                        break;
                }

                if (hasDividerBeforeChildAt(i)) {
                    childTop += mDividerHeight;
                }

                childTop += lp.topMargin;
                setChildFrame(child, childLeft, childTop + getLocationOffset(child),
                        childWidth, childHeight);
                childTop += childHeight + lp.bottomMargin + getNextLocationOffset(child);

                i += getChildrenSkipCount(child, i);
            }
        }
這個方法會遍歷所有的子元素並調用setChildFrame方法來為子元素指定對應的位置,其中childTop的數值會不斷的增大,這意味著後面的子元素還位於靠下的位置,剛好符合豎直的LinearLayout的特性,setChildFrame方法中不過是調用了子元素的Layout方法而已
private void setChildFrame(View child, int left, int top, int width, int height) {
        child.layout(left, top, left + width, top + height);
}
同時,會發現setChildFrame中的width和height實際上就是子元素的測量寬高
final int childWidth = child.getMeasuredWidth();
             final int childHeight = child.getMeasuredHeight();
View的layout方法中會通過setFrame方法去設置子元素四個頂點的位置,這樣子元素的位置就可以確定
int oldWidth = mRight - mLeft;
            int oldHeight = mBottom - mTop;
            int newWidth = right - left;
            int newHeight = bottom - top;
            boolean sizeChanged = (newWidth != oldWidth) || (newHeight != oldHeight);

            // Invalidate our old position
            invalidate(sizeChanged);

            mLeft = left;
            mTop = top;
            mRight = right;
            mBottom = bottom;
            mRenderNode.setLeftTopRightBottom(mLeft, mTop, mRight, mBottom);
接下來是View的getWidth和getHeight方法,結合裡面的實現,可以發現他們分別返回的就是View測量的寬度和高度
@ViewDebug.ExportedProperty(category = "layout")
    public final int getWidth() {
        return mRight - mLeft;
    }

    /**
     * Return the height of your view.
     *
     * @return The height of your view, in pixels.
     */
    @ViewDebug.ExportedProperty(category = "layout")
    public final int getHeight() {
        return mBottom - mTop;
}
layout總結
1.layout也是從頂層父View向子View的遞歸調用view.layout方法的過程,即父View根據上一步measure子View所得到的布局大小和布局參數,將子View放在合適的位置上。
2.View.layout方法可被重載,ViewGroup.layout為final的不可重載,ViewGroup.onLayout為abstract的,子類必須重載實現自己的位置邏輯。
3.measure操作完成後得到的是對每個View經測量過的measuredWidth和measuredHeight,layout操作完成之後得到的是對每個View進行位置分配後的mLeft、mTop、mRight、mBottom,這些值都是相對於父View來說的。
4.凡是layout_XXX的布局屬性基本都針對的是包含子View的ViewGroup的,當對一個沒有父容器的View設置相關layout_XXX屬性是沒有任何意義的。
5.使用View的getWidth()和getHeight()方法來獲取View測量的寬高,必須保證這兩個方法在onLayout流程之後被調用才能返回有效值。
draw的過程
View的繪制過程遵循以下幾步:
1)繪制背景background.draw(canvas)
2)繪制自己(onDraw)
3)繪制 children(dispatchDraw)
4)繪制裝飾(onDrawScrollBars)
public void draw(Canvas canvas) {
        final int privateFlags = mPrivateFlags;
        final boolean dirtyOpaque = (privateFlags & PFLAG_DIRTY_MASK) == PFLAG_DIRTY_OPAQUE &&
                (mAttachInfo == null || !mAttachInfo.mIgnoreDirtyState);
        mPrivateFlags = (privateFlags & ~PFLAG_DIRTY_MASK) | PFLAG_DRAWN;

        /*
         * Draw traversal performs several drawing steps which must be executed
         * in the appropriate order:
         *
         *      1. Draw the background
         *      2. If necessary, save the canvas' layers to prepare for fading
         *      3. Draw view's content
         *      4. Draw children
         *      5. If necessary, draw the fading edges and restore layers
         *      6. Draw decorations (scrollbars for instance)
         */

        // Step 1, draw the background, if needed
        int saveCount;

        if (!dirtyOpaque) {
            drawBackground(canvas);
        }

        // skip step 2 & 5 if possible (common case)
        final int viewFlags = mViewFlags;
        boolean horizontalEdges = (viewFlags & FADING_EDGE_HORIZONTAL) != 0;
        boolean verticalEdges = (viewFlags & FADING_EDGE_VERTICAL) != 0;
        if (!verticalEdges && !horizontalEdges) {
            // Step 3, draw the content
            if (!dirtyOpaque) onDraw(canvas);

            // Step 4, draw the children
            dispatchDraw(canvas);

            // Overlay is part of the content and draws beneath Foreground
            if (mOverlay != null && !mOverlay.isEmpty()) {
                mOverlay.getOverlayView().dispatchDraw(canvas);
            }

            // Step 6, draw decorations (foreground, scrollbars)
            onDrawForeground(canvas);

            // we're done...
            return;
        }

        /*
         * Here we do the full fledged routine...
         * (this is an uncommon case where speed matters less,
         * this is why we repeat some of the tests that have been
         * done above)
         */

        boolean drawTop = false;
        boolean drawBottom = false;
        boolean drawLeft = false;
        boolean drawRight = false;

        float topFadeStrength = 0.0f;
        float bottomFadeStrength = 0.0f;
        float leftFadeStrength = 0.0f;
        float rightFadeStrength = 0.0f;

        // Step 2, save the canvas' layers
        int paddingLeft = mPaddingLeft;

        final boolean offsetRequired = isPaddingOffsetRequired();
        if (offsetRequired) {
            paddingLeft += getLeftPaddingOffset();
        }

        int left = mScrollX + paddingLeft;
        int right = left + mRight - mLeft - mPaddingRight - paddingLeft;
        int top = mScrollY + getFadeTop(offsetRequired);
        int bottom = top + getFadeHeight(offsetRequired);

        if (offsetRequired) {
            right += getRightPaddingOffset();
            bottom += getBottomPaddingOffset();
        }

        final ScrollabilityCache scrollabilityCache = mScrollCache;
        final float fadeHeight = scrollabilityCache.fadingEdgeLength;
        int length = (int) fadeHeight;

        // clip the fade length if top and bottom fades overlap
        // overlapping fades produce odd-looking artifacts
        if (verticalEdges && (top + length > bottom - length)) {
            length = (bottom - top) / 2;
        }

        // also clip horizontal fades if necessary
        if (horizontalEdges && (left + length > right - length)) {
            length = (right - left) / 2;
        }

        if (verticalEdges) {
            topFadeStrength = Math.max(0.0f, Math.min(1.0f, getTopFadingEdgeStrength()));
            drawTop = topFadeStrength * fadeHeight > 1.0f;
            bottomFadeStrength = Math.max(0.0f, Math.min(1.0f, getBottomFadingEdgeStrength()));
            drawBottom = bottomFadeStrength * fadeHeight > 1.0f;
        }

        if (horizontalEdges) {
            leftFadeStrength = Math.max(0.0f, Math.min(1.0f, getLeftFadingEdgeStrength()));
            drawLeft = leftFadeStrength * fadeHeight > 1.0f;
            rightFadeStrength = Math.max(0.0f, Math.min(1.0f, getRightFadingEdgeStrength()));
            drawRight = rightFadeStrength * fadeHeight > 1.0f;
        }

        saveCount = canvas.getSaveCount();

        int solidColor = getSolidColor();
        if (solidColor == 0) {
            final int flags = Canvas.HAS_ALPHA_LAYER_SAVE_FLAG;

            if (drawTop) {
                canvas.saveLayer(left, top, right, top + length, null, flags);
            }

            if (drawBottom) {
                canvas.saveLayer(left, bottom - length, right, bottom, null, flags);
            }

            if (drawLeft) {
                canvas.saveLayer(left, top, left + length, bottom, null, flags);
            }

            if (drawRight) {
                canvas.saveLayer(right - length, top, right, bottom, null, flags);
            }
        } else {
            scrollabilityCache.setFadeColor(solidColor);
        }

        // Step 3, draw the content
        if (!dirtyOpaque) onDraw(canvas);

        // Step 4, draw the children
        dispatchDraw(canvas);

        // Step 5, draw the fade effect and restore layers
        final Paint p = scrollabilityCache.paint;
        final Matrix matrix = scrollabilityCache.matrix;
        final Shader fade = scrollabilityCache.shader;

        if (drawTop) {
            matrix.setScale(1, fadeHeight * topFadeStrength);
            matrix.postTranslate(left, top);
            fade.setLocalMatrix(matrix);
            p.setShader(fade);
            canvas.drawRect(left, top, right, top + length, p);
        }

        if (drawBottom) {
            matrix.setScale(1, fadeHeight * bottomFadeStrength);
            matrix.postRotate(180);
            matrix.postTranslate(left, bottom);
            fade.setLocalMatrix(matrix);
            p.setShader(fade);
            canvas.drawRect(left, bottom - length, right, bottom, p);
        }

        if (drawLeft) {
            matrix.setScale(1, fadeHeight * leftFadeStrength);
            matrix.postRotate(-90);
            matrix.postTranslate(left, top);
            fade.setLocalMatrix(matrix);
            p.setShader(fade);
            canvas.drawRect(left, top, left + length, bottom, p);
        }

        if (drawRight) {
            matrix.setScale(1, fadeHeight * rightFadeStrength);
            matrix.postRotate(90);
            matrix.postTranslate(right, top);
            fade.setLocalMatrix(matrix);
            p.setShader(fade);
            canvas.drawRect(right - length, top, right, bottom, p);
        }

        canvas.restoreToCount(saveCount);

        // Overlay is part of the content and draws beneath Foreground
        if (mOverlay != null && !mOverlay.isEmpty()) {
            mOverlay.getOverlayView().dispatchDraw(canvas);
        }

        // Step 6, draw decorations (foreground, scrollbars)
        onDrawForeground(canvas);
}
View的繪制過程的傳遞是通過dispatchDraw實現的,dispatchdraw會遍歷調用所有子元素的draw方法。如此draw事件就一層一層的傳遞下去。
draw總結
1.如果該View是一個ViewGroup,則需要遞歸繪制其所包含的所有子View。
2.View默認不會繪制任何內容,真正的繪制都需要自己在子類中實現。
3.View的繪制是借助onDraw方法傳入的Canvas類來進行的。
4.在獲取畫布剪切區(每個View的draw中傳入的Canvas)時會自動處理掉padding,子View獲取Canvas不用關注這些邏輯,只用關心如何繪制即可。
5.默認情況下子View的ViewGroup.drawChild繪制順序和子View被添加的順序一致,但是你也可以重載ViewGroup.getChildDrawingOrder()方法提供不同順序。
參考資料
《Android開發藝術探索》
 從零開始打造一個Android 3D立體旋轉容器
1.概述 回到正題,這次帶來的效果,是一個Android 的3D立體旋轉的效果。 當然靈感的來源,來自早些時間微博上看到的效果圖。 非常酷有木有!作為程序猿我當然
 7款Android開發者常用的Android UI組件
本文由碼農網 – 小峰原創,轉載請看清文末的轉載要求,歡迎參與我們的付費投稿計劃! Android開發是目前最熱門的移動開發技術之一,隨著開發者的不斷努力
 非常全面的 Android Bitmap 知識點梳理
在日常開發中,可以說和Bitmap低頭不見抬頭見,基本上每個應用都會直接或間接的用到,而這裡面又涉及到大量的相關知識。 所以這裡把Bitmap的常用知識做個梳理,
 Android自定義圓形進度條實現代碼
今天無意中發現一個圓形進度,想想自己實現一個,如下圖: 基本思路是這樣的: 1.首先繪制一個實心圓 2.繪制一個白色實心的正方形,遮住實心圓 3.在圓的中心動態