編輯:Android資訊
Android Transition框架允許我們對應用程序用戶界面當中的各類外觀變化加以配置。大家可以在應用程序屏幕內實現動畫式過渡、將每個階段定義為一種場景並控制應用程序如何從一種顯示場景過渡到另一種。
在今天的文章中,我們將構建一款簡單的應用程序、並為其制作一套動畫過渡效果。為了完成這項任務,大家需要涉及的內容包括在XML當中准備布局與可繪制文件、而後利用Java配置並應用這套過渡機制。我們將定義兩種場景,其中同樣的一組視圖項目將以不同方式排列在設備屏幕之上。在大家使用Transition框架時,Android將自動完成兩種場景轉換過程中的動畫過渡效果。
第一步
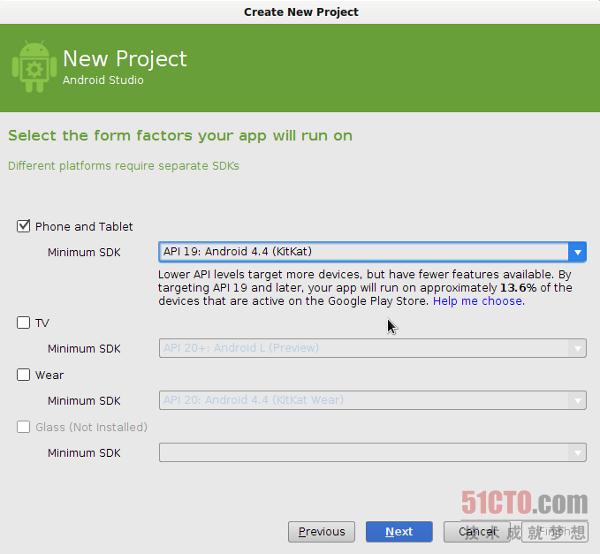
作為教程的第一步,我們首先在自己選定的IDE中創建一款新的應用程序。大家至少需要使用SDK 19才能讓這些Transition類順利起效,因此如果打算讓其支持其它早期版本、我們還需要執行其它一些額外步驟。
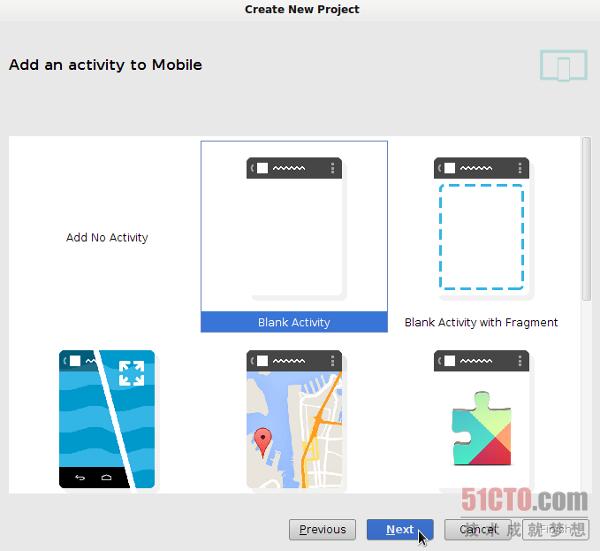
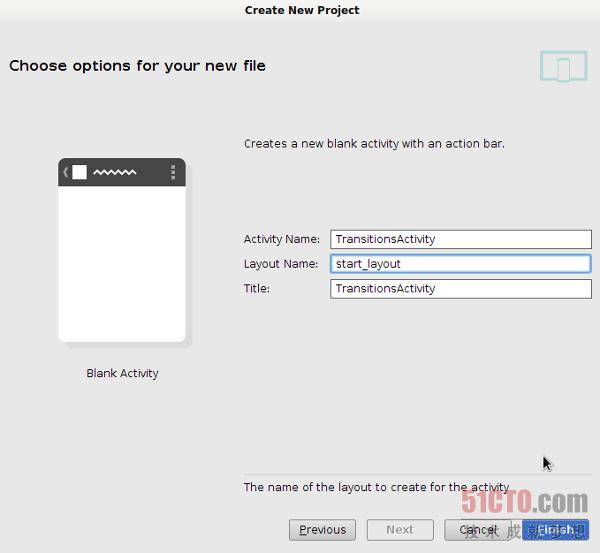
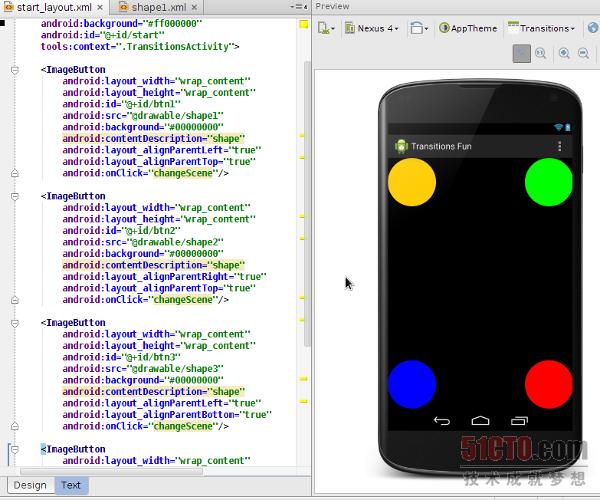
首先為應用程序指定一個主Activity與布局文件,並為該布局選擇start_layout.xml作為名稱。我們隨後還會添加其它布局文件,並利用Transition機制在不同顯示布局之間進行轉換。下面幾幅截圖顯示了這一過程在Android Studio中的具體實現流程。

第二步
下面我們在Transition中准備一些可繪制圖形以資利用。我們將准備四個圓形圖案,每一個都采用不同的漸變顏色進行填充。在這款示例應用程序的可繪制資源目錄內,首先創建一個名為shape1.xml的新文件。通過以下代碼添加圖形:
<?xml version="1.0" encoding="utf-8"?>
<shape xmlns:android="http://schemas.android.com/apk/res/android"
    android:dither="true"
    android:shape="oval" >

    <gradient
        android:endColor="#66ff0000"
        android:gradientRadius="150"
        android:startColor="#ffffcc00"
        android:type="radial"
        android:useLevel="false" />

    <size
        android:height="100dp"
        android:width="100dp" />

</shape>
以上代碼構建出的是一個由漸變色填充而成的圓形圖案。而四個圖形在大小與樣式方面完全相同,僅僅在色彩上有所區別。當然,大家可能需要為不同像素密度的設備分別准備多種不同版本的圖形。利用以下代碼創建shape2.xml:
<?xml version="1.0" encoding="utf-8"?>
<shape xmlns:android="http://schemas.android.com/apk/res/android"
    android:dither="true"
    android:shape="oval" >

    <gradient
        android:endColor="#66ffcc00"
        android:gradientRadius="150"
        android:startColor="#ff00ff00"
        android:type="radial"
        android:useLevel="false" />

    <size
        android:height="100dp"
        android:width="100dp" />

</shape>
現在添加shape3.xml:
<?xml version="1.0" encoding="utf-8"?>
<shape xmlns:android="http://schemas.android.com/apk/res/android"
    android:dither="true"
    android:shape="oval" >

    <gradient
        android:endColor="#6600ff00"
        android:gradientRadius="150"
        android:startColor="#ff0000ff"
        android:type="radial"
        android:useLevel="false" />

    <size
        android:height="100dp"
        android:width="100dp" />

</shape>
最後添加shape4.xml:
<?xml version="1.0" encoding="utf-8"?>
<shape xmlns:android="http://schemas.android.com/apk/res/android"
    android:dither="true"
    android:shape="oval" >

    <gradient
        android:endColor="#660000ff"
        android:gradientRadius="150"
        android:startColor="#ffff0000"
        android:type="radial"
        android:useLevel="false" />

    <size
        android:height="100dp"
        android:width="100dp" />

</shape>
我們將把這些圖形作為ImageButtons應用在兩種布局場景之內。
第一步
接下來,我們要對將在幾種XML布局之間進行過渡的兩類場景進行定義。首先是處理大家在創建應用程序時就已經添加完成的主布局文件,即start_layout.xml。將其打開並切換到XML編輯標簽。利用以下代碼使用RelativeLayout:
<RelativeLayout xmlns:android="http://schemas.android.com/apk/res/android"
    xmlns:tools="http://schemas.android.com/tools"
    android:layout_width="match_parent"
    android:layout_height="match_parent"
    android:background="#ff000000"
    android:id="@+id/base"
    tools:context=".TransitionsActivity">

</RelativeLayout>
我們已經為該布局添加了背景顏色與ID。這條ID的作用在於確保Android處理不同場景之間的過渡效果,大家還將在第二個場景中再次使用同樣的ID。當我們在兩個場景之間過渡時,Android會以動畫形式對各場景中擁有同樣ID的視圖進行轉換。如果二者不具備同樣的ID,那麼Android系統會將它們視為完全不同的項目、並單純以淡入或者淡出方式處理其過渡效果。
在RelativeLayout當中,為我們之前創建好的每個圖形創建ImageButton:
<ImageButton
    android:layout_width="wrap_content"
    android:layout_height="wrap_content"
    android:id="@+id/btn1"
    android:src="@drawable/shape1"
    android:background="#00000000"
    android:contentDescription="shape"
    android:layout_alignParentLeft="true"
    android:layout_alignParentTop="true"
    android:onClick="changeScene"/>

<ImageButton
    android:layout_width="wrap_content"
    android:layout_height="wrap_content"
    android:id="@+id/btn2"
    android:src="@drawable/shape2"
    android:background="#00000000"
    android:contentDescription="shape"
    android:layout_alignParentRight="true"
    android:layout_alignParentTop="true"
    android:onClick="changeScene"/>

<ImageButton
    android:layout_width="wrap_content"
    android:layout_height="wrap_content"
    android:id="@+id/btn3"
    android:src="@drawable/shape3"
    android:background="#00000000"
    android:contentDescription="shape"
    android:layout_alignParentLeft="true"
    android:layout_alignParentBottom="true"
    android:onClick="changeScene"/>

<ImageButton
    android:layout_width="wrap_content"
    android:layout_height="wrap_content"
    android:id="@+id/btn4"
    android:src="@drawable/shape4"
    android:background="#00000000"
    android:contentDescription="shape"
    android:layout_alignParentRight="true"
    android:layout_alignParentBottom="true"
    android:onClick="changeScene"/>
需要注意的是,每一個圖形按鈕都擁有自己的ID——我們創建的第二套布局當然也是如此——外加onClick屬性。我們隨後將把這一方法添加到主Activity當中並在用戶點擊任意圖形時啟動過渡流程。
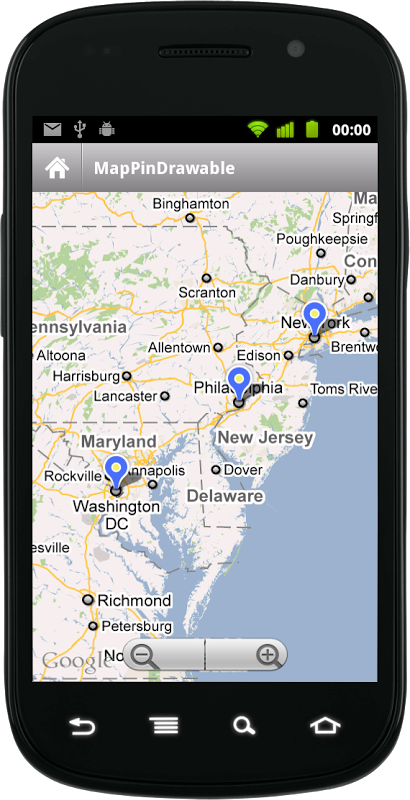
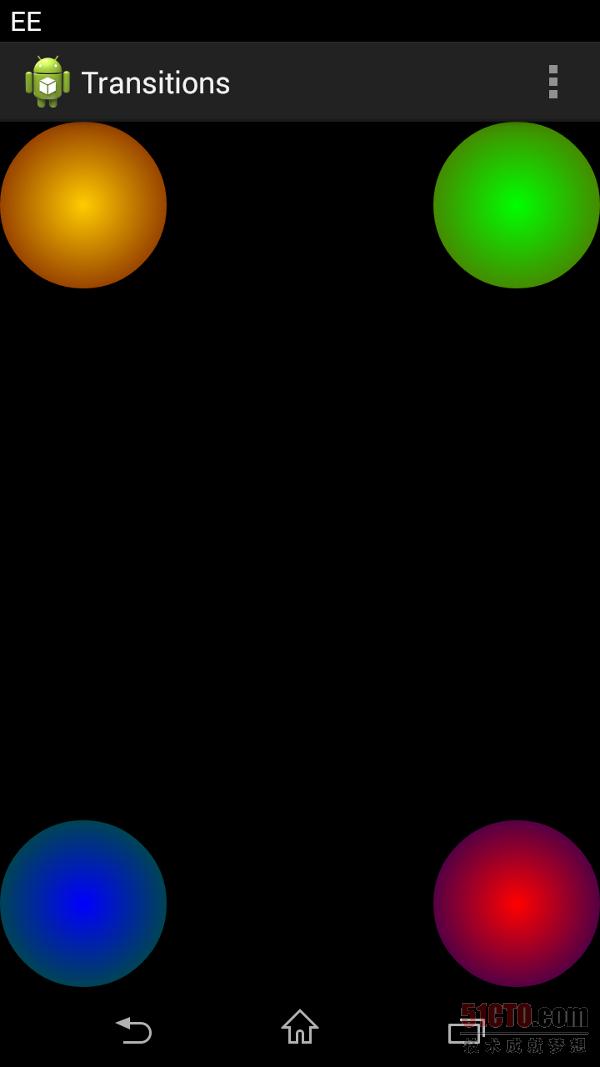
現在我們將在IDE當中看到整套布局的預覽圖,不過在某些情況下大家要真正在設備或者模擬器上運行該應用才能看到其漸變以及/或者透明效果。這些圖形被排列在屏幕的四個邊角位置,具體效果如下圖所示。
第二步
我們創建的第一套布局方案將顯示為過渡流程的起始狀態。現在讓我們為場景創建第二個布局文件,並將其作為過渡流程的結束狀態。在我們的應用程序布局資源目錄中添加一個新文件,將其命名為end_layout.xml。切換到文本編輯標簽並輸入以下代碼:
<RelativeLayout xmlns:android="http://schemas.android.com/apk/res/android"
    xmlns:tools="http://schemas.android.com/tools"
    android:layout_width="match_parent"
    android:layout_height="match_parent"
    android:background="#ff000000"
    android:id="@+id/base"
    tools:context=".TransitionsActivity">

    <ImageButton
        android:layout_width="wrap_content"
        android:layout_height="wrap_content"
        android:id="@+id/btn1"
        android:src="@drawable/shape1"
        android:background="#00000000"
        android:contentDescription="shape"
        android:layout_alignParentRight="true"
        android:layout_alignParentBottom="true"
        android:onClick="changeScene"/>

    <ImageButton
        android:layout_width="wrap_content"
        android:layout_height="wrap_content"
        android:id="@+id/btn2"
        android:src="@drawable/shape2"
        android:background="#00000000"
        android:contentDescription="shape"
        android:layout_alignParentLeft="true"
        android:layout_alignParentBottom="true"
        android:onClick="changeScene"/>

    <ImageButton
        android:layout_width="wrap_content"
        android:layout_height="wrap_content"
        android:id="@+id/btn3"
        android:src="@drawable/shape3"
        android:background="#00000000"
        android:contentDescription="shape"
        android:layout_alignParentRight="true"
        android:layout_alignParentTop="true"
        android:onClick="changeScene"/>

    <ImageButton
        android:layout_width="wrap_content"
        android:layout_height="wrap_content"
        android:id="@+id/btn4"
        android:src="@drawable/shape4"
        android:background="#00000000"
        android:contentDescription="shape"
        android:layout_alignParentLeft="true"
        android:layout_alignParentTop="true"
        android:onClick="changeScene"/>

</RelativeLayout>
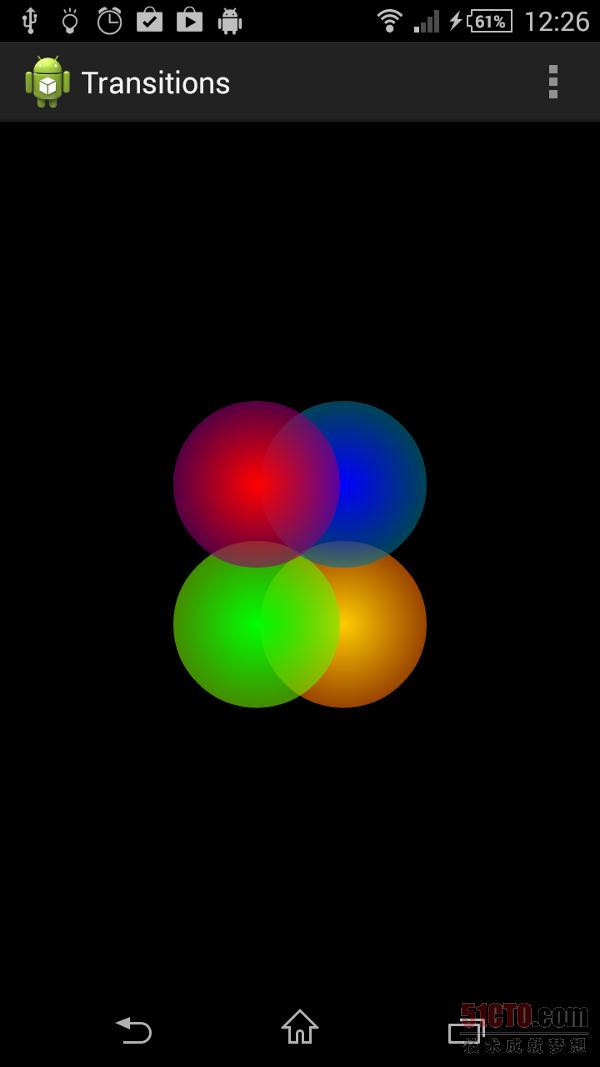
現在讓我們花點時間審視以上布局代碼。除了各個圖形按鈕的位置之外,它與第一套布局完全相同。每個圖形都從起始位置被移動到了其對角線處。過渡流程將因此而對各圖形進行位置互換,也就是將其引導至屏幕上的對角位置。
第一步
現在我們已經對兩套布局進行了定義,現在要做的就是利用過渡機制完成二者之間的移動流程。打開應用程序中的主Activity類。大家將需要使用以下導入語句:
import android.transition.AutoTransition;
import android.transition.Scene;
import android.transition.Transition;
import android.view.View;
import android.view.ViewGroup;
import android.view.animation.AccelerateDecelerateInterpolator;
import android.widget.RelativeLayout;
import android.transition.TransitionManager;
在Activity類聲明中、onCreate方法之前處,我們需要添加以下實例變量以應用該過渡機制:
//scenes to transition
private Scene scene1, scene2;
//transition to move between scenes
private Transition transition;
//flag to swap between scenes
private boolean start;
第二步
現在讓我們為過渡做好准備,整個流程將在用戶點擊任意圖形時正式開始。在onCreate中,我們要在IDE已經輸入的現有代碼之後添加以下內容:
//get the layout ID
RelativeLayout baseLayout = (RelativeLayout)findViewById(R.id.base);

//first scene
ViewGroup startViews = (ViewGroup)getLayoutInflater()
    .inflate(R.layout.start_layout, baseLayout, false);

//second scene
ViewGroup endViews = (ViewGroup)getLayoutInflater()
    .inflate(R.layout.end_layout, baseLayout, false);
我們首先需要對基礎場景進行定義,也就是我們在兩個場景布局文件內為所包含布局設定的ID。接下來,我們還需要定義作為過渡流程起始與結束狀態的兩個場景,為其指定布局文件名稱以及所包含基礎場景。通過這種方式,Android將能夠根據我們的需要在兩個場景之間進行過渡、並將不同場景下具備相同ID的任意視圖元素作為同一對象加以處理,這樣場景切換時就能顯示出動畫式的變化效果。
接下來,我們定義作為過渡流程起始與結束狀態的兩個場景,仍然是在onCreate當中:
//create the two scenes
scene1 = new Scene(baseLayout, startViews);
scene2 = new Scene(baseLayout, endViews);
我們要將基礎布局與相關場景布局傳遞至每一個構造函數當中。現在我們已經可以在定義過渡流程時引用這些場景了。
第三步
下面我們作好執行過渡的准備,仍然是在onCreate當中:
//create transition, set properties
transition = new AutoTransition();
transition.setDuration(5000);
transition.setInterpolator(new AccelerateDecelerateInterpolator());

//initialize flag
start=true;
Android提供了一系列過渡類型可供選擇,大家可以根據自己需要的場景變化方式采用其中的不同動畫效果。在今天的示例當中,我們選擇的是AutoTransition,因此Android會計算如何以兩種變化場景的屬性為基礎實現過渡。感興趣的朋友也可以點擊此處查看更多與Transition引用相關的選項。
我們為過渡流程設置了持續時間與內插程序。大家也可以根據需要為整套變化機制設定啟動延時。最後,我們通過初始化將布爾標記設定為true。為了簡便起見,我們將采取點擊任意圖形來激活場景切換的方式,但這只是為了演示示例所具備的實際功能。
第四步
大家一定還記得,我們在創建布局XML文件時已經將onClick屬性添加到圖形按鈕當中。現在我們要將該方法添加到Activity內:
public void changeScene(View v){

    //check flag
    if(start) {
        TransitionManager.go(scene2, transition);
        start=false;
    }
    else {
        TransitionManager.go(scene1, transition);
        start=true;
    }
}
我們利用Activity實現從當前場景向另一套場景的過渡,其中布爾標記會持續追蹤我們當前正在使用的場景類型。我們還指定了此前已經創建完成的Transition對象,旨在保證切換的執行過程與預期效果相匹配。
現在大家應該已經可以運行自己的應用程序,並在點擊任意圖形時查看到整個過渡流程。每當我們執行點擊操作時,過渡流程就會將各個圖形緩慢移動到屏幕上的對角線位置,再次點擊則可使其回歸原位。
在今天的文章中,我們事實上還只是初步了解了自己能夠利用Android Transition框架實現怎樣的設計方案與過渡效果。要在自己的應用程序中引入更多過渡機制,大家可以點擊此處查看TransitionManager類當中的其它方法,其中包括beginDelayedTransition與transitionTo。此外,大家也不妨嘗試利用TransitionSet將多種過渡機制結合在一起,例如同時使用來自不同過渡機制的漸變與移動效果。根據過渡機制復雜程度的不同,大家可能還需要用到TransitionValues類,它能夠提供與對應過渡相關的數據值引用能力。如果各位還想了解更多與場景處理相關的技術手段,也可以點擊此處查看Scene類的相關說明。
 6 個可以讓代碼變得更整潔的 Android 庫
本文由碼農網 – 小峰原創翻譯,轉載請看清文末的轉載要求,歡迎參與我們的付費投稿計劃! Android開發是有趣的——這毫無疑問。然而,還是有很多平台迫使
 Win10兼容安卓和iOS 這是微軟史上最危險豪賭
納德拉掌控微軟之後,微軟開啟了蓋茨開發 Windows 之後最重大的一場技術革命,免費增值、操作系統和應用軟件免費等過去不可思議的政策,都變成了現實。在 4 月
 Android N 完全不同以往的四個新特性
本文由碼農網 – 溫迪原創翻譯,轉載請看清文末的轉載要求,歡迎參與我們的付費投稿計劃! Google最近發布了Android的下一個版本,Android
 Android UI控件系列:TextView(文本框)
TextView比較簡單,不能夠用來進行編輯,只能夠用來顯示信息 布局文件裡的一些常用的XML屬性 android:gravity—用來設置控件內文本