編輯:Android資訊
開始前我們先來關注一下Android Overflow menu的幾個相關問題:
先來兩張對比圖:
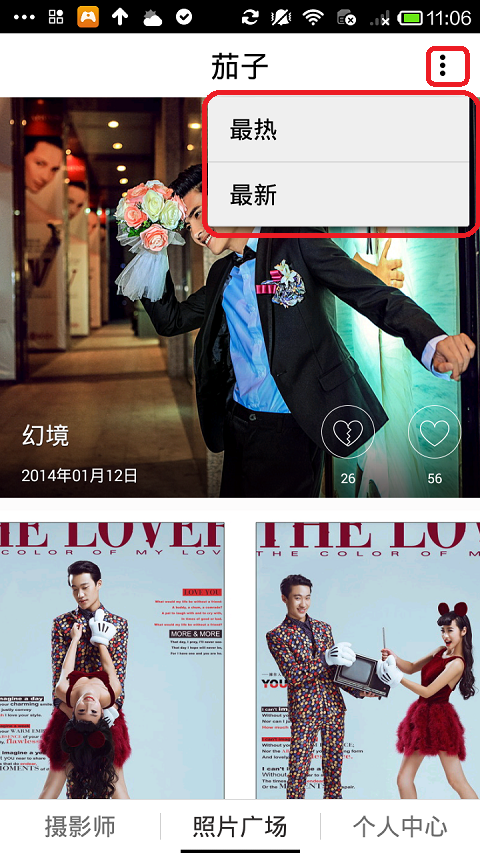
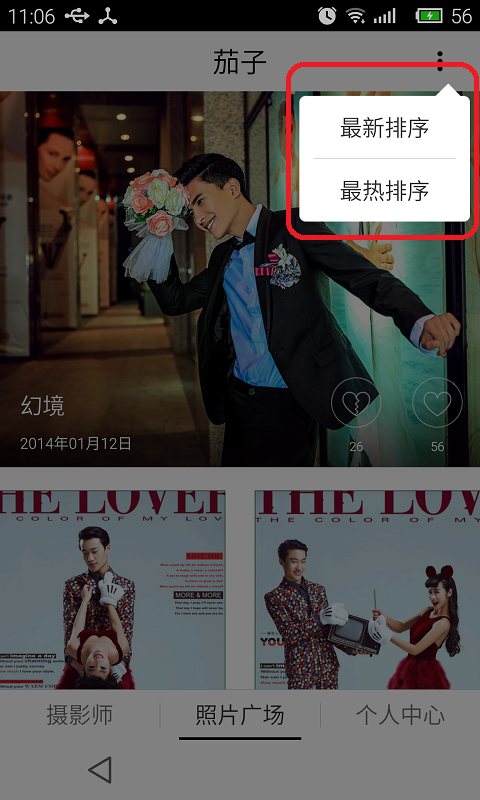
左邊是紅米手機的效果,右邊是針對魅族Mx4pro做的適配效果。
先來解釋一下什麼是overflow menu,中文叫做“溢出菜單”,顧名思義溢出的菜單,我們有些手機是有實體按鍵或虛擬按鍵,其中一個是菜單鍵,有的可能沒有,例如魅族就只有一個back的返回虛擬鍵。點擊菜單鍵的時候,就會在底部彈出溢出菜單,在Android 3.0之後,也就是API 11之後才可以加入ActionBar控件的,再其右上角會有三個點,那個就是我們說的overflow menu,我們在menu中定義菜單項就可以彈出類似上面紅米手機彈出的效果。關於ActionBar有很多用法,本篇博客就不展開講,有興趣的同學可以到官網進行學習。
Android 3.0以上的手機默認是不顯示溢出菜單的,那如何強制在Android 4.4以下的手機顯示溢出菜單呢?可以使用以下方法:
// 強制actionbar顯示overflow菜單
	// force to show overflow menu in actionbar for android 4.4 below
	private void getOverflowMenu() {
		try {
			ViewConfiguration config = ViewConfiguration.get(this);
			Field menuKeyField = ViewConfiguration.class
					.getDeclaredField("sHasPermanentMenuKey");
			if (menuKeyField != null) {
				menuKeyField.setAccessible(true);
				menuKeyField.setBoolean(config, false);
			}
		} catch (Exception e) {
			e.printStackTrace();
		}
	}
上面已經解決了如何在Android 4.4以下的手機強制顯示溢出菜單,下面來解決一些奇葩手機無法顯示溢出菜單的問題。為什麼魅族手機無法顯示,了解到的是魅族沒有所謂的actionbar,它們稱為smartbar,看來是魅族的工程師把官方的actionbar進行了修改。一個字,坑!不過小巫想到了一個解決辦法,我們每部手機都有自己的手機品牌,我們可以針對這些奇葩手機進行適配,溢出菜單我們就使用popupwindow來替代。
獲得手機信息
/**
	 * 獲取IMEI號,IESI號,手機型號
	 */
	public static void getInfo(Context context) {
		TelephonyManager mTm = (TelephonyManager) context
				.getSystemService(Context.TELEPHONY_SERVICE);
		String imei = mTm.getDeviceId();
		String imsi = mTm.getSubscriberId();
		String mtype = android.os.Build.MODEL; // 手機型號
		String mtyb = android.os.Build.BRAND;// 手機品牌
		String numer = mTm.getLine1Number(); // 手機號碼,有的可得,有的不可得
		Log.i("text", "手機IMEI號:" + imei + "手機IESI號:" + imsi + "手機型號:" + mtype
				+ "手機品牌:" + mtyb + "手機號碼" + numer);
	}
獲取手機品牌
/**
	 * 得到手機品牌
	 * @return
	 */
	public static String getPhoneBrand() {
		return android.os.Build.BOARD;
	}
得到手機品牌之後,我們就在創建溢出菜單的時候進行判斷:
1. 如果是魅族手機,則加載自定義菜單
2. 如果不是,則使用系統的溢出菜單,加載菜單內容
@Override
	public void onCreateOptionsMenu(Menu menu, MenuInflater inflater) {
		// Inflate the menu; this adds items to the action bar if it is present.
		super.onCreateOptionsMenu(menu, inflater);
		String brand = PhoneUtils.getPhoneBrand();
		if ("mx4pro".equals(brand)) {
			inflater.inflate(R.menu.overflow_menu, menu);
		} else {
			inflater.inflate(R.menu.main, menu);
		}
	}
溢出菜單文件
/res/menu/main.xm
<menu xmlns:android="http://schemas.android.com/apk/res/android" >

        <item
            android:id="@+id/menu_hotest"
            android:orderInCategory="100"
            android:showAsAction="never"
            android:title="@string/menu_hotest"/>
        <item
            android:id="@+id/menu_lastest"
            android:orderInCategory="100"
            android:showAsAction="never"
            android:title="@string/menu_lastest"/>

</menu>
自定義的菜單文件
/res/menu/overflow_menu.xml
<?xml version="1.0" encoding="utf-8"?>
<menu xmlns:android="http://schemas.android.com/apk/res/android" >

    <item
        android:id="@+id/menu_overflow"
        android:icon="@drawable/ic_more"
        android:orderInCategory="100"
        android:showAsAction="always"
        android:title="@string/menu_overflow">
    </item>

</menu>
自定義菜單就直接給它設置一個actionbar的按鈕,圖標是那三個點
我們在選中菜單的時候執行我們的業務邏輯
	@Override
	public boolean onOptionsItemSelected(MenuItem item) {
		switch (item.getItemId()) {
		case R.id.menu_overflow:
			popupOverflowMenu();
			return true;
		case R.id.menu_lastest:
			type = "latest";
			break;
		case R.id.menu_hotest:
			type = "hotest";
			break;
		default:
			break;
		}
		return super.onOptionsItemSelected(item);
	}
如果是魅族mx4pro手機,就彈出我們的自定義菜單,下面是實現:
/**
	 * 彈出自定義溢出菜單
	 */
	public void popupOverflowMenu() {
		// 顯示溢出菜單的時候設置背景半透明
		setWindowAlpha(0.5f);
		// 獲取狀態欄高度
		Rect frame = new Rect();
		getActivity().getWindow().getDecorView().getWindowVisibleDisplayFrame(frame);
		// 狀態欄高度 frame.top
		int xOffset = frame.top + getActivity().getActionBar().getHeight() - 25; // 減去陰影寬度,適配UI
		int yOffset = Dp2Dx(getActivity(), 8f); // 設置x方向offset為5dp
		View parentView = getActivity().getLayoutInflater().inflate(R.layout.fragment_portfolio, null);
		View popView = getActivity().getLayoutInflater().inflate(R.layout.action_overflow_menu, null);
		// popView即popupWindow布局
		PopupWindow popupWindow = new PopupWindow(popView, LayoutParams.WRAP_CONTENT, LayoutParams.WRAP_CONTENT, true);
		// 必須設計BackgroundDrawable後setOutsideTouchable(true)才會有效。這裡在XML中定義背景,所以這裡為null
		popupWindow.setBackgroundDrawable(new ColorDrawable(0000000000));
		popupWindow.setFocusable(true);
		popupWindow.setOutsideTouchable(true); // 點擊外部關閉
		popupWindow.setAnimationStyle(android.R.style.Animation_Dialog);
		// 設置Gravity,讓它顯示在右上角
		popupWindow.showAtLocation(parentView, Gravity.RIGHT | Gravity.TOP, yOffset, xOffset);
		popupWindow.setOnDismissListener(new OnDismissListener() {

			@Override
			public void onDismiss() {
				// popupWindow消失時,設置為全透明
				setWindowAlpha(1f);
			}
		});
	}

	/**
	 * 設置屏幕透明度
	 * @param alpha
	 */
	private void setWindowAlpha(float alpha) {
		WindowManager.LayoutParams lp = getActivity().getWindow().getAttributes();
		lp.alpha = alpha; //0.0-1.0
		getActivity().getWindow().setAttributes(lp);
	}

	public int Dp2Dx(Context context, float dp) {
		final float scale = context.getResources().getDisplayMetrics().density;
		return (int) (dp * scale + 0.5f);
	}
這裡就是通過自定義pupupwindow,指定popupwindow的xml布局,這個自己來定,根據父布局來顯示popupwindow的位置,當popupwindow顯示的時候,設置屏幕為半透明,監聽它的消失事件,消失的時候,設置屏幕為全透明效果。最終實現適配魅族手機,這裡是小巫想到的一個解決方案,有更好的方法,可以留言交流一下。
 Android UI控件系列:Toast(提示)
Toast用於向用戶顯示一些幫助/提示。下面我做了5中效果,來說明Toast的強大,定義一個屬於你自己的Toast。 注意: LENGTH_LONG—
 普渡大學軟件延長16%的Android電池壽命 代碼已開源
普渡大學、英特爾公司和 Mobile Enerlytics 的研究人員分析了2000 部 Galaxy S3 和 S4 手機的使用,發現手機上安裝的應用在屏幕關閉
 Android平台Airplay的實現方法
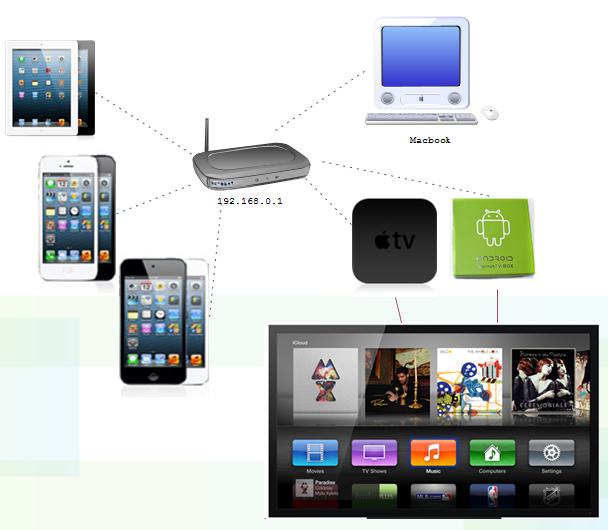
如果Android機頂盒能夠支持IOS設備的Airplay協議,實現為Airplay服務器,能夠接收和處理來自IOS設備的多媒體數據(視頻、照片和音樂),將能提高
 Android 性能監控實現原理
涉及知識點:APM, Java Agent, plugin, bytecode, asm, InvocationHandler, smail 一. 背景介紹 AP