編輯:Android資訊
一個好的app總少不了精美的圖片,所以Android開發中圖片的加載總是避免不了的,而在加載圖片過程中,如果處理不當則會出現OOM的問題。那麼如何徹底解決這個問題呢?本文將具體介紹這方面的知識。
首先我們來總結一下,在加載圖片過程中出現的OOM的場景無非就這麼幾種:
1、 加載的圖片過大
2、 一次加載的圖片過多
3、 以上兩種情況兼有
那麼為什麼在以上場景下會出現OOM問題呢?實際上在API文檔中有著明確的說明,出現OMM的主要原因有兩點:
1、移動設備會限制每個app所能夠使用的內存,最小為16M,有的設備分配的會更多,如24、32M、64M等等不一,總之會有限制,不會讓你無限制的使用。
2、在andorid中圖片加載到內存中是以位圖的方式存儲的,在android2.3之後默認情況下使用ARGB_8888,這種方式下每個像素要使用4各字節來存儲。所以加載圖片是會占用大量的內存。
場景和原因我們都分析完了,下面我們來看看如何解決這些問題。
首先先來解決大圖加載的問題,一般在實際應用中展示圖片時,因屏幕尺寸及布局顯示的原因,我們沒有必要加載原始大圖,只需要按照比例采樣縮放即可。這樣即節省內存又能保證圖片不失真,具體實施步驟如下:
這裡需要用的BitmapFactory的decode系列方法和BitmapFactory.Options。當使用decode系列方法加載圖片時,一定要將Options的inJustDecodeBounds屬性設置為true。
    BitmapFactory.Options options = new BitmapFactory.Options();
    options.inJustDecodeBounds=true;
    BitmapFactory.decodeFile(path, options);
public int calculateInSampleSize(BitmapFactory.Options options,
            int reqWidth, int reqHeight) {
        // Raw height and width of image
        final int height = options.outHeight;
        final int width = options.outWidth;
        int inSampleSize = 1;

        if (height > reqHeight || width > reqWidth) {
            if (width > height) {
                inSampleSize = Math.round((float) height / (float) reqHeight);
            } else {
                inSampleSize = Math.round((float) width / (float) reqWidth);
            }
        }
        return inSampleSize;
    }
//計算圖片的縮放比例
 options.inSampleSize = calculateInSampleSize(options, reqWidth, reqHeight);
 options.inJustDecodeBounds = false;
 Bitmap bitmap= BitmapFactory.decodeFile(path, options);
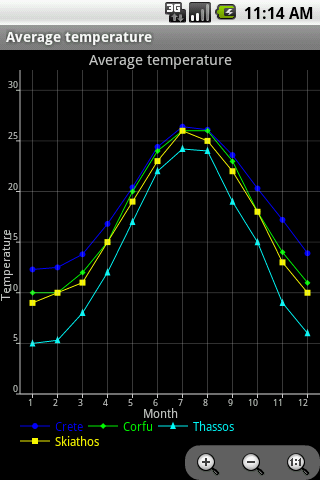
根據縮放比例,會比原始大圖節省很多內存,效果圖如下:

下面我們看看如何批量加載大圖,首先第一步還是我們上面所講到的,要根據界面展示圖片控件的大小來確定圖片的縮放比例。在此我們使用gridview加載本地圖片為例,具體步驟如下:
     private void loadPhotoPaths(){
        Cursor cursor= getContentResolver().query(MediaStore.Images.Media.EXTERNAL_CONTENT_URI, null, null, null, null);
        while(cursor.moveToNext()){
            String path = cursor.getString(cursor.getColumnIndex(MediaColumns.DATA));
            paths.add(path);
        }
        cursor.close();
    }
2、自定義adapter,在adapter的getview方法中加載圖片
    @Override
    public View getView(int position, View convertView, ViewGroup parent) {
        ViewHolder holder=null;
        if(convertView==null){
            convertView = LayoutInflater.from(this.mContext).inflate(R.layout.grid_item_layout, null);
            holder = new ViewHolder();
            holder.photo=(ImageView)convertView.findViewById(R.id.photo);
            convertView.setTag(holder);
        }else{
            holder=(ViewHolder)convertView.getTag();
        }

        final String path = this.paths.get(position);
        holder.photo.setImageBitmap(imageLoader.getBitmapFromCache(path));
        return convertView;
    }
通過以上關鍵兩個步驟後,我們發現程序運行後,用戶體驗特別差,半天沒有反應,很明顯這是因為我們在主線程中加載大量的圖片,這是不合適的。在這裡我們要將圖片的加載工作放到子線程中進行,改造自定義的ImageLoader工具類,為其添加一個線程池對象,用來管理用於下載圖片的子線程。
    private ExecutorService executor;
    private ImageLoader(Context mContxt) {
        super();
        executor = Executors.newFixedThreadPool(3);
    }
    //加載圖片的異步方法,含有回調監聽
    public void loadImage(final ImageView view,
            final String path,
            final int reqWidth,
            final int reqHeight,
            final onBitmapLoadedListener callback){

        final Handler mHandler = new Handler(){
            @Override
            public void handleMessage(Message msg) {
                super.handleMessage(msg);
                switch (msg.what) {
                case 1:
                    Bitmap bitmap = (Bitmap)msg.obj;
                    callback.displayImage(view, bitmap);
                    break;

                default:
                    break;
                }
            }

        };

        executor.execute(new Runnable() {
            @Override
            public void run() {
                    Bitmap bitmap = loadBitmapInBackground(path, reqWidth,
                            reqHeight);
                    putBitmapInMemey(path, bitmap);

                    Message msg = mHandler.obtainMessage(1);
                    msg.obj = bitmap;
                    mHandler.sendMessage(msg);
            }
        });
    }
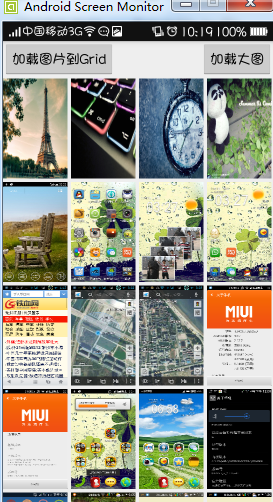
通過改造後用戶體驗明顯好多了,效果圖如下:
雖然效果有所提升,但是在加載過程中還存在兩個比較嚴重的問題:
1、圖片錯位顯示
2、當我們滑動速度過快的時候,圖片加載速度過慢
經過分析原因不難找出,主要是因為我們時候holder緩存了grid的item進行重用和線程池中的加載任務過多所造成的,只需要對程序稍作修改,具體如下:
Adapter中:
        holder.photo.setImageResource(R.drawable.ic_launcher);
        holder.photo.setTag(path);
        imageLoader.loadImage(holder.photo,
                path,
                DensityUtil.dip2px(80),
                DensityUtil.dip2px(80),
                new onBitmapLoadedListener() {
            @Override
            public void displayImage(ImageView view, Bitmap bitmap) {
                String imagePath= view.getTag().toString();
                if(imagePath.equals(path)){
                    view.setImageBitmap(bitmap);
                }
            }
        });
ImageLoader中:
executor.execute(new Runnable() {
                @Override
                public void run() {
                    String key = view.getTag().toString();
                    if (key.equals(path)) {
                        Bitmap bitmap = loadBitmapInBackground(path, reqWidth,
                                reqHeight);
                        putBitmapInMemey(path, bitmap);

                        Message msg = mHandler.obtainMessage(1);
                        msg.obj = bitmap;
                        mHandler.sendMessage(msg);
                    }
                }
            });
為了獲得更好的用戶體驗,我們還可以繼續優化,即對圖片進行緩存,緩存我們可以分為兩個部分內存緩存磁盤緩存,本文例子加載的是本地圖片所有只進行了內存緩存。對ImageLoader對象繼續修改,添加LruCache對象用於緩存圖片。
private ImageLoader(Context mContxt) {
        super();
        executor = Executors.newFixedThreadPool(3);
        //將應用的八分之一作為圖片緩存
        ActivityManager am=(ActivityManager)mContxt.getSystemService(Context.ACTIVITY_SERVICE);
        int maxSize = am.getMemoryClass()*1024*1024/8;
        mCache = new LruCache<String, Bitmap>(maxSize){
            @Override
            protected int sizeOf(String key, Bitmap value) {
                return value.getRowBytes()*value.getHeight();
            }
        };
    }

    //存圖片到緩存
    public void putBitmapInMemey(String path,Bitmap bitmap){
        if(path==null)
            return;
        if(bitmap==null)
            return;
        if(getBitmapFromCache(path)==null){
            this.mCache.put(path, bitmap);
        }
    }

    public Bitmap getBitmapFromCache(String path){
        return mCache.get(path);
    }
在loadImage方法中異步加載圖片前先從內存中取,具體代碼請下載案例。
總結一下解決加載圖片出現OOM的問題主要有以下方法:
1、 不要加載原始大圖,根據顯示控件進行比例縮放後加載其縮略圖。
2、 不要在主線程中加載圖片,主要在listview和gridview中使用異步加載圖片是要注意處理圖片錯位和無用線程的問題。
3、 使用緩存,根據實際情況確定是否使用雙緩存和緩存大小。
小伙伴們看懂了嘛?想要自己測試的,可以點擊“下載工程”運行測試哦!
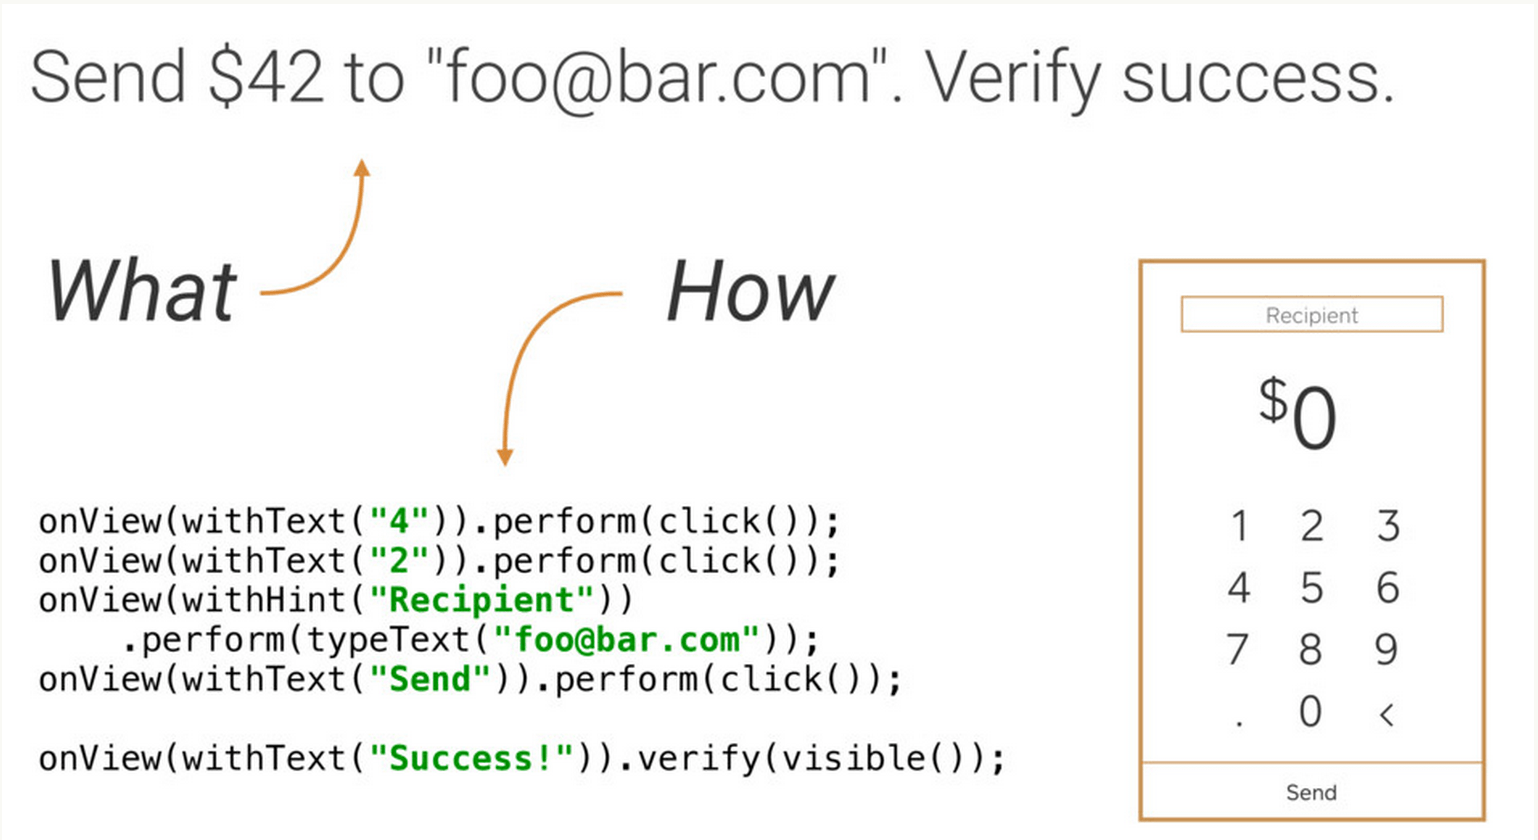
 Android Flux架構初探
序言 之前寫過一篇關於Android項目如何架構的,有MVC和MCVP,前幾天又看到了新的一種架構,當然並不是新出的,出了有一段時間,當前被應用的並不是很普遍,接
 Android事件總線還能怎麼玩?
顧名思義,AndroidEventBus ( github鏈接 : https://github.com/bboyfeiyu/AndroidEventBus )是
 Facebook移動架構:Android Flux架構詳解
要為Android應用找到一個好的架構不是一件容易的事情。谷歌似乎不太在乎這個事情,因此在設計模式上,除了Activity 生命周期管理之外,再也沒有官方的推薦。
 Android 6.0 運行時權限處理
運行時權限介紹 Android 6.0在我們原有的AndroidManifest.xml聲明權限的基礎上,又新增了運行時權限動態檢測,以下權限都需要在運行時判斷: