編輯:Android資訊
最近相對來說比較閒,加上養病,所以沒事干就撸些自己之前的知識點為博客,方便自己也方便別人。
之所以選擇這個知識點來分析有以下幾個原因:
基於以上幾點也得拿出來分析分析,該篇博客從實例到源碼完全進行了剖析(包含Handler、Message、MessageQueue、Looper、HandlerThread等源碼),不同於網上很多只是分析局部的博客。
你可能在剛開始接觸Android開發時就會知道如下問題:
Android的UI時線程不安全的,如果在線程中更新UI會出現異常,導致程序崩潰;同時如果UI中做耗時操作又會導致臭名昭著的ANR異常。
為了解決如上這些問題,我們怎辦呢?很簡單,通常最經典常用的做法就是使用Android的異步消息機制實現即可(創建一個Message對象,使用Handler發送出去,然後在Handler的handleMessage()方法中獲得剛才發送的Message對象,然後在這裡進行UI操作)。所以說還是很有必要了解異步消息機制的Looper , Handler , Message等原理的。
如下開始一個示例使用,然後通過源碼分析吧。
如下示例展示了UI Thread與Child Thread之間互相發送消息,同時在UI Thread與Child Thread中分別定義Handler。這樣如果沒有mCount的判斷,這段程序會一直死循環打印下去。
public class MainActivity extends ActionBarActivity {
    private int mCount = 0;
    private Handler mHandlerThr = null;
    private Handler mHandler = new Handler() {
        @Override
        public void handleMessage(Message msg) {
            super.handleMessage(msg);
            Log.d(null, ">>>>>>>>>>>>>UI# mHandler--handleMessage--msg.what="+msg.what);
            //接收發送到UI線程的消息,然後向線程中的Handler發送msg 1。
            mHandlerThr.sendEmptyMessage(1);
            mCount++;
            if (mCount >= 3) {
                //由於mHandlerThr是在Child Thread創建,Looper手動死循環阻塞,所以需要quit。
                mHandlerThr.getLooper().quit();
            }
        }
    };

    @Override
    protected void onCreate(Bundle savedInstanceState) {
        super.onCreate(savedInstanceState);
        setContentView(R.layout.activity_main);

        initData();
    }

    @Override
    protected void onStop() {
        super.onStop();
        //刪除所有call與msg
        mHandler.removeCallbacksAndMessages(null);
    }

    private void initData() {
        Log.d(null, ">>>>>>>>>>>>>UI# begin start thread!!!");
        new Thread() {
            @Override
            public void run() {
                super.run();
                Looper.prepare();
                mHandlerThr = new Handler() {
                    @Override
                    public void handleMessage(Message msg) {
                        super.handleMessage(msg);
                        Log.d(null, ">>>>>>>>>>>>>Child# mHandlerThr--handleMessage--msg.what=" + msg.what);
                        //接收發送到子線程的消息,然後向UI線程中的Handler發送msg 0。
                        mHandler.sendEmptyMessage(0);
                    }
                };

                Log.d(null, ">>>>>>>>>>>>>Child# begin start send msg!!!");
                //Activity中啟動Thread,在Thread結束前發送msg 0到UI Thread。
                mHandler.sendEmptyMessage(0);

                Looper.loop(); //不能在這個後面添加代碼,程序是無法運行到這行之後的。
            }
        }.start();
    }
}
運行結果展示如下:
>>>>>>>>>>>>>UI# begin start thread!!!
>>>>>>>>>>>>>Child# begin start send msg!!!
>>>>>>>>>>>>>UI# mHandler--handleMessage--msg.what=0
>>>>>>>>>>>>>Child# mHandlerThr--handleMessage--msg.what=1
>>>>>>>>>>>>>UI# mHandler--handleMessage--msg.what=0
>>>>>>>>>>>>>Child# mHandlerThr--handleMessage--msg.what=1
>>>>>>>>>>>>>UI# mHandler--handleMessage--msg.what=0
怎麼樣,這和你平時用的Handler一樣吧,對於Handler異步處理的簡單基礎示例先說到這,接下來依據上面示例的寫法分析原因與源代碼原理。
從哪著手分析呢?當然是實例化構造函數呀,所以我們先從Handler的默認構造函數開始分析,如下:
 /**
     * Default constructor associates this handler with the {@link Looper} for the
     * current thread.
     *
     * If this thread does not have a looper, this handler won't be able to receive messages
     * so an exception is thrown.
     */
    public Handler() {
        this(null, false);
    }
通過注釋也能看到,默認構造函數沒有參數,而且調運了帶有兩個參數的其他構造函數,第一個參數傳遞為null,第二個傳遞為false。
這個構造函數得到的Handler默認屬於當前線程,而且如果當前線程如果沒有Looper則通過這個默認構造實例化Handler時會拋出異常,至於是啥異常還有為啥咱們繼續往下分析,this(null, false)的實現如下:
public Handler(Callback callback, boolean async) {
        if (FIND_POTENTIAL_LEAKS) {
            final Class<? extends Handler> klass = getClass();
            if ((klass.isAnonymousClass() || klass.isMemberClass() || klass.isLocalClass()) &&
                    (klass.getModifiers() & Modifier.STATIC) == 0) {
                Log.w(TAG, "The following Handler class should be static or leaks might occur: " +
                    klass.getCanonicalName());
            }
        }

        mLooper = Looper.myLooper();
        if (mLooper == null) {
            throw new RuntimeException(
                "Can't create handler inside thread that has not called Looper.prepare()");
        }
        mQueue = mLooper.mQueue;
        mCallback = callback;
        mAsynchronous = async;
    }
可以看到,在第11行調用了mLooper = Looper.myLooper();語句,然後獲取了一個Looper對象mLooper ,如果mLooper實例為空,則會拋出一個運行時異常(Can’t create handler inside thread that has not called Looper.prepare()!)。
好奇的你指定在想什麼時候mLooper 對象才可能為空呢?很簡單,跳進去看下吧,Looper類的靜態方法myLooper如下:
   /**
     * Return the Looper object associated with the current thread.  Returns
     * null if the calling thread is not associated with a Looper.
     */
    public static Looper myLooper() {
        return sThreadLocal.get();
    }
咦?這裡好簡單。單單就是從sThreadLocal對象中get了一個Looper對象返回。跟蹤了一下sThreadLocal對象,發現他定義在Looper中,是一個static final類型的ThreadLocal<Looper>對象(在Java中,一般情況下,通過ThreadLocal.set() 到線程中的對象是該線程自己使用的對象,其他線程是不需要訪問的,也訪問不到的,各個線程中訪問的是不同的對象。)。所以可以看出,如果sThreadLocal中有Looper存在就返回Looper,沒有Looper存在自然就返回null了。
這時候你一定有疑惑,既然這裡是通過sThreadLocal的get獲得Looper,那指定有地方對sThreadLocal進行set操作吧?是的,我們在Looper類中跟蹤發現如下:
    private static void prepare(boolean quitAllowed) {
        if (sThreadLocal.get() != null) {
            throw new RuntimeException("Only one Looper may be created per thread");
        }
        sThreadLocal.set(new Looper(quitAllowed));
    }
看著這個Looper的static方法prepare沒有?這段代碼首先判斷sThreadLocal中是否已經存在Looper了,如果還沒有則創建一個新的Looper設置進去。
那就看下Looper的實例化,如下:
    private Looper(boolean quitAllowed) {
        mQueue = new MessageQueue(quitAllowed);
        mThread = Thread.currentThread();
    }
可以看見Looper構造函數無非就是創建了一個MessageQueue(它是一個消息隊列,用於將所有收到的消息以隊列的形式進行排列,並提供入隊和出隊的方法。)和貨到當前Thread實例引用而已。通過這裡可以發現,一個Looper只能對應了一個MessageQueue。
你可能會說上面的例子在子線程中明明先調運的是Looper.prepare();方法,這裡怎麼有參數了?那就繼續看吧,如下:
    public static void prepare() {
        prepare(true);
    }
可以看見,prepare()僅僅是對prepare(boolean quitAllowed) 的封裝而已,默認傳入了true,也就是將MessageQueue對象中的quitAllowed標記標記為true而已,至於MessageQueue後面會分析。
稀奇古怪的事情來了!如果你足夠留意上面的例子,你會發現我們在UI Thread中創建Handler時沒有調用Looper.prepare();,而在initData方法中創建的Child Thread中首先就調運了Looper.prepare();。你指定很奇怪吧?UI Thread為啥不需要呢?上面源碼分析明明需要先保證mLooper對象不為null呀?
這是由於在UI線程(Activity等)啟動的時候系統已經幫我們自動調用了Looper.prepare()方法。
那麼在哪啟動的呢?這個涉及Android系統架構問題比較多,後面文章會分析Activity的啟動流程。這裡你只要知道,以前一直都說Activity的人口是onCreate方法,其實android上一個應用的入口應該是ActivityThread類的main方法就行了。
所以為了解開UI Thread為何不需要創建Looper對象的原因,我們看下ActivityThread的main方法,如下:
    public static void main(String[] args) {
        SamplingProfilerIntegration.start();

        // CloseGuard defaults to true and can be quite spammy.  We
        // disable it here, but selectively enable it later (via
        // StrictMode) on debug builds, but using DropBox, not logs.
        CloseGuard.setEnabled(false);

        Environment.initForCurrentUser();

        // Set the reporter for event logging in libcore
        EventLogger.setReporter(new EventLoggingReporter());

        Security.addProvider(new AndroidKeyStoreProvider());

        // Make sure TrustedCertificateStore looks in the right place for CA certificates
        final File configDir = Environment.getUserConfigDirectory(UserHandle.myUserId());
        TrustedCertificateStore.setDefaultUserDirectory(configDir);

        Process.setArgV0("<pre-initialized>");

        Looper.prepareMainLooper();

        ActivityThread thread = new ActivityThread();
        thread.attach(false);

        if (sMainThreadHandler == null) {
            sMainThreadHandler = thread.getHandler();
        }

        if (false) {
            Looper.myLooper().setMessageLogging(new
                    LogPrinter(Log.DEBUG, "ActivityThread"));
        }

        Looper.loop();

        throw new RuntimeException("Main thread loop unexpectedly exited");
    }
看見22行沒?沒說錯吧?Looper.prepareMainLooper();,我們跳到Looper看下prepareMainLooper方法,如下:
    public static void prepareMainLooper() {
        prepare(false);
        synchronized (Looper.class) {
            if (sMainLooper != null) {
                throw new IllegalStateException("The main Looper has already been prepared.");
            }
            sMainLooper = myLooper();
        }
    }
可以看到,UI線程中會始終存在一個Looper對象(sMainLooper 保存在Looper類中,UI線程通過getMainLooper方法獲取UI線程的Looper對象),從而不需要再手動去調用Looper.prepare()方法了。如下Looper類提供的get方法:
    public static Looper getMainLooper() {
        synchronized (Looper.class) {
            return sMainLooper;
        }
    }
看見沒有,到這裡整個Handler實例化與為何子線程在實例化Handler之前需要先調運Looper.prepare();語句的原理分析完畢。
到此先初步總結下上面關於Handler實例化的一些關鍵信息,具體如下:
Handler對象也創建好了,接下來就該用了吧,所以下面咱們從Handler的收發消息角度來分析分析源碼。
還記得上面的例子嗎?我們在Child Thread的最後通過主線程的Handler對象調運sendEmptyMessage方法發送出去了一條消息。
當然,其實Handler類提供了許發送消息的方法,我們這個例子只是用了最簡單的發送一個empty消息而已,有時候我們會先定義一個Message,然後通過Handler提供的其他方法進行發送。通過分析Handler源碼發現Handler中提供的很多個發送消息方法中除了sendMessageAtFrontOfQueue()方法之外,其它的發送消息方法最終都調用了sendMessageAtTime()方法。所以,咱們先來看下這個sendMessageAtTime方法,如下:
    public boolean sendMessageAtTime(Message msg, long uptimeMillis) {
        MessageQueue queue = mQueue;
        if (queue == null) {
            RuntimeException e = new RuntimeException(
                    this + " sendMessageAtTime() called with no mQueue");
            Log.w("Looper", e.getMessage(), e);
            return false;
        }
        return enqueueMessage(queue, msg, uptimeMillis);
    }
再看下Handler中和其他發送方法不同的sendMessageAtFrontOfQueue方法,如下:
    public final boolean sendMessageAtFrontOfQueue(Message msg) {
        MessageQueue queue = mQueue;
        if (queue == null) {
            RuntimeException e = new RuntimeException(
                this + " sendMessageAtTime() called with no mQueue");
            Log.w("Looper", e.getMessage(), e);
            return false;
        }
        return enqueueMessage(queue, msg, 0);
    }
對比上面兩個方法可以發現,表面上說Handler的sendMessageAtFrontOfQueue方法和其他發送方法不同,其實實質是相同的,僅僅是sendMessageAtFrontOfQueue方法是sendMessageAtTime方法的一個特例而已(sendMessageAtTime最後一個參數傳遞0就變為了sendMessageAtFrontOfQueue方法)。所以咱們現在繼續分析sendMessageAtTime方法,如下分析:
sendMessageAtTime(Message msg, long uptimeMillis)方法有兩個參數;msg是我們發送的Message對象,uptimeMillis表示發送消息的時間,uptimeMillis的值等於從系統開機到當前時間的毫秒數再加上延遲時間。
在該方法的第二行可以看到queue = mQueue,而mQueue是在Handler實例化時構造函數中實例化的。在Handler的構造函數中可以看見mQueue = mLooper.mQueue;,而Looper的mQueue對象上面分析過了,是在Looper的構造函數中創建的一個MessageQueue。
接著第9行可以看到,上面說的兩個參數和剛剛得到的queue對象都傳遞到了enqueueMessage(queue, msg, uptimeMillis)方法中,那就看下這個方法吧,如下:
    private boolean enqueueMessage(MessageQueue queue, Message msg, long uptimeMillis) {
        msg.target = this;
        if (mAsynchronous) {
            msg.setAsynchronous(true);
        }
        return queue.enqueueMessage(msg, uptimeMillis);
    }
這個方法首先將我們要發送的消息Message的target屬性設置為當前Handler對象(進行關聯);接著將msg與uptimeMillis這兩個參數都傳遞到MessageQueue(消息隊列)的enqueueMessage()方法中,所以接下來我們就繼續分析MessageQueue類的enqueueMessage方法,如下:
    boolean enqueueMessage(Message msg, long when) {
        if (msg.target == null) {
            throw new IllegalArgumentException("Message must have a target.");
        }
        if (msg.isInUse()) {
            throw new IllegalStateException(msg + " This message is already in use.");
        }

        synchronized (this) {
            if (mQuitting) {
                IllegalStateException e = new IllegalStateException(
                        msg.target + " sending message to a Handler on a dead thread");
                Log.w("MessageQueue", e.getMessage(), e);
                msg.recycle();
                return false;
            }

            msg.markInUse();
            msg.when = when;
            Message p = mMessages;
            boolean needWake;
            if (p == null || when == 0 || when < p.when) {
                // New head, wake up the event queue if blocked.
                msg.next = p;
                mMessages = msg;
                needWake = mBlocked;
            } else {
                // Inserted within the middle of the queue.  Usually we don't have to wake
                // up the event queue unless there is a barrier at the head of the queue
                // and the message is the earliest asynchronous message in the queue.
                needWake = mBlocked && p.target == null && msg.isAsynchronous();
                Message prev;
                for (;;) {
                    prev = p;
                    p = p.next;
                    if (p == null || when < p.when) {
                        break;
                    }
                    if (needWake && p.isAsynchronous()) {
                        needWake = false;
                    }
                }
                msg.next = p; // invariant: p == prev.next
                prev.next = msg;
            }

            // We can assume mPtr != 0 because mQuitting is false.
            if (needWake) {
                nativeWake(mPtr);
            }
        }
        return true;
    }
通過這個方法名可以看出來通過Handler發送消息實質就是把消息Message添加到MessageQueue消息隊列中的過程而已。
通過上面遍歷等next操作可以看出來,MessageQueue消息隊列對於消息排隊是通過類似c語言的鏈表來存儲這些有序的消息的。其中的mMessages對象表示當前待處理的消息;然後18到49行可以看出,消息插入隊列的實質就是將所有的消息按時間(uptimeMillis參數,上面有介紹)進行排序。所以還記得上面sendMessageAtFrontOfQueue方法嗎?它的實質就是把消息添加到MessageQueue消息隊列的頭部(uptimeMillis為0,上面有分析)。
到此Handler的發送消息及發送的消息如何存入到MessageQueue消息隊列的邏輯分析完成。
那麼問題來了!既然消息都存入到了MessageQueue消息隊列,當然要取出來消息吧,不然存半天有啥意義呢?我們知道MessageQueue的對象在Looper構造函數中實例化的;一個Looper對應一個MessageQueue,所以說Handler發送消息是通過Handler構造函數裡拿到的Looper對象的成員MessageQueue的enqueueMessage方法將消息插入隊列,也就是說出隊列一定也與Handler和Looper和MessageQueue有關系。
還記不記得上面實例部分中Child Thread最後調運的Looper.loop();方法呢?這個方法其實就是取出MessageQueue消息隊列裡的消息方法。具體在下面分析。
先來看下上面例子中Looper.loop();這行代碼調運的方法,如下:
    /**
     * Run the message queue in this thread. Be sure to call
     * {@link #quit()} to end the loop.
     */
    public static void loop() {
        final Looper me = myLooper();
        if (me == null) {
            throw new RuntimeException("No Looper; Looper.prepare() wasn't called on this thread.");
        }
        final MessageQueue queue = me.mQueue;

        // Make sure the identity of this thread is that of the local process,
        // and keep track of what that identity token actually is.
        Binder.clearCallingIdentity();
        final long ident = Binder.clearCallingIdentity();

        for (;;) {
            Message msg = queue.next(); // might block
            if (msg == null) {
                // No message indicates that the message queue is quitting.
                return;
            }

            // This must be in a local variable, in case a UI event sets the logger
            Printer logging = me.mLogging;
            if (logging != null) {
                logging.println(">>>>> Dispatching to " + msg.target + " " +
                        msg.callback + ": " + msg.what);
            }

            msg.target.dispatchMessage(msg);

            if (logging != null) {
                logging.println("<<<<< Finished to " + msg.target + " " + msg.callback);
            }

            // Make sure that during the course of dispatching the
            // identity of the thread wasn't corrupted.
            final long newIdent = Binder.clearCallingIdentity();
            if (ident != newIdent) {
                Log.wtf(TAG, "Thread identity changed from 0x"
                        + Long.toHexString(ident) + " to 0x"
                        + Long.toHexString(newIdent) + " while dispatching to "
                        + msg.target.getClass().getName() + " "
                        + msg.callback + " what=" + msg.what);
            }

            msg.recycleUnchecked();
        }
    }
可以看到,第6行首先得到了當前線程的Looper對象me,接著第10行通過當前Looper對象得到與Looper對象一一對應的MessageQueue消息隊列(也就類似上面發送消息部分,Handler通過myLoop方法得到Looper對象,然後獲取Looper的MessageQueue消息隊列對象)。17行進入一個死循環,18行不斷地調用MessageQueue的next()方法,進入MessageQueue這個類查看next方法,如下:
    Message next() {
        // Return here if the message loop has already quit and been disposed.
        // This can happen if the application tries to restart a looper after quit
        // which is not supported.
        final long ptr = mPtr;
        if (ptr == 0) {
            return null;
        }

        int pendingIdleHandlerCount = -1; // -1 only during first iteration
        int nextPollTimeoutMillis = 0;
        for (;;) {
            if (nextPollTimeoutMillis != 0) {
                Binder.flushPendingCommands();
            }

            nativePollOnce(ptr, nextPollTimeoutMillis);

            synchronized (this) {
                // Try to retrieve the next message.  Return if found.
                final long now = SystemClock.uptimeMillis();
                Message prevMsg = null;
                Message msg = mMessages;
                if (msg != null && msg.target == null) {
                    // Stalled by a barrier.  Find the next asynchronous message in the queue.
                    do {
                        prevMsg = msg;
                        msg = msg.next;
                    } while (msg != null && !msg.isAsynchronous());
                }
                if (msg != null) {
                    if (now < msg.when) {
                        // Next message is not ready.  Set a timeout to wake up when it is ready.
                        nextPollTimeoutMillis = (int) Math.min(msg.when - now, Integer.MAX_VALUE);
                    } else {
                        // Got a message.
                        mBlocked = false;
                        if (prevMsg != null) {
                            prevMsg.next = msg.next;
                        } else {
                            mMessages = msg.next;
                        }
                        msg.next = null;
                        if (false) Log.v("MessageQueue", "Returning message: " + msg);
                        return msg;
                    }
                } else {
                    // No more messages.
                    nextPollTimeoutMillis = -1;
                }

                // Process the quit message now that all pending messages have been handled.
                if (mQuitting) {
                    dispose();
                    return null;
                }

                // If first time idle, then get the number of idlers to run.
                // Idle handles only run if the queue is empty or if the first message
                // in the queue (possibly a barrier) is due to be handled in the future.
                if (pendingIdleHandlerCount < 0
                        && (mMessages == null || now < mMessages.when)) {
                    pendingIdleHandlerCount = mIdleHandlers.size();
                }
                if (pendingIdleHandlerCount <= 0) {
                    // No idle handlers to run.  Loop and wait some more.
                    mBlocked = true;
                    continue;
                }

                if (mPendingIdleHandlers == null) {
                    mPendingIdleHandlers = new IdleHandler[Math.max(pendingIdleHandlerCount, 4)];
                }
                mPendingIdleHandlers = mIdleHandlers.toArray(mPendingIdleHandlers);
            }

            // Run the idle handlers.
            // We only ever reach this code block during the first iteration.
            for (int i = 0; i < pendingIdleHandlerCount; i++) {
                final IdleHandler idler = mPendingIdleHandlers[i];
                mPendingIdleHandlers[i] = null; // release the reference to the handler

                boolean keep = false;
                try {
                    keep = idler.queueIdle();
                } catch (Throwable t) {
                    Log.wtf("MessageQueue", "IdleHandler threw exception", t);
                }

                if (!keep) {
                    synchronized (this) {
                        mIdleHandlers.remove(idler);
                    }
                }
            }

            // Reset the idle handler count to 0 so we do not run them again.
            pendingIdleHandlerCount = 0;

            // While calling an idle handler, a new message could have been delivered
            // so go back and look again for a pending message without waiting.
            nextPollTimeoutMillis = 0;
        }
    }
可以看出來,這個next方法就是消息隊列的出隊方法(與上面分析的MessageQueue消息隊列的enqueueMessage方法對比)。可以看見上面代碼就是如果當前MessageQueue中存在待處理的消息mMessages就將這個消息出隊,然後讓下一條消息成為mMessages,否則就進入一個阻塞狀態(在上面Looper類的loop方法上面也有英文注釋,明確說到了阻塞特性),一直等到有新的消息入隊。
繼續看loop()方法的第30行(msg.target.dispatchMessage(msg);),每當有一個消息出隊就將它傳遞到msg.target的dispatchMessage()方法中。其中這個msg.target其實就是上面分析Handler發送消息代碼部分Handler的enqueueMessage方法中的msg.target = this;語句,也就是當前Handler對象。所以接下來的重點自然就是回到Handler類看看我們熟悉的dispatchMessage()方法,如下:
    /**
     * Handle system messages here.
     */
    public void dispatchMessage(Message msg) {
        if (msg.callback != null) {
            handleCallback(msg);
        } else {
            if (mCallback != null) {
                if (mCallback.handleMessage(msg)) {
                    return;
                }
            }
            handleMessage(msg);
        }
    }
可以看見dispatchMessage方法中的邏輯比較簡單,具體就是如果mCallback不為空,則調用mCallback的handleMessage()方法,否則直接調用Handler的handleMessage()方法,並將消息對象作為參數傳遞過去。
這樣我相信大家就都明白了為什麼handleMessage()方法中可以獲取到之前發送的消息了吧!
對了,既然上面說了獲取消息在MessageQueue消息隊列中是一個死循環的阻塞等待,所以Looper的quit方法也很重要,這樣在不需要時可以退出這個死循環,如上面實例部分使用所示。
如下展示了Looper類的quit方法源碼:
    public void quit() {
        mQueue.quit(false);
    }
看見沒有,quit方法實質就是調運了MessageQueue消息隊列的quit,如下:
    void quit(boolean safe) {
        if (!mQuitAllowed) {
            throw new IllegalStateException("Main thread not allowed to quit.");
        }

        synchronized (this) {
            if (mQuitting) {
                return;
            }
            mQuitting = true;

            if (safe) {
                removeAllFutureMessagesLocked();
            } else {
                removeAllMessagesLocked();
            }

            // We can assume mPtr != 0 because mQuitting was previously false.
            nativeWake(mPtr);
        }
    }
看見上面2到4行代碼沒有,通過判斷標記mQuitAllowed來決定該消息隊列是否可以退出,然而當mQuitAllowed為fasle時拋出的異常竟然是”Main thread not allowed to quit.”,Main Thread,所以可以說明Main Thread關聯的Looper一一對應的MessageQueue消息隊列是不能通過該方法退出的。
你可能會疑惑這個mQuitAllowed在哪設置的?
其實他是MessageQueue構造函數傳遞參數傳入的,而MessageQueue對象的實例化是在Looper的構造函數實現的,所以不難發現mQuitAllowed參數實質是從Looper的構函數傳入的。上面實例化Handler模塊源碼分析時說過,Looper實例化是在Looper的靜態方法prepare(boolean quitAllowed)中處理的,也就是說mQuitAllowed是由Looper.prpeare(boolean quitAllowed)參數傳入的。追根到底說明mQuitAllowed就是Looper.prpeare的參數,我們默認調運的Looper.prpeare();其中對mQuitAllowed設置為了true,所以可以通過quit方法退出,而主線程ActivityThread的main中使用的是Looper.prepareMainLooper();,這個方法裡對mQuitAllowed設置為false,所以才會有上面說的”Main thread not allowed to quit.”。
回到quit方法繼續看,可以發現實質就是對mQuitting標記置位,這個mQuitting標記在MessageQueue的阻塞等待next方法中用做了判斷條件,所以可以通過quit方法退出整個當前線程的loop循環。
到此整個Android的一次完整異步消息機制分析使用流程結束。接下來進行一些總結提升與拓展。
通過上面的源碼分析原理我們可以總結出整個異步消息處理流程的關系圖如下:
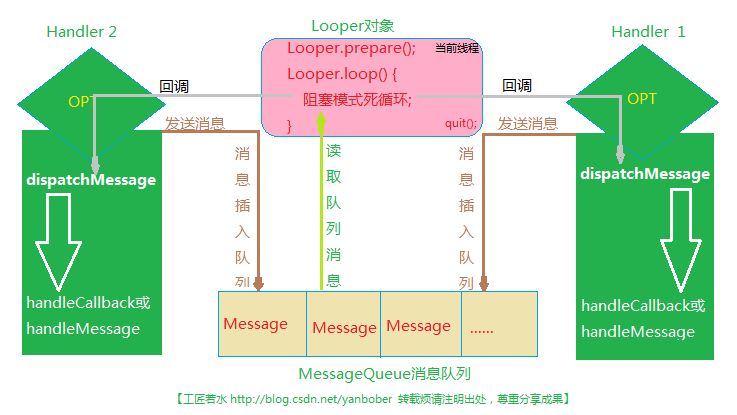
這幅圖很明顯的表達出了Handler異步機制的來龍去脈,不做過多解釋。
上面實例部分我們只是演示了Handler的局部方法,具體Handler還有很多方法,下面詳細介紹。
在上面例子中我們只是演示了發送消息的sendEmptyMessage(int what)方法,其實Handler有如下一些發送方式:
sendMessage(Message msg); sendEmptyMessage(int what); sendEmptyMessageDelayed(int what, long delayMillis);sendEmptyMessageAtTime(int what, long uptimeMillis); sendMessageDelayed(Message msg, long delayMillis);sendMessageAtTime(Message msg, long uptimeMillis); sendMessageAtFrontOfQueue(Message msg);方法。
這些方法不再做過多解釋,用法雷同,頂一個Message決定啥時發送到target去。
post(Runnable r); postDelayed(Runnable r, long delayMillis);等post系列方法。
該方法實質源碼其實就是如下:
    public final boolean postDelayed(Runnable r, long delayMillis)
    {
        return sendMessageDelayed(getPostMessage(r), delayMillis);
    }
額,原來post方法的實質也是調運sendMessageDelayed()方法去處理的額,看見getPostMessage(r)方法沒?如下源碼:
    private static Message getPostMessage(Runnable r) {
        Message m = Message.obtain();
        m.callback = r;
        return m;
    }
如上方法僅僅是將消息的callback字段指定為傳入的Runnable對象r。其實這個Message對象的m.callback就是上面分析Handler接收消息回調處理dispatchMessage()方法中調運的。在Handler的dispatchMessage方法中首先判斷如果Message的callback等於null才會去調用handleMessage()方法,否則就調用handleCallback()方法。那就再看下Handler的handleCallback()方法源碼,如下:
    private static void handleCallback(Message message) {
        message.callback.run();
    }
額,這裡竟然直接執行了Runnable對象的run()方法。所以說我們在Runnable對象的run()方法裡更新UI的效果完全和在handleMessage()方法中更新UI相同,特別強調這個Runnable的run方法還在當前線程中阻塞執行,沒有創建新的線程(很多人以為是Runnable就創建了新線程)。
Activity.runOnUiThread(Runnable);方法。
首先看下Activity的runOnUiThread方法源碼:
    public final void runOnUiThread(Runnable action) {
        if (Thread.currentThread() != mUiThread) {
            mHandler.post(action);
        } else {
            action.run();
        }
    }
看見沒有,實質還是在UI線程中執行了Runnable的run方法。不做過多解釋。
View.post(Runnable);和View.postDelayed(Runnable action, long delayMillis);方法。
首先看下View的postDelayed方法源碼:
    public boolean postDelayed(Runnable action, long delayMillis) {
        final AttachInfo attachInfo = mAttachInfo;
        if (attachInfo != null) {
            return attachInfo.mHandler.postDelayed(action, delayMillis);
        }
        // Assume that post will succeed later
        ViewRootImpl.getRunQueue().postDelayed(action, delayMillis);
        return true;
    }
看見沒有,實質還是在UI線程中執行了Runnable的run方法。不做過多解釋。
到此基本上關於Handler的所有發送消息方式都被解釋明白了。既然會用了基本的那就得提高下,接下來看看關於Message的一點優化技巧。
還記得我們說過,當發送一個消息時我們首先會new一個Message對象,然後再發送嗎?你是不是覺得每次new Message很浪費呢?那麼我們就來分析一下這個問題。
如下是我們正常發送消息的代碼局部片段:
    Message message = new Message();
    message.arg1 = 110;
    message.arg2 = 119;
    message.what = 0x120;
    message.obj = "Test Message Content!";

    mHandler.sendMessage(message);
相信很多初學者都是這麼發送消息的吧?當有大量多次發送時如上寫法會不太高效。不賣關子,先直接看達到同樣效果的優化寫法,如下:
mHandler.sendMessage(mHandler.obtainMessage(0x120, 110, 119, "\"Test Message Content!\""));
咦?怎麼send時沒實例化Message?這是咋回事?我們看下mHandler.obtainMessage(0x120, 110, 119, "\"Test Message Content!\"")這一段代碼,obtainMessage是Handler提供的一個方法,看下源碼:
    public final Message obtainMessage(int what, int arg1, int arg2, Object obj)
    {
        return Message.obtain(this, what, arg1, arg2, obj);
    }
這方法竟然直接調運了Message類的靜態方法obtain,我們再去看看obtain的源碼,如下:
    public static Message obtain(Handler h, int what,
            int arg1, int arg2, Object obj) {
        Message m = obtain();
        m.target = h;
        m.what = what;
        m.arg1 = arg1;
        m.arg2 = arg2;
        m.obj = obj;

        return m;
    }
看見沒有?首先又調運一個無參的obtain方法,然後設置Message各種參數後返回。我們繼續看下這個無參方法,如下:
    /**
     * Return a new Message instance from the global pool. Allows us to
     * avoid allocating new objects in many cases.
     */
    public static Message obtain() {
        synchronized (sPoolSync) {
            if (sPool != null) {
                Message m = sPool;
                sPool = m.next;
                m.next = null;
                m.flags = 0; // clear in-use flag
                sPoolSize--;
                return m;
            }
        }
        return new Message();
    }
真相大白了!看見注釋沒有?從整個Messge池中返回一個新的Message實例,在許多情況下使用它,因為它能避免分配新的對象。
所以看見這兩種獲取Message寫法的優缺點沒有呢?明顯可以看見通過調用Handler的obtainMessage方法獲取Message對象就能避免創建對象,從而減少內存的開銷了。所以推薦這種寫法!!!
正如上面我們實例部分的代碼,使用Android Lint會提示我們這樣一個Warning,如下:
In Android, Handler classes should be static or leaks might occur.
意思是說在Android中Handler類應該是靜態的否則可能發生洩漏。
啥是內存洩漏呢?
Java通過GC自動檢查內存中的對象,如果GC發現一個或一組對象為不可到達狀態,則將該對象從內存中回收。也就是說,一個對象不被任何引用所指向,則該對象會在被GC發現的時候被回收;另外,如果一組對象中只包含互相的引用,而沒有來自它們外部的引用(例如有兩個對象A和B互相持有引用,但沒有任何外部對象持有指向A或B的引用),這仍然屬於不可到達,同樣會被GC回收。本該被回收的對象沒被回收就是內存洩漏。
Handler中怎麼洩漏的呢?
當使用內部類(包括匿名類)來創建Handler的時候,Handler對象會隱式地持有一個外部類對象(通常是一個Activity)的引用。而Handler通常會伴隨著一個耗時的後台線程一起出現,這個後台線程在任務執行完畢之後,通過消息機制通知Handler,然後Handler把消息發送到UI線程。然而,如果用戶在耗時線程執行過程中關閉了Activity(正常情況下Activity不再被使用,它就有可能在GC檢查時被回收掉),由於這時線程尚未執行完,而該線程持有Handler的引用,這個Handler又持有Activity的引用,就導致該Activity暫時無法被回收(即內存洩露)。
Handler內存洩漏解決方案呢?
方案一:通過程序邏輯來進行保護
方案二:將Handler聲明為靜態類
靜態類不持有外部類的對象,所以你的Activity可以隨意被回收。代碼如下:
static class TestHandler extends Handler {
    @Override
    public void handleMessage(Message msg) {
        mImageView.setImageBitmap(mBitmap);
    }
}
這時你會發現,由於Handler不再持有外部類對象的引用,導致程序不允許你在Handler中操作Activity中的對象了。所以你需要在Handler中增加一個對Activity的弱引用(WeakReference),如下:
static class TestHandler extends Handler {
    WeakReference<Activity > mActivityReference;

    TestHandler(Activity activity) {
        mActivityReference= new WeakReference<Activity>(activity);
    }

    @Override
    public void handleMessage(Message msg) {
        final Activity activity = mActivityReference.get();
        if (activity != null) {
            mImageView.setImageBitmap(mBitmap);
        }
    }
}
如上就是關於Handler內存洩漏的分析及解決方案。
可能在你會用了Handler之後見過HandlerThread這個關鍵字,那我們接下來就看看HandlerThread吧。
很多人在會使用Handler以後會發現有些代碼裡出現了HandlerThread,然後就分不清HandlerThread與Handler啥關系,咋回事之類的。這裡就來分析分析HandlerThread的源碼。如下:
public class HandlerThread extends Thread {
    //線程的優先級
    int mPriority;
    //線程的id
    int mTid = -1;
    //一個與Handler關聯的Looper對象
    Looper mLooper;

    public HandlerThread(String name) {
        super(name);
        //設置優先級為默認線程
        mPriority = android.os.Process.THREAD_PRIORITY_DEFAULT;
    }

    public HandlerThread(String name, int priority) {
        super(name);
        mPriority = priority;
    }
    //可重寫方法,Looper.loop之前在線程中需要處理的其他邏輯在這裡實現
    protected void onLooperPrepared() {
    }
    //HandlerThread線程的run方法
    @Override
    public void run() {
        //獲取當前線程的id
        mTid = Process.myTid();
        //創建Looper對象
        //這就是為什麼我們要在調用線程的start()方法後才能得到Looper(Looper.myLooper不為Null)
        Looper.prepare();
        //同步代碼塊,當獲得mLooper對象後,喚醒所有線程
        synchronized (this) {
            mLooper = Looper.myLooper();
            notifyAll();
        }
        //設置線程優先級
        Process.setThreadPriority(mPriority);
        //Looper.loop之前在線程中需要處理的其他邏輯
        onLooperPrepared();
        //建立了消息循環
        Looper.loop();
        //一般執行不到這句,除非quit消息隊列
        mTid = -1;
    }

    public Looper getLooper() {
        if (!isAlive()) {
            //線程死了
            return null;
        }

        //同步代碼塊,正好和上面run方法中同步塊對應
        //只要線程活著並且mLooper為null,則一直等待
        // If the thread has been started, wait until the looper has been created.
        synchronized (this) {
            while (isAlive() && mLooper == null) {
                try {
                    wait();
                } catch (InterruptedException e) {
                }
            }
        }
        return mLooper;
    }

    public boolean quit() {
        Looper looper = getLooper();
        if (looper != null) {
            //退出消息循環
            looper.quit();
            return true;
        }
        return false;
    }

    public boolean quitSafely() {
        Looper looper = getLooper();
        if (looper != null) {
            //退出消息循環
            looper.quitSafely();
            return true;
        }
        return false;
    }

    public int getThreadId() {
        //返回線程id
        return mTid;
    }
}
看見沒有,這就是HandlerThread的系統源碼,整個HandlerThread類很簡單。如上對重點都進行了注釋。
現在可以很負責的告訴你Handler到底與HandlerThread啥關系,其實HandlerThread就是Thread、Looper和Handler的組合實現,Android系統這麼封裝體現了Android系統組件的思想,同時也方便了開發者開發。
上面源碼可以看到,HandlerThread主要是對Looper進行初始化,並提供一個Looper對象給新創建的Handler對象,使得Handler處理消息事件在子線程中處理。這樣就發揮了Handler的優勢,同時又可以很好的和線程結合到一起。
到此HandlerThread源碼原理也分析完了,那麼就差實戰了,如下繼續。
上面分析了關於HandlerThread源碼,下面就來演示一個實例,如下:
public class ListenerActivity extends Activity {
    private HandlerThread mHandlerThread = null;
    private Handler mThreadHandler = null;
    private Handler mUiHandler = null;

    @Override
    public void onCreate(Bundle savedInstanceState) {
        super.onCreate(savedInstanceState);

        setContentView(R.layout.main);

        initData();
    }

    private void initData() {
        Log.i(null, "Main Thread id="+Thread.currentThread().getId());

        mHandlerThread = new HandlerThread("HandlerWorkThread");
        //必須在實例化mThreadHandler之前調運start方法,原因上面源碼已經分析了
        mHandlerThread.start();
        //將當前mHandlerThread子線程的Looper傳入mThreadHandler,使得
        //mThreadHandler的消息隊列依賴於子線程(在子線程中執行)
        mThreadHandler = new Handler(mHandlerThread.getLooper()) {
            @Override
            public void handleMessage(Message msg) {
                super.handleMessage(msg);
                Log.i(null, "在子線程中處理!id="+Thread.currentThread().getId());
                //從子線程往主線程發送消息
                mUiHandler.sendEmptyMessage(0);
            }
        };

        mUiHandler = new Handler() {
            @Override
            public void handleMessage(Message msg) {
                super.handleMessage(msg);
                Log.i(null, "在UI主線程中處理!id="+Thread.currentThread().getId());
            }
        };
        //從主線程往子線程發送消息
        mThreadHandler.sendEmptyMessage(1);
    }
}
運行結果如下:
Main Thread id=1
在子線程中處理!id=113
在UI主線程中處理!id=1
好了,不做過多解釋了,很簡單的。
到此整個Android的異步處理機制Handler與HandlerThread等分析完成(關於Android的另一種異步處理機制AsyncTask後面有時間再分析)。相信通過這一篇文章你對Android的Handler使用還是原理都會有一個質的飛躍。
 每個 Android 開發者必須知道的資源集錦
本文由碼農網 – 小峰原創翻譯,轉載請看清文末的轉載要求,歡迎參與我們的付費投稿計劃! 隨著Android平台持續驚人的增長,越來越多的開發人員開始工作於
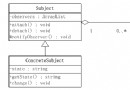 Android設計模式源碼解析之ListView觀察者模式
1. 模式介紹 模式的定義 定義對象間一種一對多的依賴關系,使得每當一個對象改變狀態,則所有依賴於它的對象都會得到通知並被自動更新。 模式的使用場景 關聯行為場
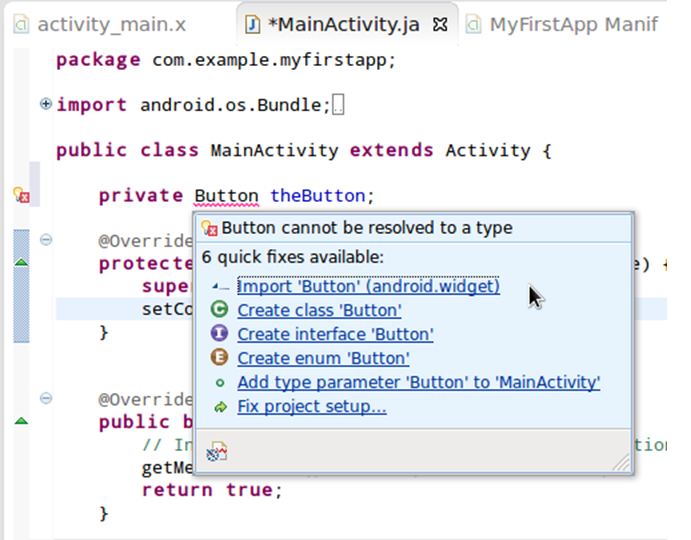 Android SDK簡明教程:用戶交互
在這篇教程中,我們將對之前所添加的Button元素進行設置以實現對用戶點擊的檢測與響應。為了達成這一目標,我們需要在應用程序的主Activity類中略微涉及Jav
 Android 開發軟件架構思考以及經驗總結
一、萌芽 作為一只編程經驗並不怎麼豐富的程序猿來講,我一直覺得架構師是一個比較神秘的職業,架構設計就更加的高大上了。經過今年的幾個項目,之前曾發文敘述我的從MVC