編輯:Android資訊
過年前發了一篇介紹 Translucent System Bar 特性的文章 Translucent System Bar 的最佳實踐 ,收到很多開發者的關注和反饋。今天開始寫第二篇,全面的介紹一下 Toolbar 的使用。說起 Toolbar ,可能有很多開發的童鞋還比較陌生,沒關系,請接著往下看。
Toolbar是在 Android 5.0 開始推出的一個 Material Design 風格的導航控件 ,Google 非常推薦大家使用 Toolbar 來作為Android客戶端的導航欄,以此來取代之前的 Actionbar 。與 Actionbar 相比, Toolbar 明顯要靈活的多。它不像 Actionbar 一樣,一定要固定在Activity的頂部,而是可以放到界面的任意位置。除此之外,在設計 Toolbar 的時候,Google也留給了開發者很多可定制修改的余地,這些可定制修改的屬性在API文檔中都有詳細介紹,如:
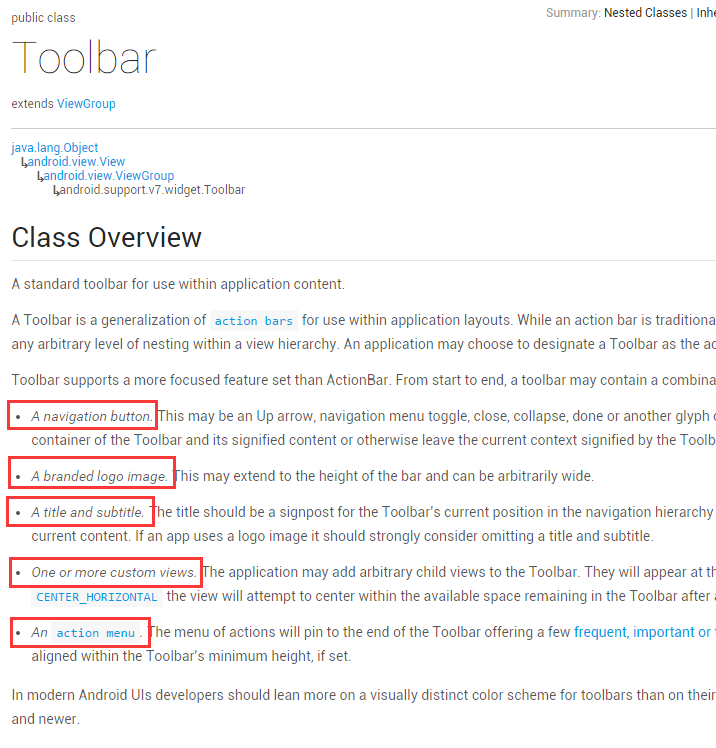
Toolbar支持的特性
總之,與 Actionbar 相比, Toolbar 讓我感受到Google滿滿的誠意。怎樣?是否已經對 Toolbar 有大概的了解,躍躍欲試的感覺出來了有木有?接下來,我們就一步一步的來看如何使用 Toolbar (其實是我使用 Toolbar 踩坑填坑的血淚史,你們接下去看,我先擦個眼淚…. )。
前面提到 Toolbar 是在 Android 5.0 才開始加上的,Google 為了將這一設計向下兼容,自然也少不了要推出兼容版的 Toolbar 。為此,我們需要在工程中引入 appcompat-v7 的兼容包,使用 android.support.v7.widget.Toolbar 進行開發。下面看一下代碼結構,同樣把重點部分已經紅圈圈出:
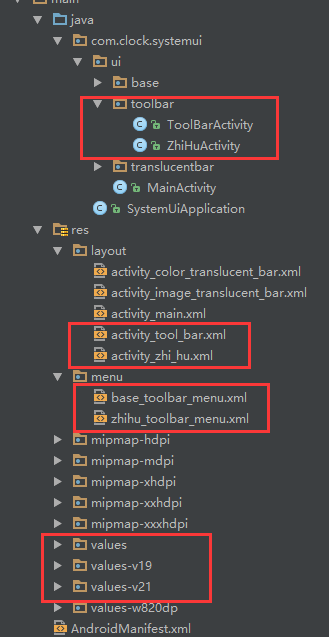
關鍵部分代碼
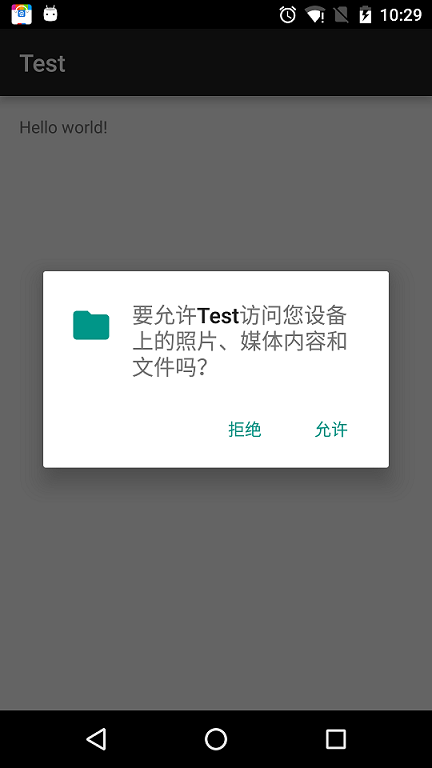
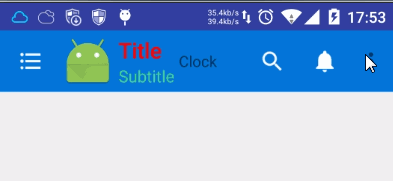
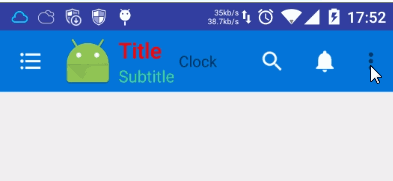
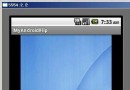
我們先來看一下 ToolbarActivity 的運行效果
ToolbarActivity效果圖
按照效果圖,從左到右分別是我們前面提及到的 導航欄圖標 、 App的logo 、 標題和子標題 、 自定義控件 、以及 ActionMenu 。接著,我們來看下布局文件和代碼實現。
首先,在布局文件 activity_tool_bar.xml 中添加進我們需要的 Toolbar 控件
<?xml version="1.0" encoding="utf-8"?>
<LinearLayout xmlns:android="http://schemas.android.com/apk/res/android"
    android:layout_width="match_parent"
    android:layout_height="match_parent"
    android:orientation="vertical">

    <android.support.v7.widget.Toolbar
        android:id="@+id/toolbar"
        android:layout_width="match_parent"
        android:layout_height="wrap_content"
        android:background="@color/color_0176da">

        <!--自定義控件-->
        <TextView
            android:layout_width="wrap_content"
            android:layout_height="wrap_content"
            android:text="Clock" />
    </android.support.v7.widget.Toolbar>
</LinearLayout>
接著在 base_toolbar_menu.xml 中添加 action menu 菜單項
<?xml version="1.0" encoding="utf-8"?>
<menu xmlns:android="http://schemas.android.com/apk/res/android"
    xmlns:app="http://schemas.android.com/apk/res-auto">

    <item
        android:id="@id/action_search"
        android:icon="@mipmap/ic_search"
        android:title="@string/menu_search"
        app:showAsAction="ifRoom" />

    <item
        android:id="@id/action_notification"
        android:icon="@mipmap/ic_notifications"
        android:title="@string/menu_notifications"
        app:showAsAction="ifRoom" />

    <item
        android:id="@+id/action_item1"
        android:title="@string/item_01"
        app:showAsAction="never" />

    <item
        android:id="@+id/action_item2"
        android:title="@string/item_02"
        app:showAsAction="never" />
</menu>
最後到 ToolbarActivity 中調用代碼拿到這 Toolbar 控件,並在代碼中做各種setXXX操作。
/**
 * Toolbar的基本使用
 */
public class ToolBarActivity extends BaseActivity {

    @Override
    protected void onCreate(Bundle savedInstanceState) {
        super.onCreate(savedInstanceState);
        setContentView(R.layout.activity_tool_bar);

        Toolbar toolbar = (Toolbar) findViewById(R.id.toolbar);

        toolbar.setNavigationIcon(R.mipmap.ic_drawer_home);//設置導航欄圖標
        toolbar.setLogo(R.mipmap.ic_launcher);//設置app logo
        toolbar.setTitle("Title");//設置主標題
        toolbar.setSubtitle("Subtitle");//設置子標題

        toolbar.inflateMenu(R.menu.base_toolbar_menu);//設置右上角的填充菜單
        toolbar.setOnMenuItemClickListener(new Toolbar.OnMenuItemClickListener() {
            @Override
            public boolean onMenuItemClick(MenuItem item) {
                int menuItemId = item.getItemId();
                if (menuItemId == R.id.action_search) {
                    Toast.makeText(ToolBarActivity.this , R.string.menu_search , Toast.LENGTH_SHORT).show();

                } else if (menuItemId == R.id.action_notification) {
                    Toast.makeText(ToolBarActivity.this , R.string.menu_notifications , Toast.LENGTH_SHORT).show();

                } else if (menuItemId == R.id.action_item1) {
                    Toast.makeText(ToolBarActivity.this , R.string.item_01 , Toast.LENGTH_SHORT).show();

                } else if (menuItemId == R.id.action_item2) {
                    Toast.makeText(ToolBarActivity.this , R.string.item_02 , Toast.LENGTH_SHORT).show();

                }
                return true;
            }
        });

    }

}
代碼到此已經完成了 Toolbar 的基本使用,注意,是基本使用而已!!!!!下面有幾個代碼裡面需要注意的地方:
坑一:xml布局文件中,Toolbar屬性設置無效
剛開始使用Toolbar的時候,我的布局文件中是這樣寫的
<?xml version="1.0" encoding="utf-8"?>
<LinearLayout xmlns:android="http://schemas.android.com/apk/res/android"
    android:layout_width="match_parent"
    android:layout_height="match_parent"
    android:orientation="vertical">

    <android.support.v7.widget.Toolbar
        android:id="@+id/toolbar"
        android:layout_width="match_parent"
        android:layout_height="wrap_content"
        android:background="@color/color_0176da"
        android:logo="@mipmap/ic_launcher"
        android:navigationIcon="@mipmap/ic_drawer_home"
        android:subtitle="456"
        android:title="123">

        <!--自定義控件-->
        <TextView
            android:layout_width="wrap_content"
            android:layout_height="wrap_content"
            android:text="Clock" />
    </android.support.v7.widget.Toolbar>
</LinearLayout>
在真機跑起來之後,看到的結果是下面這樣的。
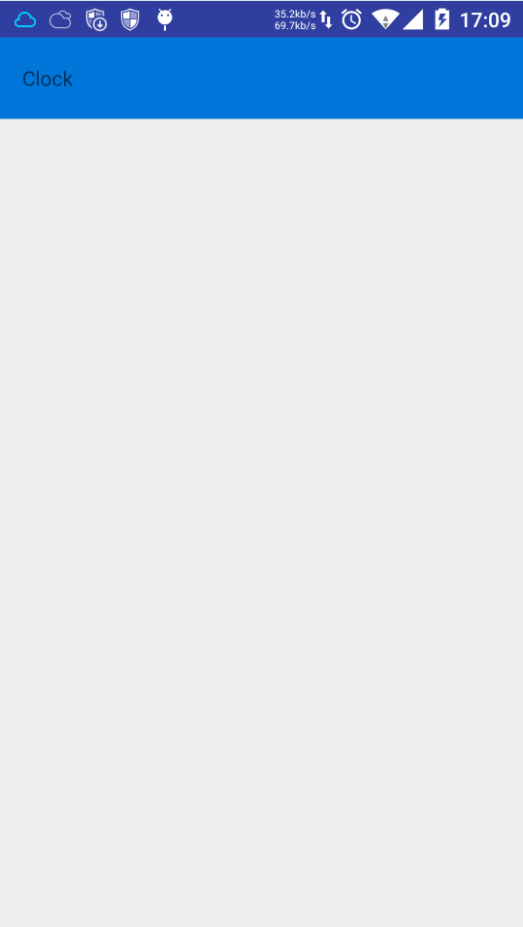
Toolbar 屬性設置無效
此時心中真是萬千匹草泥馬在奔騰,除了設置背景色和TextView有效外,說好的 logo 、 navigationIcon 、 subtitle 、 title 都跑哪去了?在編譯器沒報錯又不見效果的情況下,參考了其他開發者的用法後找到了以下的解決方案,就是在根布局中加入自定義屬性的命名空間
xmlns:toolbar="http://schemas.android.com/apk/res-auto"(這裡的toolbar可以換成你想要其他命名,做過自定義控件的童鞋相比很熟悉此用法了)
然後把所有用 android:xxx 設置無效的,都用 toolbar:xxx 設置即可生效。最終的布局代碼如下:
<?xml version="1.0" encoding="utf-8"?>
<LinearLayout xmlns:android="http://schemas.android.com/apk/res/android"
    xmlns:toolbar="http://schemas.android.com/apk/res-auto"
    android:layout_width="match_parent"
    android:layout_height="match_parent"
    android:orientation="vertical">

    <android.support.v7.widget.Toolbar
        android:id="@+id/toolbar"
        android:layout_width="match_parent"
        android:layout_height="wrap_content"
        android:background="@color/color_0176da"
        toolbar:navigationIcon="@mipmap/ic_drawer_home"
        toolbar:logo="@mipmap/ic_launcher"
        toolbar:subtitle="456"
        toolbar:title="123">

        <!--自定義控件-->
        <TextView
            android:layout_width="wrap_content"
            android:layout_height="wrap_content"
            android:text="Clock" />
    </android.support.v7.widget.Toolbar>
</LinearLayout>
到此即可解決 xml 中屬性設置失效的問題,為什麼會出現這種問題呢?我猜測是因為這個控件是兼容版的控件,用 android:xxx 設置無效是的這些屬性是在兼容包中,不在默認的Android SDK中,所以我們需要額外的引入。至於為什麼IDE不報錯,估計就是bug了吧!
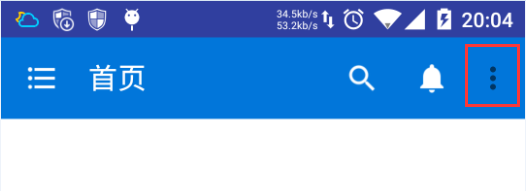
坑二:Action Menu Item 的文字顏色設置無效
系統默設置了ActionMenu每個Item的文字顏色和大小,像ToolbarActivity在Google原生5.1系統下默認效果就是下面這樣的
Android 5.1 默認的ActionMenu Item的風格
此時,如果我有需求要改變一下item文字顏色,應該怎麼破?我按照網上比較普遍的解決方案,做了如下兩步的修改操作:
在styles.xml中自定義一個Theme,並設置 actionMenuTextColor 屬性(注意:不是 android:actionMenuTextColor )
<style name="Theme.ToolBar.Base" parent="Theme.AppCompat.Light.NoActionBar">
    <item name="actionMenuTextColor">@color/color_red</item>
</style>
在布局文件的Toolbar中設置popupTheme(注意:是toolbar:xxx,不是android:xxx)
    <android.support.v7.widget.Toolbar
        android:id="@+id/toolbar"
        android:layout_width="match_parent"
        android:layout_height="wrap_content"
        android:background="@color/color_0176da"
        toolbar:popupTheme="@style/Theme.ToolBar.Base">

        <!--自定義控件-->
        <TextView
            android:layout_width="wrap_content"
            android:layout_height="wrap_content"
            android:text="Clock" />
    </android.support.v7.widget.Toolbar>
運行之後,文字的顏色的並沒有發生任何改變。說好的改變顏色呢…..找來找去,最後再 StackOverflow 找到一個還不錯的解決方案,就是把上面的的 actionMenuTextColor 屬性換成 android:textColorPrimary 即可解決,最終得到下面的運行效果。
成功修改 actionmenu item 文字的顏色
這種方法也有一個小缺點,如果我把自定義控件換成Button,你會發現Button默認的文字顏色也變成了紅色。所以,此處如果有朋友有更好的解決方案,請留言賜教。
如果你想要修改 ActionMenu Item 的文字大小,也可以在theme中設置加上如下設置
<item name="android:textSize">20sp</item>
以上就是目前使用 Toolbar 一些比較折騰的坑,感覺 Google 對 Toolbar 這些坑,還可以進一步優化優化,不然就坑苦了開發者們了。
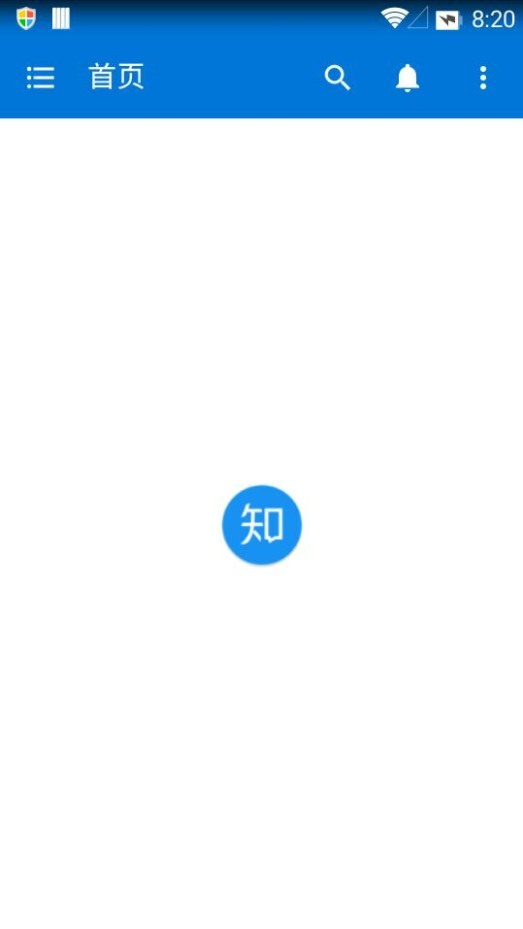
為了加深一下 Toolbar 的開發體驗,我們使用 Toolbar 來實現知乎主頁的效果!先來看下知乎主頁的效果
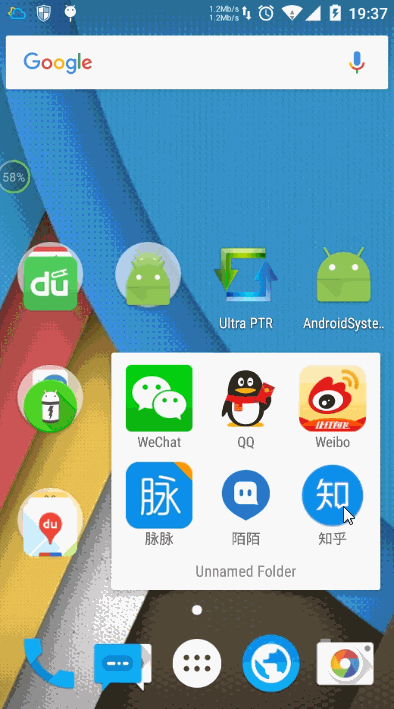
Android 5.1上知乎主頁效果圖
如果前面的內容你看明白,想撸出這個界面無非是幾分鐘的事情,下面就直接上代碼,不做贅述了。
ZhiHuActivity界面代碼
public class ZhiHuActivity extends BaseActivity {

    @Override
    protected void onCreate(Bundle savedInstanceState) {
        super.onCreate(savedInstanceState);
        setContentView(R.layout.activity_zhi_hu);

        Toolbar toolbar = (Toolbar) findViewById(R.id.toolbar);
        toolbar.inflateMenu(R.menu.zhihu_toolbar_menu);

        toolbar.setNavigationIcon(R.mipmap.ic_drawer_home);

        toolbar.setTitle(R.string.home_page);
        toolbar.setTitleTextColor(getResources().getColor(android.R.color.white));
    }
}
zhihu_toolbar_menu.xml 菜單
<?xml version="1.0" encoding="utf-8"?>
<menu xmlns:android="http://schemas.android.com/apk/res/android"
    xmlns:app="http://schemas.android.com/apk/res-auto">

    <item
        android:id="@id/action_search"
        android:icon="@mipmap/ic_search"
        android:title="@string/menu_search"
        app:showAsAction="ifRoom" />

    <item
        android:id="@id/action_notification"
        android:icon="@mipmap/ic_notifications"
        android:title="@string/menu_notifications"
        app:showAsAction="ifRoom" />

    <item
        android:id="@id/action_settings"
        android:orderInCategory="100"
        android:title="@string/menu_settings"
        app:showAsAction="never" />

    <item
        android:id="@id/action_about"
        android:orderInCategory="101"
        android:title="@string/menu_about_us"
        app:showAsAction="never" />
</menu>
activity_zhi_hu.xml 布局
<?xml version="1.0" encoding="utf-8"?>
<LinearLayout xmlns:android="http://schemas.android.com/apk/res/android"
    android:layout_width="match_parent"
    android:layout_height="match_parent"
    android:orientation="vertical">

    <android.support.v7.widget.Toolbar
        android:id="@+id/toolbar"
        android:layout_width="match_parent"
        android:layout_height="wrap_content"
        android:background="@color/color_0176da"
        android:theme="@style/Theme.ToolBar.ZhiHu">

    </android.support.v7.widget.Toolbar>

    <RelativeLayout
        android:layout_width="match_parent"
        android:layout_height="match_parent"
        android:background="@android:color/white">

        <ImageView
            android:layout_width="60dp"
            android:layout_height="60dp"
            android:layout_centerInParent="true"
            android:background="@mipmap/ic_zhihu_logo" />
    </RelativeLayout>

</LinearLayout>
styles.xml 中的 Theme.ToolBar.ZhiHu,給 Toolbar 設置android:theme用的
<resources>

    ...
    ...

    <style name="Theme.ToolBar.ZhiHu" parent="Theme.AppCompat.Light.NoActionBar">
        <item name="actionOverflowButtonStyle">@style/ActionButton.Overflow.ZhiHu</item>
    </style>

    <style name="ActionButton.Overflow.ZhiHu" parent="android:style/Widget.Holo.Light.ActionButton.Overflow">
        <item name="android:src">@mipmap/ic_menu_more_overflow</item>
    </style>

</resources>
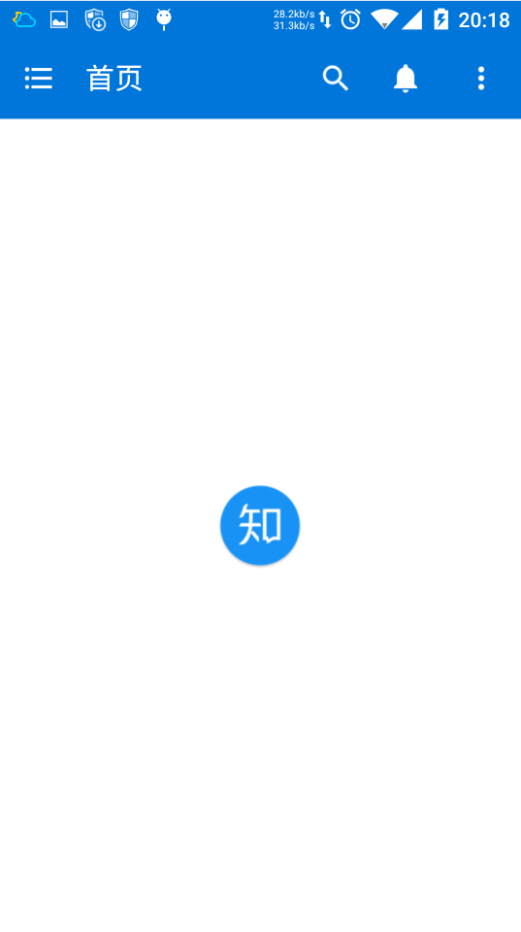
最終得到下面這樣的效果
Android5.1上仿知乎主頁面效果
這裡在 Toolbar 設置 android:theme=”@style/Theme.ToolBar.ZhiHu” 主要是為了替換系統右上角三個點的圖標,如果不設置,則會成系統默認主題的樣子。
不設置Theme的效果
最後,再給知乎的主頁面做個小小的優化,它在 Android 4.4 上運行還是能夠看到一條黑乎乎的通知欄,為此我把 Toolbar 和 Translucent System Bar 的特性結合起來,最終改進成下面的效果(附上 Android4.4 和 5.1 上的運行效果)。
Android4.4上改進版的知乎主頁
Android5.1上改進版的知乎主頁
如果你還不知道 Translucent System Bar 的特性怎麼使用,請查看我的上一篇文章: Translucent System Bar 的最佳實踐
關於 Toolbar 的使用就介紹到此,本來是懷著很簡單就可以上手的心態來使用,結果發現還是有很多坑需要填。果然還是驗證了一句老話
紙上得來終覺淺,絕知此事要躬行
對於想要更深的了解 Toolbar 設計的童鞋,也可以看看這篇 官網文檔 (自備梯子)。
同樣,分享即美德,需要源代碼的童鞋,請戳: https://github.com/D-clock/AndroidSystemUiTraining
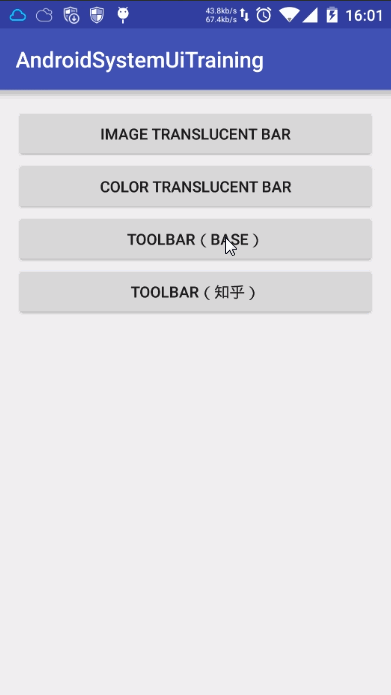
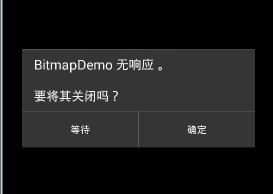 Android中的ANR用法詳解
有過Android開發經歷的人都不會對ANR陌生,它和崩潰一樣是程序設計的問題。本文將以較為深入的視角來介紹什麼是ANR,出現場景,如何避免以及如何定位分析ANR
 Android N 完全不同以往的四個新特性
本文由碼農網 – 溫迪原創翻譯,轉載請看清文末的轉載要求,歡迎參與我們的付費投稿計劃! Google最近發布了Android的下一個版本,Android
 Android左右滑動效果的代碼實現
我們經常會在Android應用中看到左右滑動的效果,那麼這種左右滑動效果是如何實現的呢?本文通過對Android代碼的講解,來分析Android中左右滑動效果的代
 Windows下搭建React Native Android開發環境詳解
最近看到React Native好像好厲害的樣子,好奇心驅使之下體驗了一下並將在Window下搭建React Natvie Android環境的步驟記錄下來,並