編輯:Android資訊
在日常開發中,可以說和Bitmap低頭不見抬頭見,基本上每個應用都會直接或間接的用到,而這裡面又涉及到大量的相關知識。
所以這裡把Bitmap的常用知識做個梳理,限於經驗和能力,不做太深入的分析。
這裡的區別不是指方法名和參數的區別,而是對於解碼後圖片尺寸在處理上的區別:
decodeFile()用於讀取SD卡上的圖,得到的是圖片的原始尺寸
decodeResource()用於讀取Res、Raw等資源,得到的是圖片的原始尺寸 * 縮放系數
可以看的出來,decodeResource()比decodeFile()多了一個縮放系數,縮放系數的計算依賴於屏幕密度,當然這個參數也是可以調整的:
// 通過BitmapFactory.Options的這幾個參數可以調整縮放系數
public class BitmapFactory {
    public static class Options {
        public boolean inScaled;     // 默認true
        public int inDensity;        // 無dpi的文件夾下默認160
        public int inTargetDensity;  // 取決具體屏幕
    }
}
我們分具體情況來看,現在有一張720×720的圖片:
如果inScaled設置為false,則不進行縮放,解碼後圖片大小為720×720; 否則請往下看。
如果inScaled設置為true或者不設置,則根據inDensity和inTargetDensity計算縮放系數。
把這張圖片放到drawable目錄下, 默認:
以720p的紅米3為例子,縮放系數 = inTargetDensity(具體320 / inDensity(默認160)= 2 = density,解碼後圖片大小為1440×1440。
以1080p的MX4為例子,縮放系數 = inTargetDensity(具體480 / inDensity(默認160)= 3 = density, 解碼後圖片大小為2160×2160。
把圖片放到drawable或者raw這樣不帶dpi的文件夾,會按照上面的算法計算。
如果放到xhdpi會怎樣呢? 在MX4上,放到xhdpi,解碼後圖片大小為1080 x 1080。
因為放到有dpi的文件夾,會影響到inDensity的默認值,放到xhdpi為160 x 2 = 320; 所以縮放系數 = 480(屏幕) / 320 (xhdpi) = 1.5; 所以得到的圖片大小為1080 x 1080。
如果你不想依賴於這個系統本身的density,你可以手動設置inDensity和inTargetDensity來控制縮放系數:
BitmapFactory.Options options = new BitmapFactory.Options();
options.inJustDecodeBounds = false;
options.inSampleSize = 1;
options.inDensity = 160;
options.inTargetDensity = 160;
bitmap = BitmapFactory.decodeResource(getResources(),
        R.drawable.origin, options);
// MX4上,雖然density = 3
// 但是通過設置inTargetDensity / inDensity = 160 / 160 = 1
// 解碼後圖片大小為720x720
System.out.println("w:" + bitmap.getWidth()
        + ", h:" + bitmap.getHeight());
首先,Android對Bitmap內存(像素數據)的分配區域在不同版本上是有區分的:
As of Android 3.0 (API level 11), the pixel data is stored on the Dalvik heap along with the associated bitmap.
從3.0開始,Bitmap像素數據和Bitmap對象一起存放在Dalvik堆中,而在3.0之前,Bitmap像素數據存放在Native內存中。
所以,在3.0之前,Bitmap像素數據在Nativie內存的釋放是不確定的,容易內存溢出而Crash,官方強烈建議調用recycle()(當然是在確定不需要的時候);而在3.0之後,則無此要求。
參考鏈接:Managing Bitmap Memory
3.0之後官方無recycle()建議,是不是就真的不需要recycle()了呢?
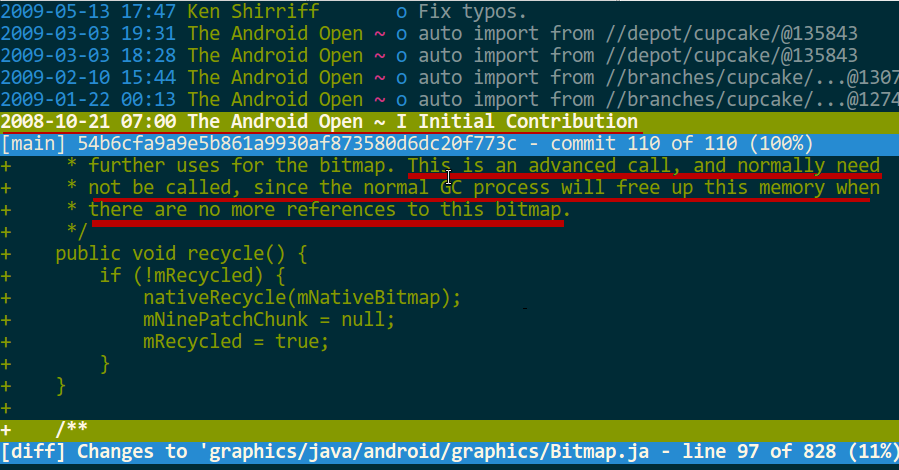
在醫生的這篇文章:Bitmap.recycle引發的血案 最後指出:“在不兼容Android2.3的情況下,別在使用recycle方法來管理Bitmap了,那是GC的事!”。文章開頭指出了原因在於recycle()方法的注釋說明:
/**
 * ... This is an advanced call, and normally need not be called,
 * since the normal GC process will free up this memory when
 * there are no more references to this bitmap.
 */
public void recycle() {}
事實上這個說法是不准確的,是不能作為recycle()方法不調用的依據的。
因為從commit history中看,這行注釋早在08年初始化代碼的就有了,但是早期的代碼並沒有因此不需要recycle()方法了。
如果3.0之後真的完全不需要主動recycle(),最新的AOSP源碼應該有相應體現,我查了SystemUI和Gallery2的代碼,並沒有取締Bitmap的recycle()方法。
所以,我個人認為,如果Bitmap真的不用了,recycle一下又有何妨?
PS:至於醫生說的那個bug,顯然是一種優化策略,APP開發中加個兩個bitmap不相等的判斷條件即可。
這個已經有一篇bugly出品的絕好文章講的很清楚:
Android 開發繞不過的坑:你的 Bitmap 究竟占多大內存?
BitmapFactory.Options.inBitmap是AndroiD3.0新增的一個屬性,如果設置了這個屬性則會重用這個Bitmap的內存從而提升性能。
但是這個重用是有條件的,在Android4.4之前只能重用相同大小的Bitmap,Android4.4+則只要比重用Bitmap小即可。
在官方網站有詳細介紹,這裡列舉示例代碼的兩個方法了解一下:
private static void addInBitmapOptions(BitmapFactory.Options options,
        ImageCache cache) {
    // inBitmap only works with mutable bitmaps, so force the decoder to
    // return mutable bitmaps.
    options.inMutable = true;

    if (cache != null) {
        // Try to find a bitmap to use for inBitmap.
        Bitmap inBitmap = cache.getBitmapFromReusableSet(options);

        if (inBitmap != null) {
            // If a suitable bitmap has been found,
            // set it as the value of inBitmap.
            options.inBitmap = inBitmap;
        }
    }
}

static boolean canUseForInBitmap(
        Bitmap candidate, BitmapFactory.Options targetOptions) {

    if (Build.VERSION.SDK_INT >= Build.VERSION_CODES.KITKAT) {
        // From Android 4.4 (KitKat) onward we can re-use
        // if the byte size of the new bitmap is smaller than
        // the reusable bitmap candidate
        // allocation byte count.
        int width = targetOptions.outWidth / targetOptions.inSampleSize;
        int height =
            targetOptions.outHeight / targetOptions.inSampleSize;
        int byteCount = width * height
            * getBytesPerPixel(candidate.getConfig());
        return byteCount <= candidate.getAllocationByteCount();
    }

    // On earlier versions,
    // the dimensions must match exactly and the inSampleSize must be 1
    return candidate.getWidth() == targetOptions.outWidth
        && candidate.getHeight() == targetOptions.outHeight
        && targetOptions.inSampleSize == 1;
}
參考鏈接:
Managing Bitmap Memory
Bitmap對象的復用
LRU,Least Recently Used,Discards the least recently used items first。
在最近使用的數據中,丟棄使用最少的數據。與之相反的還有一個MRU,丟棄使用最多的數據。
這就是著名的局部性原理。
1.新數據插入到鏈表頭部;
2.每當緩存命中(即緩存數據被訪問),則將數據移到鏈表頭部;
3.當鏈表滿的時候,將鏈表尾部的數據丟棄。

在Android3.1和support v4中均提供了Lru算法的實現類LruCache。
內部使用LinkedHashMap實現。
LruCache的所有對象和數據都是在內存中(或者說LinkedHashMap中),而DiskLruCache是磁盤緩存,不過它的實現要稍微復雜一點。
使用DiskLruCache後就不用擔心文件或者圖片太多占用過多磁盤空間,它能把那些不常用的圖片自動清理掉。
DiskLruCache系統中並沒有正式提供,需要另外下載: DiskLruCache
使用Bitmap節省內存最重要的技巧就是加載合適大小的Bitmap,因為以現在相機像素,很多照片都巨無霸的大,這些大圖直接加載到內存,最容易OOM。
加載合適的Bitmap需要先讀取Bitmap的原始大小,按縮小了合適的倍數的大小進行加載。
那麼,這個縮小的倍數的計算就是inSampleSize的計算。
// 根據maxWidth, maxHeight計算最合適的inSampleSize
public static int $sampleSize(BitmapFactory.Options options,
        int maxWidth, int maxHeight) {
    // raw height and width of image
    int rawWidth = options.outWidth;
    int rawHeight = options.outHeight;

    // calculate best sample size
    int inSampleSize = 0;
    if (rawHeight > maxHeight || rawWidth > maxWidth) {
        float ratioWidth = (float) rawWidth / maxWidth;
        float ratioHeight = (float) rawHeight / maxHeight;
        inSampleSize = (int) Math.min(ratioHeight, ratioWidth);
    }
    inSampleSize = Math.max(1, inSampleSize);

    return inSampleSize;
}
關於inSampleSize需要注意,它只能是2的次方,否則它會取最接近2的次方的值。
為了節省內存,需要先設置BitmapFactory.Options的inJustDecodeBounds為true,這樣的Bitmap可以借助decodeFile方法把高和寬存放到Bitmap.Options中,但是內存占用為空(不會真正的加載圖片)。
有了具備高寬信息的Options,結合上面的inSampleSize算法算出縮小的倍數,我們就能加載本地大圖的某個合適大小的縮略圖了
/**
 * 獲取縮略圖
 * 支持自動旋轉
 * 某些型號的手機相機圖片是反的,可以根據exif信息實現自動糾正
 * @return
 */
public static Bitmap $thumbnail(String path,
        int maxWidth, int maxHeight, boolean autoRotate) {

    int angle = 0;
    if (autoRotate) {
        angle = ImageLess.$exifRotateAngle(path);
    }

    BitmapFactory.Options options = new BitmapFactory.Options();
    options.inJustDecodeBounds = true;
    // 獲取這個圖片的寬和高信息到options中, 此時返回bm為空
    Bitmap bitmap = BitmapFactory.decodeFile(path, options);
    options.inJustDecodeBounds = false;
    // 計算縮放比
    int sampleSize = $sampleSize(options, maxWidth, maxHeight);
    options.inSampleSize = sampleSize;
    options.inPreferredConfig = Bitmap.Config.RGB_565;
    options.inPurgeable = true;
    options.inInputShareable = true;

    if (bitmap != null && !bitmap.isRecycled()) {
        bitmap.recycle();
    }
    bitmap = BitmapFactory.decodeFile(path, options);

    if (autoRotate && angle != 0) {
        bitmap = $rotate(bitmap, angle);
    }

    return bitmap;
}
系統內置了一個ThumbnailUtils也能生成縮略圖,細節上不一樣但原理是相同的。
學過線性代數或者圖像處理的同學們一定深知Matrix的強大,很多常見的圖像變換一個Matrix就能搞定,甚至更復雜的也是如此。
// Matrix matrix = new Matrix();
// 每一種變化都包括set,pre,post三種,分別為設置、矩陣先乘、矩陣後乘。
平移:matrix.setTranslate()
縮放:matrix.setScale()
旋轉:matrix.setRotate()
斜切:matrix.setSkew()
下面我舉兩個例子說明一下。
借助Matrix的postRotate方法旋轉一定角度。
Matrix matrix = new Matrix();
// angle為旋轉的角度
matrix.postRotate(angle);
Bitmap rotatedBitmap = Bitmap.createBitmap(originBitmap,
        0,
        0,
        originBitmap.getWidth(),
        originBitmap.getHeight(),
        matrix,
        true);
借助Matrix的postScale方法旋轉一定角度。
Matrix matrix = new Matrix();
// scaleX,scaleY分別為為水平和垂直方向上縮放的比例
matrix.postScale(scaleX, scaleY);
Bitmap scaledBitmap = Bitmap.createBitmap(originBitmap,
        0,
        0,
        originBitmap.getWidth(),
        originBitmap.getHeight(),
        matrix,
        true);
Bitmap本身也帶了一個縮放方法,不過是把bitmap縮放到目標大小,原理也是用Matrix,我們封裝一下:
// 水平和寬度縮放到指定大小,注意,這種情況下圖片很容易變形
Bitmap scaledBitmap = Bitmap.createScaledBitmap(originBitmap,
        dstWidth,
        dstHeight,
        true);
通過組合可以實現更多效果。
圖片的裁剪的應用場景還是很多的:頭像剪切,照片裁剪,圓角,圓形等等。
矩陣形狀的裁剪比較簡單,直接用createBitmap方法即可:
Canvas canvas = new Canvas(originBitmap);
draw(canvas);
// 確定裁剪的位置和裁剪的大小
Bitmap clipBitmap = Bitmap.createBitmap(originBitmap,
        left, top,
        clipWidth, clipHeight);
對於圓角我們需要借助Xfermode和PorterDuffXfermode,把圓角矩陣套在原Bitmap上取交集得到圓角Bitmap。
// 准備畫筆
Paint paint = new Paint();
paint.setAntiAlias(true);

// 准備裁剪的矩陣
Rect rect = new Rect(0, 0,
        originBitmap.getWidth(), originBitmap.getHeight());
RectF rectF = new RectF(new Rect(0, 0,
        originBitmap.getWidth(), originBitmap.getHeight()));

Bitmap roundBitmap = Bitmap.createBitmap(originBitmap.getWidth(),
        originBitmap.getHeight(), Bitmap.Config.ARGB_8888);
Canvas canvas = new Canvas(roundBitmap);
// 圓角矩陣,radius為圓角大小
canvas.drawRoundRect(rectF, radius, radius, paint);

// 關鍵代碼,關於Xfermode和SRC_IN請自行查閱
paint.setXfermode(new PorterDuffXfermode(PorterDuff.Mode.SRC_IN));
canvas.drawBitmap(originBitmap, rect, rect, paint);
和上面的圓角裁剪原理相同,不過畫的是圓形套在上面。
為了從中間裁剪出圓形,我們需要計算繪制原始Bitmap的left和top值。
int min = originBitmap.getWidth() > originBitmap.getHeight() ?
originBitmap.getHeight() : originBitmap.getWidth();
Paint paint = new Paint();
paint.setAntiAlias(true);
Bitmap circleBitmap = Bitmap.createBitmap(min, min,
    Bitmap.Config.ARGB_8888);
Canvas canvas = new Canvas(circleBitmap);
// 圓形
canvas.drawCircle(min / 2, min / 2, min / 2, paint);
paint.setXfermode(new PorterDuffXfermode(PorterDuff.Mode.SRC_IN));

// 居中顯示
int left = - (originBitmap.getWidth() - min) / 2;
int top = - (originBitmap.getHeight() - min) / 2;
canvas.drawBitmap(originBitmap, left, top, paint);
從圓角、圓形的處理上我們應該能看的出來繪制任意多邊形都是可以的。
很多圖片應用都支持裁剪功能,濾鏡功能等等,最終還是需要把處理後的Bitmap保存到本地,不然就是再強大的功能也是白忙活了。
public static String $save(Bitmap bitmap,
        Bitmap.CompressFormat format, int quality, File destFile) {
    try {
        FileOutputStream out = new FileOutputStream(destFile);
        if (bitmap.compress(format, quality, out)) {
            out.flush();
            out.close();
        }

        if (bitmap != null && !bitmap.isRecycled()) {
            bitmap.recycle();
        }

        return destFile.getAbsolutePath();
    } catch (FileNotFoundException e) {
        e.printStackTrace();
    } catch (IOException e) {
        e.printStackTrace();
    }
    return null;
}
如果想更穩定或者更簡單的保存到SDCard的包名路徑下,可以再封裝一下:
// 保存到本地,默認路徑/mnt/sdcard/[package]/save/,用隨機UUID命名文件
public static String $save(Bitmap bitmap,
        Bitmap.CompressFormat format, int quality, Context context) {
    if (!Environment.getExternalStorageState()
            .equals(Environment.MEDIA_MOUNTED)) {
        return null;
    }

    File dir = new File(Environment.getExternalStorageDirectory()
            + "/" + context.getPackageName() + "/save/");
    if (!dir.exists()) {
        dir.mkdirs();
    }
    File destFile = new File(dir, UUID.randomUUID().toString());
    return $save(bitmap, format, quality, destFile);
}
巨圖加載,當然不能使用常規方法,必OOM。
原理比較簡單,系統中有一個類BitmapRegionDecoder:
public static BitmapRegionDecoder newInstance(byte[] data, int offset,
        int length, boolean isShareable) throws IOException {
}
public static BitmapRegionDecoder newInstance(
        FileDescriptor fd, boolean isShareable) throws IOException {
}
public static BitmapRegionDecoder newInstance(InputStream is,
        boolean isShareable) throws IOException {
}
public static BitmapRegionDecoder newInstance(String pathName,
        boolean isShareable) throws IOException {
}
可以按區域加載:
public Bitmap decodeRegion(Rect rect, BitmapFactory.Options options) {
}
微博的大圖浏覽也是通過這個BitmapRegionDecoder實現的,具體可自行查閱。
圖像處理其實是一門很深奧的學科,所幸Android提供了顏色矩陣ColorMatrix類,可實現很多簡單的特效,以灰階效果為例子:
Bitmap grayBitmap = Bitmap.createBitmap(originBitmap.getWidth(),
        originBitmap.getHeight(), Bitmap.Config.RGB_565);
Canvas canvas = new Canvas(grayBitmap);
Paint paint = new Paint();
ColorMatrix colorMatrix = new ColorMatrix();
// 設置飽和度為0,實現了灰階效果
colorMatrix.setSaturation(0);
ColorMatrixColorFilter colorMatrixColorFilter =
        new ColorMatrixColorFilter(colorMatrix);
paint.setColorFilter(colorMatrixColorFilter);
canvas.drawBitmap(originBitmap, 0, 0, paint);
除了飽和度,我們還能調整對比度,色相變化等等。
ThumbnailUtils是系統提供的一個專門生成縮略圖的方法,我專門寫了一篇文章分析,內容較多,請移步:理解ThumbnailUtils
既然與Bitmap經常打交道,那就把它都理清楚弄明白,這是很有必要的。
難免會有遺漏,歡迎留言,我會酌情補充。
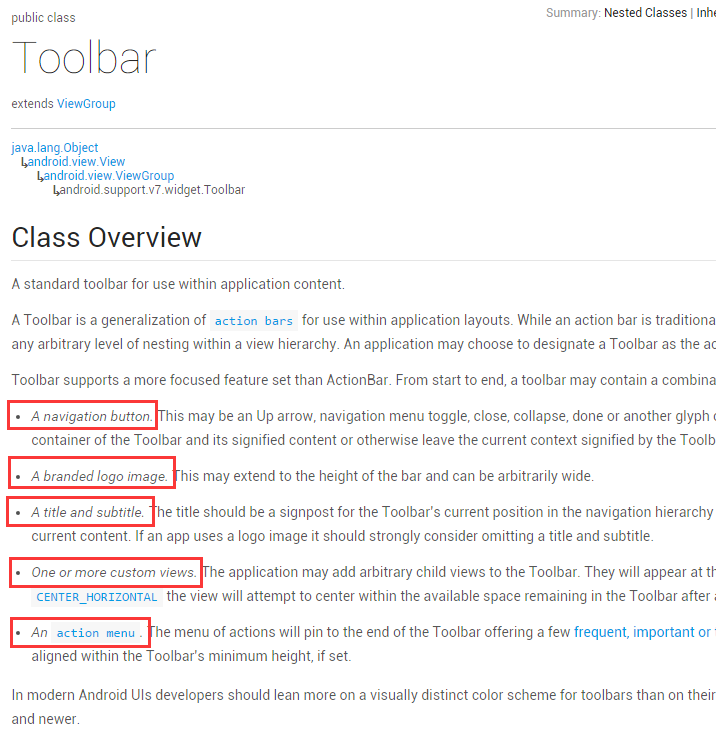 最詳細的 Android Toolbar 開發實踐總結
過年前發了一篇介紹 Translucent System Bar 特性的文章 Translucent System Bar 的最佳實踐 ,收到很多開發者的關注和反
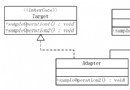 Android ListView 適配器模式解析
模式的定義 適配器模式把一個類的接口變換成客戶端所期待的另一種接口,從而使原本因接口不匹配而無法在一起工作的兩個類能夠在一起工作。 使用場景 用電源接口做例子,筆
 GitHub 上排名前 100 的 Android 開源庫介紹
本項目主要對目前 GitHub 上排名前 100 的 Android 開源庫進行簡單的介紹, 至於排名完全是根據GitHub搜索Java語言選擇 (Best Ma
 Gradle for Android 第三篇( 依賴管理 )
依賴管理 依賴管理是Gradle最閃耀的地方,最好的情景是,你僅僅只需添加一行代碼在你的build文件,Gradle會自動從遠程倉庫為你下載相關的jar包,並且保