編輯:Android開發實例
在做Android開發中經常要用到短信的發送和短信的接收,調用Android提供的api實現起來很簡單,今天要用到這個功能研究了一下順便寫下來加強一下記憶。
1.首先創建一個Android Project
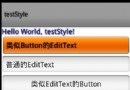
2.設計一個main Activity作為發短信的操作界面,設計好的界面圖如下:
界面布局的文件內容如下:
1: <?xml version="1.0" encoding="utf-8"?>
2: <LinearLayout xmlns:android="http://schemas.android.com/apk/res/android"
3: android:orientation="vertical"
4: android:layout_width="fill_parent"
5: android:layout_height="fill_parent"
6: android:padding="10sp"
7: >
8: <TextView
9: android:layout_width="fill_parent"
10: android:layout_height="wrap_content"
11: android:text="@string/mobile_label"
12:
13: />
14: <EditText
15: android:layout_width="fill_parent"
16: android:layout_height="wrap_content"
17: android:id="@+id/txt_from"
18: android:hint="請輸入電話號碼"
19:
20: />
21: <TextView
22: android:layout_width="fill_parent"
23: android:layout_height="wrap_content"
24: android:text="@string/content_label"
25: />
26: <EditText
27: android:layout_width="fill_parent"
28: android:layout_height="wrap_content"
29: android:id="@+id/txt_content"
30: android:hint="請輸入短信內容"
31: android:lines="3"
32: />
33: <TextView android:layout_width="fill_parent"
34: android:layout_height="wrap_content"
35: ></TextView>
36: <Button
37: android:text="發送短信"
38: android:layout_width="fill_parent"
39: android:layout_height="wrap_content"
40: android:gravity="center"
41: android:id="@+id/btnSend"
42: android:paddingTop="20sp"
43: />
44: </LinearLayout>
3.創建一個Java類文件,導入以下包:
1: import java.util.regex.Matcher;
2: import java.util.regex.Pattern;
3: import com.eshore.smsManagers.R;
4: import android.app.Activity;
5: import android.telephony.gsm.*;
6: import android.view.View;
7: import android.view.View.OnClickListener;
8: import android.widget.Button;
9: import android.widget.EditText;
10: import android.widget.Toast;
11: import android.os.Bundle;
4.重寫onCreate方:
1: txtFrom=(EditText)this.findViewById(R.id.txt_from);
2: txtContent=(EditText)this.findViewById(R.id.txt_content);
3: btnSend=(Button)this.findViewById(R.id.btnSend);
4: btnSend.setOnClickListener(new OnClickListener() {
5: public void onClick(View v) {
6: if(!validate())
7: return;
8: SmsManager.getDefault().sendTextMessage(txtFrom.getText().toString().trim(),null,txtContent.getText().toString(),null,null);
9: txtFrom.setText("");
10: txtContent.setText("");
11: Toast toast=Toast.makeText(main.this, "短信發送成功!",Toast.LENGTH_LONG);
12: toast.show();
13: }
14: });
相關的輔助方法有手機的合法性驗證和短信內容不可為空:
1: //合法性驗證
2: private boolean validate(){
3: String mobile=txtFrom.getText().toString().trim();
4: String content=txtContent.getText().toString();
5: if(mobile.equals("")){
6: Toast toast=Toast.makeText(this, "手機號碼不能為空!",Toast.LENGTH_LONG);
7: toast.show();
8: return false;
9: }
10: else if(!checkMobile(mobile)){
11: Toast toast=Toast.makeText(this, "您輸入的電話號碼不正確請重新輸入!",Toast.LENGTH_LONG);
12: toast.show();
13: return false;
14: }
15: else if(content.equals("")){
16: Toast toast=Toast.makeText(this, "短信內容不能為空請重新輸入!",Toast.LENGTH_LONG);
17: toast.show();
18: return false;
19: }
20: else{
21: return true;
22: }
23:
24: }
25: /*
26: * 中國移動134.135.136.137.138.139.150.151.152.157.158.159.187.188 ,147(數據卡不驗證)
27: 中國聯通130.131.132.155.156.185.186
28: 中國電信133.153.180.189
29: CDMA 133,153
30: 手機號碼驗證 適合目前所有的手機
31: */
32: public boolean checkMobile(String mobile){
33: String regex="^1(3[0-9]|5[012356789]|8[0789])\\d{8}$";
34: Pattern p = Pattern.compile(regex);
35: Matcher m = p.matcher(mobile);
36: return m.find();
37: }
經過上面的幾個步驟發短信的功能基本就完成了,但是現在運行程序是無法工作的,主要是配置文件AndroidManifest.xml中的權限沒有配置,要發送短信就要配置,發送短信的權限這樣Android才會發送信息,否則發不出去信息,同樣接收信息也需要有相應的接收短信的權限,在後面還要做接收短信的內容,所以在這裡順便將接收和發送短信的權限都配置好,配置代買如下:
1: <uses-permission android:name="android.permission.SEND_SMS"/>
2: <uses-permission android:name="android.permission.RECEIVE_SMS"/>
可以看出來第一行是發送短信的權限,第二行是接收短信的權限
運行程序,填寫正確的手機號和短信內容點擊發送就可以將短信內容發送到相應的手機號上。
5、接收短信,接收短信稍有點復雜,首先創建一個接收短信的Java類文件“ReceiverDemo.java”並繼承”BroadcastReceiver”
6.重寫下面的方法:
1: public void onReceive(Context context, Intent intent)
重寫內容如下:
1: private static final String strRes = "android.provider.Telephony.SMS_RECEIVED";
2: @Override
3: public void onReceive(Context context, Intent intent) {
4: /*
5: * 判斷是否是SMS_RECEIVED事件被觸發
6: */
7: if (intent.getAction().equals(strRes)) {
8: StringBuilder sb = new StringBuilder();
9: Bundle bundle = intent.getExtras();
10: if (bundle != null) {
11: Object[] pdus = (Object[]) bundle.get("pdus");
12: SmsMessage[] msg = new SmsMessage[pdus.length];
13: for (int i = 0; i < pdus.length; i++) {
14: msg[i] = SmsMessage.createFromPdu((byte[]) pdus[i]);
15: }
16: for (SmsMessage currMsg : msg) {
17: sb.append("您收到了來自:【");
18: sb.append(currMsg.getDisplayOriginatingAddress());
19: sb.append("】\n的信息,內容:");
20: sb.append(currMsg.getDisplayMessageBody());
21: }
22: Toast toast = Toast.makeText(context, "收到了短消息: " + sb.toString(),Toast.LENGTH_LONG);
23: toast.show();
24: }
25: }
26: }
注意:
A:第7行代碼用於判斷當前監聽的是否是接收短信這個事件,如果是則進行下面的處理,否則不做處理
B:12到22行解析出發信人的號碼和短信內容並組成一個可讀的字符串
C:22和23行將上面組成的字符串顯示給用戶
7.在AndroidManifest.xml中配置一個Receiver如下:
1: <receiver android:name=".ReceiverDemo" android:enabled="true">
2: <intent-filter>
3: <action android:name="android.provider.Telephony.SMS_RECEIVED" />
4: </intent-filter>
5: </receiver>
好了,經過以上這7個步驟就可以實現短信的發送和接收了,現在生成,並安裝到手機上就可以發送短信了,當手機有短信接收的時候會自動彈出來一個提示的字符串給用戶。當然也可以修改上面收短信的代碼,在onReceive裡實現一些很有意思的功能,比方說收到短信的時候播放一首自己喜歡的歌,或者在這裡實現當收到短信後馬上轉發給一個指定的號碼,比如給自己的女朋友手機上實現當她收到短信的時候立馬將短信轉到你的手機上,這樣神不知鬼不覺,一切盡在你掌握中……
轉自:http://www.cnblogs.com/vaiyanzi/archive/2010/05/06/1728465.html
 Android 進程間通信實現原理分析
Android Service是分為兩種: 本地服務(Local Service): 同一個apk內被調用 遠程服務(Remote Service):被另一個
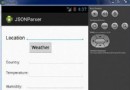 Android JSON解析器
JSON代表JavaScript對象符號。它是一個獨立的數據交換格式,是XML的最佳替代品。本章介紹了如何解析JSON文件,並從中提取所需的信息。Android提供了四個
 Android開發實例之多點觸控程序
智能終端設備的多點觸控操作為我們帶來了種種炫酷體驗,這也使得很多Android
 Android MediaPlayer(多媒體播放)
Android提供了許多方法來控制播放的音頻/視頻文件和流。其中該方法是通過一類稱為MediaPlayer。Android是提供MediaPlayer類訪問內置的媒體播放