編輯:Android開發實例
1 鍵盤監控分析 Android的按鍵產生的是一個KeyEvent,這個KeyEvent只能被最上層focus窗口的activity和view得到。 所有的按鍵事件都會首先觸發public boolean dispatchKeyEvent(KeyEvent event)這個函數,這個函數在SDK裡的英文說明如下:
boolean zy.keytest.keytest.dispatchKeyEvent(KeyEvent event) Overrides: dispatchKeyEvent(...) in Activity public boolean dispatchKeyEvent (KeyEvent event) Since: API Level 1 Called to process key events. You can override this to intercept all key events before they are dispatched to the window. Be sure to call this implementation for key events that should be handled normally. Parameters event The key event. Returns boolean Return true if this event was consumed.
然後還會觸發public void onUserInteraction()這個函數,這個函數的說明如下:void zy.keytest.keytest.onUserInteraction() Overrides: onUserInteraction() in Activity public void onUserInteraction () Since: API Level 3 Called whenever a key, touch, or trackball event is dispatched to the activity. Implement this method if you wish to know that the user has interacted with the device in some way while your activity is running. This callback and onUserLeaveHint() are intended to help activities manage status bar notifications intelligently; specifically, for helping activities determine the proper time to cancel a notfication. All calls to your activity's onUserLeaveHint() callback will be accompanied by calls to onUserInteraction(). This ensures that your activity will be told of relevant user activity such as pulling down the notification pane and touching an item there. Note that this callback will be invoked for the touch down action that begins a touch gesture, but may not be invoked for the touch-moved and touch-up actions that follow. See Also onUserLeaveHint()
按下接下來觸發public boolean onKeyDown(int keyCode, KeyEvent event)這個函數,一般相應按下都是重載這個函數。 詳細的流程如下: 當鼠標鍵按下時(即觸摸): 首先觸發dispatchTouchEvent,然後觸發onUserInteraction,再次onTouchEvent。如果是點擊的話,緊跟著下列事件(點擊分倆步,ACTION_DOWN,ACTION_up),觸發dispatchTouchEvent,再次onTouchEvent,當ACTION_up事件時不會觸發onUserInteraction(可查看源代碼) 當鍵盤按下時: 首先觸發dispatchKeyEvent,然後觸發onUserInteraction,再次onKeyDown,如果按下緊接著松開,則是倆步,緊跟著觸發dispatchKeyEvent,然後觸發onUserInteraction, 再次onKeyUp,注意與觸摸不同,當松開按鍵時onUserInteraction也會觸發。 而通過繼承InputMethodService類重寫這個類裡面的public boolean onKeyDown(int keyCode, KeyEvent event)函數,則可以監聽鍵盤按鍵,SDK裡對這個函數有詳細的描述。boolean com.example.android.softkeyboard.SoftKeyboard.onKeyDown(int keyCode, KeyEvent event) Use this to monitor key events being delivered to the application. We get first crack at them, and can either resume them or let them continue to the app. Overrides: onKeyDown(...) in InputMethodService Parameters: keyCode event
這個函數能夠在應用程序得到按鍵之前,輸入法先得到這個按鍵,並且可以釋放他們或者繼續傳遞給應用程序。 結論:Android的按鍵產生的是一個KeyEvent,這個KeyEvent只能被最上層獲得焦點窗口的activity和view得到,無法被其他進程獲得,進程間的鍵盤監聽是無法實現的。 2 鍵盤模擬分析 鍵盤模擬這一塊在調研中,在SDK1.6版本以前有一種方法,使用android.view.IWindowManager,其實現的源代碼如下:package org.anddev.android.simualtekeys; import android.app.Activity; import android.os.Bundle; import android.os.DeadObjectException; import android.os.ServiceManager; import android.view.IWindowManager; import android.view.KeyEvent; import android.view.Menu; import android.view.View; import android.view.View.OnClickListener; public class SimualteKeyInput extends Activity { /* The WindowManager capable of injecting keyStrokes. */ final IWindowManager windowManager = IWindowManager.Stub .asInterface(ServiceManager.getService("window")); /** Called when the activity is first created. */ @Override public void onCreate(Bundle icicle) { super.onCreate(icicle); setContentView(R.layout.main); /* Make the button do the menu-popup. */ this.findViewById(R.id.cmd_simulate_key).setOnClickListener( new OnClickListener() { @Override public void onClick(View arg0) { /* Start the key-simulation in a thread * so we do not block the GUI. */ new Thread(new Runnable() { public void run() { /* Simulate a KeyStroke to the menu-button. */ simulateKeystroke(KeyEvent.KEYCODE_SOFT_LEFT); } }).start(); /* And start the Thread. */ } }); } /** Create a dummy-menu. */ @Override public boolean onCreateOptionsMenu(Menu menu) { boolean supRetVal = super.onCreateOptionsMenu(menu); menu.add(0, 0, "Awesome it works =)"); return supRetVal; } /** Wrapper-function taking a KeyCode. * A complete KeyStroke is DOWN and UP Action on a key! */ private void simulateKeystroke(int KeyCode) { doInjectKeyEvent(new KeyEvent(KeyEvent.ACTION_DOWN, KeyCode)); doInjectKeyEvent(new KeyEvent(KeyEvent.ACTION_UP, KeyCode)); } /** This function actually handles the KeyStroke-Injection. */ private void doInjectKeyEvent(KeyEvent kEvent) { try { /* Inject the KeyEvent to the Window-Manager. */ windowManager.injectKeyEvent(kEvent.isDown(), kEvent.getKeyCode(), kEvent.getRepeatCount(), kEvent.getDownTime(), kEvent .getEventTime(), true); } catch (DeadObjectException e) { e.printStackTrace(); } } }
Main.xml文件如下
<?xml version="1.0" encoding="utf-8"?>
<LinearLayout xmlns:android="http://schemas.android.com/apk/res/android"
androidrientation="vertical"
android:layout_width="fill_parent"
android:layout_height="fill_parent"
>
<Button id="@+id/cmd_simulate_key"
android:layout_width="fill_parent"
android:layout_height="wrap_content"
android:text="Simulate Menu Key Press"
/>
</LinearLayout>
getCurrentInputConnection().sendKeyEvent( new KeyEvent(KeyEvent.ACTION_DOWN, keyEventCode)); getCurrentInputConnection().sendKeyEvent( new KeyEvent(KeyEvent.ACTION_UP, keyEventCode));
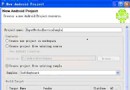
這樣就模擬了一個按鍵的按下和彈起。 結論:輸入法可以做到按鍵模擬,在使用模擬鍵盤的函數需要繼承輸入法的相關類,需要用戶手動設置輸入法(輸入法程序本身不能設置自己為默認輸入法),才能在自己的輸入法程序裡實現監聽鍵盤,這種應用性不能廣泛。普通的應用程序沒法做到按鍵模擬。設置輸入法的api需要android.uid.system,這種uid需要系統級簽名才能使用,經過測試,可以通過自己的程序進行設置輸入法,但也需要重新簽名。 3 使用Test Instrument模擬按鍵 做了一個測試工程模擬按鍵的demo 測試過程 首先 創建一個項目TestApp 參數如下Package Name: com.android.testapp Activity Name: MainActivity Application Name: TestApp
MainActivity源碼如下package com.android.testapp; import android.app.Activity; import android.os.Bundle; public class MainActivity extends Activity { /** Called when the activity is first created. */ @Override public void onCreate(Bundle savedInstanceState) { super.onCreate(savedInstanceState); setContentView(R.layout.main); } public int sum(int a,int b) { return a+b; } public int substract(int a,int b) { return a-b; } }
其實這個只是一個被測試程序,跟模擬按鍵沒有太大關系 然後 新建一個Source Folder,名為test,並在裡面新建了包com.android.testapp.test。並定義了一個TestCase,名為TestMainActivity,源代碼如下:package com.android.testapp.test; import com.android.testapp.MainActivity; import android.app.Instrumentation; import android.content.ContentResolver; import android.test.ActivityInstrumentationTestCase; import android.test.suitebuilder.annotation.MediumTest; import android.util.Log; import android.view.KeyEvent; public class TestMainActivity extends ActivityInstrumentationTestCase<MainActivity> { private Instrumentation mInst = null; private ContentResolver mContentResolver = null; public TestMainActivity() { super("com.android.testapp", MainActivity.class); } public TestMainActivity(String pkg, Class<MainActivity> activityClass) { super(pkg, activityClass); } @Override protected void setUp() throws Exception { super.setUp(); mInst = getInstrumentation(); mContentResolver = mInst.getContext().getContentResolver(); Log.i("test", "setup"); } public void testStartActivity() throws Exception { //launch activity /* Intent intent = new Intent(Intent.ACTION_MAIN); intent.addFlags(Intent.FLAG_ACTIVITY_NEW_TASK); String activityPackagePath = "com.android."; intent.setClassName(activityPackagePath, TargetActivity.getClass().getName()); Activity mActivity = (TargetActivity) getInstrumentation().startActivitySync(intent); mInst.waitForIdleSync();*/ //send keyevent to press button mInst.sendCharacterSync(KeyEvent.KEYCODE_1); Log.i("test", "send key 8"); mInst.waitForIdleSync(); } @MediumTest public void testSum() { assertEquals(3, getActivity().sum(1, 2)); mInst.sendCharacterSync(KeyEvent.KEYCODE_0); Log.i("test", "send key 7"); mInst.waitForIdleSync(); } @MediumTest public void testSubstract() { assertEquals(-1, getActivity().substract(1, 2)); } }
測試的時候將會執行幾個測試函數,我在裡面加上了模擬按鍵的代碼,並通過日志打印,並且通過輸入法程序的日志來捕獲 Manifest文件源代碼<?xml version="1.0" encoding="utf-8"?> <manifest xmlns:android="http://schemas.android.com/apk/res/android" package="com.android.testapp" android:versionCode="1" android:versionName="1.0.0"> <application android:icon="@drawable/icon" android:label="@string/app_name"> <activity android:name=".MainActivity" android:label="@string/app_name"> <intent-filter> <action android:name="android.intent.action.MAIN" /> <category android:name="android.intent.category.LAUNCHER" /> </intent-filter> </activity> <uses-library android:name="android.test.runner" /> </application> <instrumentation android:targetPackage="com.android.testapp" android:name="android.test.InstrumentationTestRunner" android:label="Test Unit Tests"></instrumentation> </manifest>
運行測試過程: 首先設置TestApp的Run configueration 設置為do nothing 不然我們運行就會啟動我們的主程序 然後運行我們的工程,將工程安裝到模擬器上 然後打開命令行,運行命令 adb shell pm list packages 可以看到我們的工程已經安裝在模擬器上 然後運行命令 adb shell am instrument -e class com.android.testapp.test.TestMainActivity –w com.android.testapp/android.test.InstrumentationTestRunner 復制粘貼會多有問題 直接用鍵盤敲入 如圖 測試執行完畢,查看logcat 可以看到結果 通過日志可以看到輸入法截獲到了我們測試程序發出的按鍵 查看了系統test Instrumentation源碼 Instrumentation類裡面關於" sendKeySync "一類函數的實現public void sendKeySync(KeyEvent event) { validateNotAppThread(); try { (IWindowManager.Stub.asInterface(ServiceManager.getService("window"))) .injectKeyEvent(event, true); } catch (RemoteException e) { } }
采用的IWindowManager類裡的injectKeyEvent函數,之前已經調研了IWindowManager類在1.6以後的版本之後被隱藏掉了 injectKeyEvent函數網上有人說得在源碼環境下編譯可以使用。最近,需要在Android中模擬按鍵功能,在不同activity中切換,查了下網上的資料,基本都是說使用IWindowManager接口中的 injectKeyEent,但是在sdk文檔中發現:此函數在sdk1.0之後就取消了,據googl說為了系統的安全,不再暴露此接口,實驗了n多方法,包括又重新使用了sdk0.9都失敗了,後來某大蝦說可以在android源碼可以編譯通過,我實驗了下的確可以。並且在adb 命令 monkey、input中都發現了此函數的身影,下面為input中的部分源碼:
IWindowManager.Stub
.asInterface(ServiceManager.getService("window")))
.injectKeyEvent(down, true);
IWindowManager.Stub
.asInterface(ServiceManager.getService("window")))
.injectKeyEvent(up, true);
package zy.runcmd; import java.io.IOException; import android.app.Activity; import android.os.Bundle; import android.util.Log; public class runcmd extends Activity { /** Called when the activity is first created. */ @Override public void onCreate(Bundle savedInstanceState) { super.onCreate(savedInstanceState); setContentView(R.layout.main); try { Runtime.getRuntime().exec("am instrument -e class com.android.testapp.test.TestMainActivity -w com.android.testapp/android.test.InstrumentationTestRunner"); Log.i("run","success!!!!!!!!!"); } catch (IOException e) { // TODO Auto-generated catch block e.printStackTrace(); Log.i("run",e.toString()); } } }
執行成功之後log裡會打印success!!!! 並且可以在log裡看到相應的效果 我們運行此程序之後 查看logcat 可以看到test 程序被執行了。 並且發出的按鍵 7 8 都被我們的輸入法程序得到了。 4 injectKeyEvent跨進程傳遞 injectKeyEvent函數跨進程進行按鍵模擬會出現錯誤:07-25 09:39:31.901: WARN/WindowManager(55): Permission denied: injecting key event from pid 460 uid 10037 to window Window{43e0fe80 com.android.contacts/com.android.contacts.DialtactsActivity paused=false} owned by uid 10001 權限不夠。即使再加上<uses-permission android:name="android.permission.INJECT_EVENTS" />
也依然不行。 結論:Test Instruments 底層調用的injectKeyEvent函數,Test Instruments環境下,injectKeyEvent函數只能給被測試的activity傳遞模擬的按鍵,而Test Instruments的工程在測試時,會調出被測試的activity,傳遞模擬按鍵,在跨進程傳遞時則會出現Permission denied,即使加上權限聲明也依然不行。推測可能是系統級進程和同一進程下才能使用這個API進行按鍵傳遞。 5 把自己的APK放到目標程序的進程中運行,使用injectKeyEvent函數 我們測試使用的android.uid.phone,也就是撥號程序,希望模擬一個按鍵到撥號程序裡。於是在我們的Manifest.xml文件裡添加android:sharedUserId="android.uid.phone",這時候我們在模擬器或者手機上再次安裝,會提示安裝錯誤,簽名不對。於是我們可以用系統簽名的文件對我們的APK程序進行重新簽名。 首先用Eclipse編譯出我們的apk,這個apk是不能安裝的。 用winrar打開我們的apk。 刪掉META-INF下面的兩個簽名文件。 然後用signapk.jar工具重新簽名 首先找到密鑰文件,在我的Android源碼目錄中的位置 是"android2.0\build\target\product\security",下面的platform.pk8和platform.x509.pem兩個文件。 然後用Android提供的Signapk工具來簽名,我寫了一個bat文件@ECHO OFF Echo Auto-sign Created By Dave Da illest 1 Echo Update.apk is now being signed and will be renamed to updated.apk java -jar signapk.jar platform.x509.pem platform.pk8 update.apk updated.apk Echo Signing Complete Pause EXIT
然後將我們刪掉兩個簽名文件的apk拷貝到簽名工具目錄下,修改名字為update.apk,然後使用這個bat文件。會生成updated.apk。我們用winrar打開這個updated.apk文件。 可以看到已經重新簽名完成。 將updated.apk安裝到手機上。 然後經過我們測試,能夠在打電話的界面上模擬按鍵。在模擬器和G2手機上都可以實現。 這也有一個問題,就是這樣生成的程序只有在原始的Android系統或者是自己編譯的系統中才可以用,因為這樣的系統才可以拿到 platform.pk8和platform.x509.pem兩個文件。要是別家公司做的Android上連安裝都安裝不了。 我們測試的環境是HTC G2手機,然後在MOTO的MILESTONE手機上不能安裝,應該是簽名的key不一致。 結論: 由於采用injectKeyEvent不能跨進程,只能放到被模擬按鍵進程中使用被模擬按鍵密鑰簽名後才可以使用。由此可見,要實現在別人程序中發送模擬鍵盤按鍵,需要我們的程序跟別人用相同的簽名,然後使用同一個shareduserid即可。如果要在系統的程序中模擬按鍵,我們只需要獲得系統的簽名的key進行簽名。不同的廠商的Android系統有不同的key。只要獲得這個key就能夠在相對應的程序裡進行按鍵模擬。 Android平台中實現數據存儲的5種方式
這篇文章主要為大家分享了介紹了Android平台中實現數據存儲技術的5種方式,供大家學習,感興趣的小伙伴們可以參考一下 本文介紹Android中的5種數據存儲方式,具體
 Android IMF開發實例(SoftKeyboard)深入剖析
Android IMF(Input Method Framework)是自An
 Android本地化
Android應用程序可以在許多不同地區的許多設備上運行。為了使應用程序更具交互性,應用程序應該處理以適合應用程序將要使用的語言環境方面的文字,數字,文件等。在本章中,我
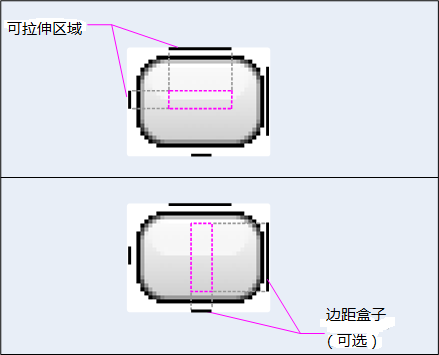 基於App自適應draw9patch不失真背景的方法詳解
這篇文章是android開發人員的必備知識,是我特別為大家整理和總結的,不求完美,但是有用。 1.背景自適應且不失真問題的存在 制作自適應背景圖片是UI開