編輯:Android開發實例
前言
上一篇介紹了Android的TextView控件,這篇博客來說一下EditText控件。EditText為一個文本控件,提供了文本輸入的功能,而且繼承自TextView,可以理解為可以輸入的TextView。因為繼承的關系,很多TextView可以用到的方法,在EditText都可以用到。
TextView
對於TextView,在很多平台上都有用到,最大的用處就是供用戶輸入一些信息,所以主要的方法就兩個:
示例程序
現在通過兩個示例程序,來講解一下EditText的使用。
第一個例子,在EditText中插入表情圖片,無論是開發任何系統,這個都是常用的實現。在編碼之前,需要找到一些表情圖片的資源,我這裡就隨機找了十張圖片,注意資源文件的文件名必須是小寫的,放在/res/drawable文件夾下。這樣在清單文件R中,就可以看到與Drawable資源對於的資源清單ID,對於在清單文件中的資源,可以通過R類訪問,但是訪問到的為一個int類型的資源ID,如果需要訪問詳細內容,需要使用getResource()方法訪問到所有的資源,在其中有特定資源的訪問方法。關於資源清單文件R,以後再進行詳細講解。
在Android中,使用圖片資源會用到一個Bitmap的類,此類代表一個位圖資源,是一個final類,需要使用BitmapFactory類的靜態方法decodeXxx()轉化獲得,此靜態方法有多種重載模式,可以適應不同的資源來源。
下面直接上代碼,對於布局而言,很簡單的只有兩個控件:
- <?xml version="1.0" encoding="utf-8"?>
- <LinearLayout xmlns:android="http://schemas.android.com/apk/res/android"
- android:layout_width="match_parent"
- android:layout_height="match_parent"
- android:orientation="vertical" >
- <EditText
- android:id="@+id/edImage"
- android:layout_width="match_parent"
- android:layout_height="wrap_content"
- android:layout_marginTop="20dp"/>
- <Button
- android:id="@+id/btnInImg"
- android:text="添加表情"
- android:layout_width="match_parent"
- android:layout_height="wrap_content"/>
- </LinearLayout>
實現InImageActivity.java代碼:
- package cn.bgxt.androiduiedittext;
- import java.util.Random;
- import android.app.Activity;
- import android.graphics.Bitmap;
- import android.graphics.BitmapFactory;
- import android.graphics.drawable.Drawable;
- import android.os.Bundle;
- import android.text.Spannable;
- import android.text.SpannableString;
- import android.text.style.ImageSpan;
- import android.view.View;
- import android.widget.Button;
- import android.widget.EditText;
- public class InImageActivity extends Activity {
- private Button btnInImg;
- private EditText edImage;
- //獲取Drawable資源的Id數組
- private final int[] DRAW_IMG_ID=
- {
- R.drawable.image0,
- R.drawable.image1,
- R.drawable.image2,
- R.drawable.image3,
- R.drawable.image4,
- R.drawable.image5,
- R.drawable.image6,
- R.drawable.image7,
- R.drawable.image8,
- R.drawable.image9
- };
- public InImageActivity() {
- // TODO Auto-generated constructor stub
- }
- @Override
- protected void onCreate(Bundle savedInstanceState) {
- super.onCreate(savedInstanceState);
- setContentView(R.layout.edittextinimg_activity);
- btnInImg=(Button)findViewById(R.id.btnInImg);
- edImage=(EditText)findViewById(R.id.edImage);
- btnInImg.setOnClickListener(new View.OnClickListener() {
- @Override
- public void onClick(View v) {
- // 參數一個0-9的隨機數
- int random=new Random().nextInt(9);
- //通過bitmapFactory獲得位圖資源
- Bitmap bit=BitmapFactory.decodeResource(getResources(), DRAW_IMG_ID[random]);
- //一個ImageSpan,用於插入的存放待插入的圖片
- ImageSpan imageSpan=new ImageSpan(InImageActivity.this,bit);
- SpannableString spannableString=new SpannableString("img");
- spannableString.setSpan(imageSpan, 0, 3, Spannable.SPAN_EXCLUSIVE_EXCLUSIVE);
- edImage.append(spannableString);
- }
- });
- }
- }
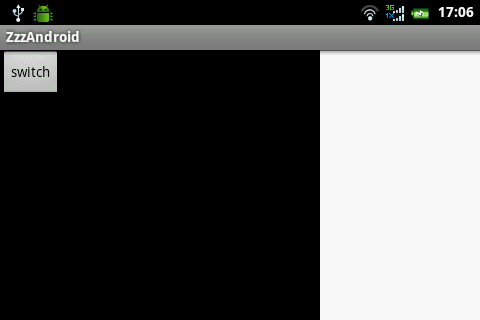
顯示效果,點擊按鈕隨機添加標簽:
既然EditText有主要是用來獲取用戶輸入的信息的,那麼第二個例子就來講講用戶輸入時候內容的驗證吧。在XML Attribute中,有一些屬性可以設置輸入驗證的范圍內容,不過此為TextView類的屬性,因為TextView無法輸入,此處在EditText中講解說明。
以上屬性僅僅是為了限制用戶的輸入,還有一些輸入需要給用戶以提示錯誤信息。這裡將使用到setError()方法,如果設定了錯誤提示信息,會在EditText旁邊以感歎號的形式顯示。
布局代碼:
- <?xml version="1.0" encoding="utf-8"?>
- <LinearLayout xmlns:android="http://schemas.android.com/apk/res/android"
- android:layout_width="match_parent"
- android:layout_height="match_parent"
- android:orientation="vertical" >
- <TextView
- android:layout_width="wrap_content"
- android:layout_height="wrap_content"
- android:text="使用Android:digits屬性(僅輸入數字與abcde)" />
- <EditText
- android:id="@+id/etNum"
- android:layout_width="200dp"
- android:layout_height="wrap_content"
- android:layout_margin="10dp"
- android:digits="123456789abcde"
- />
- <TextView
- android:layout_width="wrap_content"
- android:layout_height="wrap_content"
- android:text="使用Android:inputtype屬性(僅輸入Email)" />
- <EditText
- android:layout_width="200dp"
- android:layout_height="wrap_content"
- android:layout_margin="10dp"
- android:inputType="textPassword"
- />
- <TextView
- android:layout_width="wrap_content"
- android:layout_height="wrap_content"
- android:text="使用Android:inputtype屬性(僅輸入密碼)" />
- <EditText
- android:layout_width="200dp"
- android:layout_height="wrap_content"
- android:layout_margin="10dp"
- android:numeric="decimal|signed"
- />
- <Button
- android:id="@+id/btnValidation"
- android:text="驗證第一個輸入框是否為123"
- android:layout_width="wrap_content"
- android:layout_height="wrap_content"/>
- </LinearLayout>
Java代碼:
- package cn.bgxt.androiduiedittext;
- import android.app.Activity;
- import android.os.Bundle;
- import android.view.View;
- import android.widget.Button;
- import android.widget.EditText;
- public class EditValidationActivity extends Activity {
- private Button btnValidation;
- private EditText etNum;
- public EditValidationActivity() {
- // TODO Auto-generated constructor stub
- }
- @Override
- protected void onCreate(Bundle savedInstanceState) {
- // TODO Auto-generated method stub
- super.onCreate(savedInstanceState);
- setContentView(R.layout.editvalidation_activity);
- btnValidation=(Button)findViewById(R.id.btnValidation);
- etNum=(EditText)findViewById(R.id.etNum);
- btnValidation.setOnClickListener(new View.OnClickListener() {
- @Override
- public void onClick(View v) {
- // TODO Auto-generated method stub
- String num=etNum.getText().toString().trim();
- if(!num.equals("123"))
- {
- etNum.setError("請輸入123");
- }
- }
- });
- }
- }
效果展示:
如果點擊驗證按鈕,而第一個文本框輸入的不是123,則提示錯誤信息:
示例代碼下載
總結
以上就講解了EditText在實際項目中常用的效果,雖然大部分使用的是TextView的屬性設置的效果,但是Android下還有一些其他的供用戶輸入的控件,可以使用,所以才以這樣的繼承結構實現屬性。
 Android
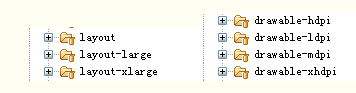
1.盡量使用線性布局(LinearLayout)和相對布局(RelativeLayout),不要使用絕對布局。 2.盡量使用dip和sp,不要使用px。 3.為不
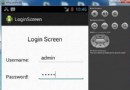 Android登錄實例
登錄應用程序的屏幕,詢問憑據登錄到一些特定的應用。可能需要登錄到Facebook,微博等本章介紹了,如何創建一個登錄界面,以及如何管理安全問題和錯誤嘗試。首先,必須定義兩
 Android本地化
Android應用程序可以在許多不同地區的許多設備上運行。為了使應用程序更具交互性,應用程序應該處理以適合應用程序將要使用的語言環境方面的文字,數字,文件等。在本章中,我
 Android之PreferenceActivity應用詳解(2)
看到很多書中都沒有對PreferenceActivity做介紹,而我正好又在項目中用到,所以就把自己的使用的在這總結一下,也方便日後查找。 PerferenceA