編輯:Android開發實例
前言
這篇講解一下Android平台下,RadioButton、CheckBox以及ToggleButton三個控件的用法,因為這三個控件之中都存在一個選中或是沒選中的狀態,所以放在一起講解。
這三個控件均是從Button之中間接繼承而來的,所以一些Button中的設置都是通用的,如圖文混排,動態修改顯示內容,因為之前已經對這些內容進行了說明,如果不清楚朋友可以參見一下另外一篇,http://www.fengfly.com/plus/view-213380-1.html,所以這篇只是就這三個控件的常用方法進行簡要說明,並給出示例。
CompoundButton
RadioButton(單選按鈕)、CheckBox(復選按鈕)、ToggleButton(開關按鈕)都繼承自android.widget.CompoundButton類,而CompoundButton又繼承自Button類,在這個類中封裝了一個checked屬性,用於判斷是否被選中,這也是它與Button的不同,對其進行了擴展,這個屬性在這三個控件中的用法是一樣的。
一般checked屬性通過以下方式來設置與獲取:
RadioButton
RadioButton,為一個單選按鈕,一般配合RadioGroup一起使用,在同一RadioGroup內,所有的RadioButton的選中狀態為互斥,它們有且只有一個RadioButton被選中,但是在不同的RadioGroup中是不相互影響的。
下面通過一個簡單的示例來說明一下,在示例中會存在兩個RadioButton,用於定義性別信息,當用戶選中了某個後,點擊按鈕,把選中的信息提示到屏幕上。
布局代碼:
- <?xml version="1.0" encoding="utf-8"?>
- <LinearLayout xmlns:android="http://schemas.android.com/apk/res/android"
- android:layout_width="match_parent"
- android:layout_height="match_parent"
- android:orientation="vertical" >
- <TextView
- android:layout_width="fill_parent"
- android:layout_height="wrap_content"
- android:text="Gender:" />
- <!-- 定義一個RadioGroup用於包裝RadioButton -->
- <RadioGroup
- android:id="@+id/gender"
- android:layout_width="wrap_content"
- android:layout_height="wrap_content" >
- <RadioButton
- android:layout_width="wrap_content"
- android:layout_height="wrap_content"
- android:text="male" />
- <RadioButton
- android:layout_width="wrap_content"
- android:layout_height="wrap_content"
- android:text="female" />
- </RadioGroup>
- <Button
- android:id="@+id/btnGender"
- android:layout_width="fill_parent"
- android:layout_height="wrap_content"
- android:text="選擇性別" />
- </LinearLayout>
實現代碼:
- package com.example.changebutton;
- import android.app.Activity;
- import android.os.Bundle;
- import android.view.View;
- import android.widget.Button;
- import android.widget.RadioButton;
- import android.widget.RadioGroup;
- import android.widget.Toast;
- public class RadioButtonActivity extends Activity {
- private RadioGroup group;
- private Button btnGender;
- @Override
- protected void onCreate(Bundle savedInstanceState) {
- // TODO Auto-generated method stub
- super.onCreate(savedInstanceState);
- setContentView(R.layout.radiobutton_layout);
- group = (RadioGroup) findViewById(R.id.gender);
- btnGender = (Button) findViewById(R.id.btnGender);
- btnGender.setOnClickListener(new View.OnClickListener() {
- @Override
- public void onClick(View v) {
- // 獲取單選按鈕的選項個數
- int len = group.getChildCount();
- String msgString = "";
- for (int i = 0; i < len; i++) {
- //RadioGroup中包含的子View就是一個RadioButton
- RadioButton radiobutton = (RadioButton) group.getChildAt(i);
- if (radiobutton.isChecked()) {
- //如果被選中,則break循環,並且記錄選中信息
- msgString = "You choose to be a "
- + radiobutton.getText().toString();
- break;
- }
- }
- if (msgString.equals("")) {
- Toast.makeText(RadioButtonActivity.this,
- "Please select a gender!", Toast.LENGTH_SHORT)
- .show();
- } else {
- Toast.makeText(RadioButtonActivity.this, msgString,
- Toast.LENGTH_SHORT).show();
- }
- }
- });
- }
- }
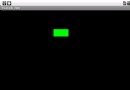
實現效果:
CheckBox
CheckBox是一個復選按鈕,它的用法與RadioButton很像,但是與之不同的是,它可以多選,所以也無需用一個組控件包裹起來。
這裡涉及了一動態添加UI控件的知識,在Android中動態增加控件一般有兩種方式:
這裡通過一個示例來說明CheckBox的使用,在示例中動態添加了CheckBox的選項,並且對其進行選中之後提示選中信息。上面兩種方式都用用到,通過一個chooseMethod(boolean)區分。
布局代碼:
- <?xml version="1.0" encoding="utf-8"?>
- <LinearLayout xmlns:android="http://schemas.android.com/apk/res/android"
- android:layout_width="match_parent"
- android:layout_height="match_parent"
- android:orientation="vertical"
- android:id="@+id/checkLayout">
- <!-- 這裡只是定義了一個按鈕,其他的CheckBox控件在代碼中動態添加 -->
- <Button
- android:id="@+id/checkBtn"
- android:layout_width="fill_parent"
- android:layout_height="wrap_content"
- android:text="確定" />
- </LinearLayout>
如果使用動態填充的方式獲取CheckBox的話,需要添加一個CheckBox的XML文件,代碼如下:
- <?xml version="1.0" encoding="utf-8"?>
- <CheckBox xmlns:android="http://schemas.android.com/apk/res/android"
- android:layout_width="match_parent"
- android:layout_height="wrap_content" >
- </CheckBox>
實現代碼:
- package com.example.changebutton;
- import java.util.ArrayList;
- import java.util.List;
- import android.app.Activity;
- import android.app.AlertDialog;
- import android.os.Bundle;
- import android.view.View;
- import android.view.View.OnClickListener;
- import android.widget.Button;
- import android.widget.CheckBox;
- import android.widget.LinearLayout;
- public class CheckBoxActivity extends Activity implements OnClickListener {
- private List<CheckBox> checkBoxs = new ArrayList<CheckBox>();
- private Button checkBtn;
- @Override
- protected void onCreate(Bundle savedInstanceState) {
- super.onCreate(savedInstanceState);
- chooseMethod(false);
- checkBtn = (Button) findViewById(R.id.checkBtn);
- checkBtn.setOnClickListener(this);
- }
- @Override
- public void onClick(View v) {
- String s = "";
- //循環cheackBoxs
- for (CheckBox c : checkBoxs) {
- if (c.isChecked()) {
- //如果選中就添加選中結果到msg中。
- s += c.getText() + "\n";
- }
- }
- if ("".equals(s)) {
- s = "您沒有選中選項!";
- }
- //使用對話框彈出選中的信息
- new AlertDialog.Builder(this).setMessage(s)
- .setPositiveButton("Exit", null).show();
- }
- private void chooseMethod(boolean b) {
- String[] checkboxText = new String[] { "You are student?",
- "Do you like Android?", "Do you have a girlfriend",
- "Do you like online shopping?" };
- if (b) {
- //使用本文中提到的第一種方式,通過Id動態加載
- setContentView(R.layout.checkbox_layout);
- //獲取帶填充的布局控件
- LinearLayout linearLayout = (LinearLayout) this
- .findViewById(R.id.checkLayout);
- //根據數組,循環添加內容
- for (int i = 0; i < checkboxText.length; i++) {
- CheckBox checkbox = new CheckBox(this);
- checkBoxs.add(checkbox);
- checkBoxs.get(i).setText(checkboxText[i]);
- //把CheckBox加入到布局控件中
- linearLayout.addView(checkbox);
- }
- } else {
- //通過動態填充的方式,找到布局文件
- LinearLayout linearLayout = (LinearLayout) getLayoutInflater()
- .inflate(R.layout.checkbox_layout, null);
- for (int i = 0; i < checkboxText.length; i++) {
- //在通過動態填充的方式找到CheckBox的文件
- CheckBox checkbox = (CheckBox) getLayoutInflater().inflate(
- R.layout.cheackbox, null);
- checkBoxs.add(checkbox);
- checkBoxs.get(i).setText(checkboxText[i]);
- linearLayout.addView(checkbox);
- }
- //最後把這個布局文件加載顯示
- setContentView(linearLayout);
- }
- }
- }
實現效果
ToggleButton
ToggleButton,一個開關按鈕,有兩個狀態,大抵的用法與上面兩個控件一直,可以通過兩個屬性顯示不同狀態時,控件內顯示文字的內容不同,屬性如下:
ToggleButton,這個控件有一個OnCheckedChangeListener()事件,當開關的狀態切換的時候會被觸發,其中需要傳遞一個OnCheckedChangeListener接口的實現內,當被切換時,觸發其中的onCheckedChange()方法,可以在其中寫需要實現的功能代碼。
下面通過一個示例講解一下ToggleButton的使用,使用一個toggleButton控件,控制一個LinearLayout的布局排列方式。
布局代碼:
- <?xml version="1.0" encoding="utf-8"?>
- <LinearLayout xmlns:android="http://schemas.android.com/apk/res/android"
- android:layout_width="match_parent"
- android:layout_height="match_parent"
- android:orientation="vertical" >
- <ToggleButton
- android:id="@+id/togBtn"
- android:layout_width="wrap_content"
- android:layout_height="wrap_content"
- android:checked="true"
- android:textOff="橫向排列"
- android:textOn="縱向排列" />
- <LinearLayout
- android:id="@+id/OriLayout"
- android:layout_width="match_parent"
- android:layout_height="match_parent"
- android:orientation="vertical" >
- <Button
- android:layout_width="wrap_content"
- android:layout_height="wrap_content"
- android:text="btn1" />
- <Button
- android:layout_width="wrap_content"
- android:layout_height="wrap_content"
- android:text="btn2" />
- <Button
- android:layout_width="wrap_content"
- android:layout_height="wrap_content"
- android:text="btn3" />
- </LinearLayout>
- </LinearLayout>
實現代碼:
- package com.example.changebutton;
- import android.app.Activity;
- import android.os.Bundle;
- import android.widget.CompoundButton;
- import android.widget.CompoundButton.OnCheckedChangeListener;
- import android.widget.LinearLayout;
- import android.widget.ToggleButton;
- public class ToggleButtonActivity extends Activity {
- private ToggleButton togBtn;
- private LinearLayout linearLayout;
- @Override
- protected void onCreate(Bundle savedInstanceState) {
- // TODO Auto-generated method stub
- super.onCreate(savedInstanceState);
- setContentView(R.layout.toggle_layout);
- togBtn = (ToggleButton) findViewById(R.id.togBtn);
- linearLayout = (LinearLayout) this.findViewById(R.id.OriLayout);
- togBtn.setOnCheckedChangeListener(new OnCheckedChangeListener() {
- @Override
- public void onCheckedChanged(CompoundButton buttonView,
- boolean isChecked) {
- //通過判斷是否選中,來設置LinearLayout的橫向縱向排列
- if (isChecked) {
- linearLayout.setOrientation(1);
- } else {
- linearLayout.setOrientation(0);
- }
- }
- });
- }
- }
實現效果:
示例代碼下載
總結
以上就講解了一下CompoundButton抽象類下的三個實現控件類的使用,在Android-4.0之後,又新加入了一個控件Switch,對它的使用與之上介紹的三個控件類似,這裡就不再詳細講解了。
 Android MediaPlayer(多媒體播放)
Android提供了許多方法來控制播放的音頻/視頻文件和流。其中該方法是通過一類稱為MediaPlayer。Android是提供MediaPlayer類訪問內置的媒體播放
 Chronometer控件實現的Android計時器
本文為大家演示了如何使用Chronometer控件實現Android計時器的實
 Android實現獲取SD卡總容量,可用大小,機身內存總容量及可用大小的方法
本文實例講述了Android實現獲取SD卡總容量,可用大小,機身內存總容量及可用大小的方法。分享給大家供大家參考,具體如下: 可能有的同學不知道系統已經提供了獲取
 Android JSON解析器
JSON代表JavaScript對象符號。它是一個獨立的數據交換格式,是XML的最佳替代品。本章介紹了如何解析JSON文件,並從中提取所需的信息。Android提供了四個