由於一個項目的需要,我研究了一下android的網絡通信方式,大體和java平台的很相似!

android平台也提供了很多的API供開發者使用,請按示例圖:
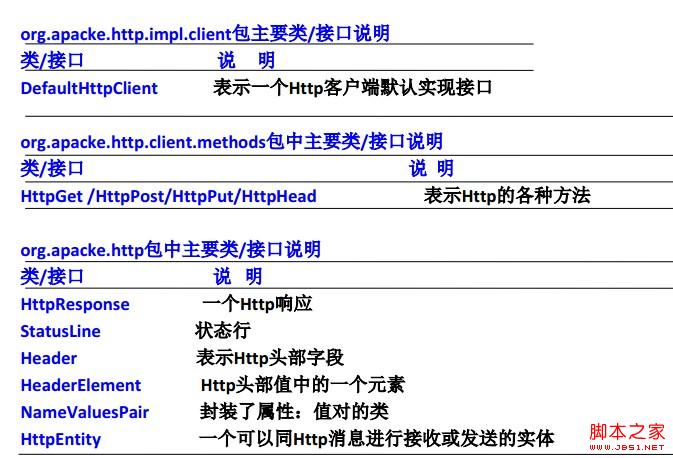
首先,介紹一下通過http包工具進行通信,分get和post兩種方式,兩者的區別是:
1,post請求發送數據到服務器端,而且數據放在html header中一起發送到服務器url,數據對用戶不可見,get請求是把參數值加到url的隊列中,這在一定程度上,體現出post的安全性要比get高
2,get傳送的數據量小,一般不能大於2kb,post傳送的數據量大,一般默認為不受限制。
訪問網絡要加入權限 <uses-permission android:name="android.permission.INTERNET" />
下面是get請求HttpGet時的示例代碼:
代碼如下:
View Code
// 創建DefaultHttpClient對象
HttpClient httpClient = new DefaultHttpClient();
// 創建一個HttpGet對象
HttpGet get = new HttpGet(
"http://192.168.1.88:8888/foo/secret.jsp");
try
{
// 發送GET請求
HttpResponse httpResponse = httpClient.execute(get);
HttpEntity entity = httpResponse.getEntity();
if (entity != null)
{
// 讀取服務器響應
BufferedReader br = new BufferedReader(
new InputStreamReader(entity.getContent()));
String line = null;
response.setText("");
while ((line = br.readLine()) != null)
{
// 使用response文本框顯示服務器響應
response.append(line + "\n");
}
}
}
catch (Exception e)
{
e.printStackTrace();
}
}
post請求HttpPost的示例代碼:
代碼如下:
View Code
HttpClient httpClient=new DefaultHttpClient();
HttpPost post = new HttpPost(
"http://192.168.1.88:8888/foo/login.jsp");
// 如果傳遞參數個數比較多的話可以對傳遞的參數進行封裝
List<NameValuePair> params = new ArrayList<NameValuePair>();
params.add(new BasicNameValuePair("name", name));
params.add(new BasicNameValuePair("pass", pass));
try
{
// 設置請求參數
post.setEntity(new UrlEncodedFormEntity(
params, HTTP.UTF_8));
// 發送POST請求
HttpResponse response = httpClient
.execute(post);
// 如果服務器成功地返回響應
if (response.getStatusLine()
.getStatusCode() == 200)
{
String msg = EntityUtils
.toString(response.getEntity());
// 提示登錄成功
Toast.makeText(HttpClientTest.this,
msg, 5000).show();
}
}
catch (Exception e)
{
e.printStackTrace();
}
}
其次,介紹一下,使用java包的工具進行通信,也分get和post方式
默認使用get方式,示例代碼:
代碼如下:
View Code
try
{
String urlName = url + "?" + params;
URL realUrl = new URL(urlName);
// 打開和URL之間的連接或者HttpUrlConnection
URLConnection conn =realUrl.openConnection();
// 設置通用的請求屬性
conn.setRequestProperty("accept", "*/*");
conn.setRequestProperty("connection", "Keep-Alive");
conn.setRequestProperty("user-agent",
"Mozilla/4.0 (compatible; MSIE 6.0; Windows NT 5.1; SV1)");
// 建立實際的連接
conn.connect();
// 獲取所有響應頭字段
Map<String, List<String>> map = conn.getHeaderFields();
// 遍歷所有的響應頭字段
for (String key : map.keySet())
{
System.out.println(key + "--->" + map.get(key));
}
// 定義BufferedReader輸入流來讀取URL的響應
in = new BufferedReader(
new InputStreamReader(conn.getInputStream()));
String line;
while ((line = in.readLine()) != null)
{
result += "\n" + line;
}
}
catch (Exception e)
{
System.out.println("發送GET請求出現異常!" + e);
e.printStackTrace();
}
// 使用finally塊來關閉輸入流
使用post的示例代碼:
代碼如下:
View Code
try
{
URL realUrl = new URL(url);
// 打開和URL之間的連接
URLConnection conn = realUrl.openConnection();
// 設置通用的請求屬性
conn.setRequestProperty("accept", "*/*");
conn.setRequestProperty("connection", "Keep-Alive");
conn.setRequestProperty("user-agent",
"Mozilla/4.0 (compatible; MSIE 6.0; Windows NT 5.1; SV1)");
// 發送POST請求必須設置如下兩行
conn.setDoOutput(true);
conn.setDoInput(true);
// 獲取URLConnection對象對應的輸出流
out = new PrintWriter(conn.getOutputStream());
// 發送請求參數
out.print(params);
// flush輸出流的緩沖
out.flush();
// 定義BufferedReader輸入流來讀取URL的響應
in = new BufferedReader(
new InputStreamReader(conn.getInputStream()));
String line;
while ((line = in.readLine()) != null)
{
result += "\n" + line;
}
}
catch (Exception e)
{
System.out.println("發送POST請求出現異常!" + e);
e.printStackTrace();
}
從以上知,get請求只需要conn.connect(),post請求時,必須設置 conn.setDoOutput(true),conn.setDoinput(true),還必須獲取URLConnection的輸出流getOutputStream()
最後,使用套接字(soket)進行通信分為兩種形式:面向連接的(tcp)和無連接的(udp 數據報)
tcp連接示例:
代碼如下:
View Code
//服務器端
//創建一個ServerSocket,用於監聽客戶端Socket的連接請求
ServerSocket ss = new ServerSocket(30000);
//采用循環不斷接受來自客戶端的請求
while (true)
{
//每當接受到客戶端Socket的請求,服務器端也對應產生一個Socket
Socket s = ss.accept();
OutputStream os = s.getOutputStream();
os.write("您好,您收到了服務器的消息!\n"
.getBytes("utf-8"));
//關閉輸出流,關閉Socket
os.close();
s.close();
}
//客戶端
Socket socket = new Socket("192.168.1.88" , 30000);
//將Socket對應的輸入流包裝成BufferedReader
BufferedReader br = new BufferedReader(
new InputStreamReader(socket.getInputStream()));
//進行普通IO操作
String line = br.readLine();
show.setText("來自服務器的數據:" + line);
br.close();
socket.close();
udp連接示例:
代碼如下:
View Code
服務器端:
try {
//創建一個DatagramSocket對象,並指定監聽的端口號
DatagramSocket socket = new DatagramSocket(4567);
byte data [] = new byte[1024];
//創建一個空的DatagramPacket對象
DatagramPacket packet = new DatagramPacket(data,data.length);
//使用receive方法接收客戶端所發送的數據
socket.receive(packet);
String result = new String(packet.getData(),packet.getOffset(),packet.getLength());
System.out.println("result--->" + result);
} catch (Exception e) {
// TODO Auto-generated catch block
e.printStackTrace();
客戶端:
try {
//首先創建一個DatagramSocket對象
DatagramSocket socket = new DatagramSocket(4567);
//創建一個InetAddree
InetAddress serverAddress = InetAddress.getByName("192.168.1.104");
String str = "hello";
byte data [] = str.getBytes();
//創建一個DatagramPacket對象,並指定要講這個數據包發送到網絡當中的哪個地址,以及端口號
DatagramPacket packet = new DatagramPacket(data,data.length,serverAddress,4567);
//調用socket對象的send方法,發送數據
socket.send(packet);
} catch (Exception e) {
// TODO Auto-generated catch block
e.printStackTrace();
}
以上,是我的總結,最近正在做一個類似網絡視頻客戶端的作品,如果大家有人做過這方面,歡迎您們提出建議和實現終端和服務器訪問的其他方法。謝謝!
與大家共勉!!!
 Android MediaPlayer(多媒體播放)
 基於Android AppWidgetProvider的使用介紹
 Android JSON解析器
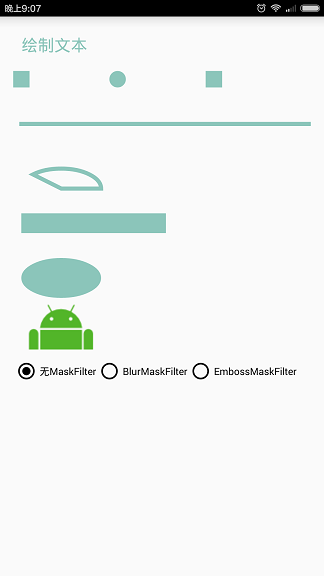 Android Canvas繪圖之MaskFilter圖文詳解(附源碼下載)