Android設備多分辨率的問題 Android浏覽器默認預覽模式浏覽 會縮小頁面 WebView中則會以原始大小顯示
Android浏覽器和WebView默認為mdpi。hdpi相當於mdpi的1.5倍 ldpi相當於0.75倍
三種解決方式:1 viewport屬性 2 CSS控制 3 JS控制
1 viewport屬性放在HTML的<meta>中
Html代碼
代碼如下:
<SPAN> <head>
<title>Exmaple</title>
<metaname=”viewport” content=”width=device-width,user-scalable=no”/>
</head></SPAN>
meta中viewport的屬性如下
Html代碼
代碼如下:
<SPAN> <metaname="viewport"
content="
height = [pixel_value | device-height] ,
width = [pixel_value | device-width ] ,
initial-scale = float_value ,
minimum-scale = float_value ,
maximum-scale = float_value ,
user-scalable = [yes | no] ,
target-densitydpi = [dpi_value | device-dpi |
high-dpi | medium-dpi | low-dpi]
"
/></SPAN>
2 CSS控制設備密度
為每種密度創建獨立的樣式表(注意其中的webkit-device-pixel-ratio 3個數值對應3種分辨率)
Html代碼
代碼如下:
<linkrel="stylesheet"media="screen and (-webkit-device-pixel-ratio: 1.5)"href="hdpi.css"/>
<linkrel="stylesheet"media="screen and (-webkit-device-pixel-ratio: 1.0)"href="mdpi.css"/>
<linkrel="stylesheet"media="screen and (-webkit-device-pixel-ratio: 0.75)"href="ldpi.css"/>
在一個樣式表中,指定不同的樣式
Html代碼
代碼如下:
#header {
<SPAN> </SPAN> background:url(medium-density-image.png);
}
@media screen and (-webkit-device-pixel-ratio: 1.5) {
// CSS for high-density screens
#header {
background:url(high-density-image.png);
}
}
@media screen and (-webkit-device-pixel-ratio: 0.75) {
// CSS for low-density screens
#header {
background:url(low-density-image.png);
}
}
Html代碼
代碼如下:
<metaname="viewport"content="target-densitydpi=device-dpi, width=device-width"/>
[code]
3 JS控制
Android浏覽器和WebView支持查詢當前設別密度的DOM特性
window.devicePixelRatio 同樣值有3個(0.75,1,1.5對應3種分辨率)
JS中查詢設備密度的方法
Js代碼
[code]
if (window.devicePixelRatio == 1.5) {
alert("This is a high-density screen");
} elseif (window.devicePixelRation == 0.75) {
alert("This is a low-density screen");
}
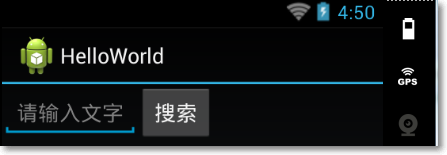
Android中構建HTML5應用 使用WebView控件 與其他控件的使用方法相同 在layout中使用一個<WebView>標簽
WebView不包括導航欄,地址欄等完整浏覽器功能,只用於顯示一個網頁
在WebView中加載Web頁面,使用loadUrl()
Java代碼
代碼如下:
WebView myWebView = (WebView) findViewById(R.id.webview);
myWebView.loadUrl("http://www.example.com");
注意在manifest文件中加入訪問互聯網的權限:
Xml代碼
代碼如下:
<uses-permissionandroid:name="android.permission.INTERNET"/>
在Android中點擊一個鏈接,默認是調用應用程序來啟動,因此WebView需要代為處理這個動作 通過WebViewClient
Java代碼
代碼如下:
//設置WebViewClient
webView.setWebViewClient(new WebViewClient(){
publicboolean shouldOverrideUrlLoading(WebView view, String url) {
view.loadUrl(url);
returntrue;
}
publicvoid onPageFinished(WebView view, String url) {
super.onPageFinished(view, url);
}
publicvoid onPageStarted(WebView view, String url, Bitmap favicon) {
super.onPageStarted(view, url, favicon);
}
});
這個WebViewClient對象是可以自己擴展的,例如
Java代碼
代碼如下:
privateclass MyWebViewClient extends WebViewClient {
publicboolean shouldOverrideUrlLoading(WebView view, String url) {
if (Uri.parse(url).getHost().equals("www.example.com")) {
returnfalse;
}
Intent intent = new Intent(Intent.ACTION_VIEW, Uri.parse(url));
startActivity(intent);
returntrue;
}
}
之後:
Java代碼
代碼如下:
WebView myWebView = (WebView) findViewById(R.id.webview);
myWebView.setWebViewClient(new MyWebViewClient());
另外出於用戶習慣上的考慮 需要將WebView表現得更像一個浏覽器,也就是需要可以回退歷史記錄
因此需要覆蓋系統的回退鍵 goBack,goForward可向前向後浏覽歷史頁面
Java代碼
代碼如下:
publicboolean onKeyDown(int keyCode, KeyEvent event) {
if ((keyCode == KeyEvent.KEYCODE_BACK) && myWebView.canGoBack() {
myWebView.goBack();
returntrue;
}
returnsuper.onKeyDown(keyCode, event);
}
Java代碼
代碼如下:
WebView myWebView = (WebView) findViewById(R.id.webview);
WebSettings webSettings = myWebView.getSettings();
webSettings.setJavaScriptEnabled(true);
(這裡的webSetting用處非常大 可以開啟很多設置 在之後的本地存儲,地理位置等之中都會使用到)
1 在JS中調用Android的函數方法
首先 需要在Android程序中建立接口
Java代碼
代碼如下:
finalclass InJavaScript {
publicvoid runOnAndroidJavaScript(final String str) {
handler.post(new Runnable() {
publicvoid run() {
TextView show = (TextView) findViewById(R.id.textview);
show.setText(str);
}
});
}
}
Java代碼
代碼如下:
//把本類的一個實例添加到js的全局對象window中,
//這樣就可以使用windows.injs來調用它的方法
webView.addJavascriptInterface(new InJavaScript(), "injs");
在JavaScript中調用Js代碼
function sendToAndroid(){
var str = "Cookie call the Android method from js";
windows.injs.runOnAndroidJavaScript(str);//調用android的函數
}
2 在Android中調用JS的方法
在JS中的方法:
Js代碼
代碼如下:
function getFromAndroid(str){
document.getElementByIdx_x_x_x("android").innerHTML=str;
}
在Android調用該方法Java代碼
代碼如下:
Button button = (Button) findViewById(R.id.button);
button.setOnClickListener(new OnClickListener() {
publicvoid onClick(View arg0) {
//調用javascript中的方法
webView.loadUrl("javascript:getFromAndroid('Cookie call the js function from Android')");
}
});
3 Android中處理JS的警告,對話框等 在Android中處理JS的警告,對話框等需要對WebView設置WebChromeClient對象
Java代碼
代碼如下:
//設置WebChromeClient
webView.setWebChromeClient(new WebChromeClient(){
//處理javascript中的alert
publicboolean onJsAlert(WebView view, String url, String message, final JsResult result) {
//構建一個Builder來顯示網頁中的對話框
Builder builder = new Builder(MainActivity.this);
builder.setTitle("Alert");
builder.setMessage(message);
builder.setPositiveButton(android.R.string.ok,
new AlertDialog.OnClickListener() {
publicvoid onClick(DialogInterface dialog, int which) {
result.confirm();
}
});
builder.setCancelable(false);
builder.create();
builder.show();
returntrue;
};
//處理javascript中的confirm
publicboolean onJsConfirm(WebView view, String url, String message, final JsResult result) {
Builder builder = new Builder(MainActivity.this);
builder.setTitle("confirm");
builder.setMessage(message);
builder.setPositiveButton(android.R.string.ok,
new AlertDialog.OnClickListener() {
publicvoid onClick(DialogInterface dialog, int which) {
result.confirm();
}
});
builder.setNegativeButton(android.R.string.cancel,
new DialogInterface.OnClickListener() {
publicvoid onClick(DialogInterface dialog, int which) {
result.cancel();
}
});
builder.setCancelable(false);
builder.create();
builder.show();
returntrue;
};
@Override
//設置網頁加載的進度條
publicvoid onProgressChanged(WebView view, int newProgress) {
MainActivity.this.getWindow().setFeatureInt(Window.FEATURE_PROGRESS, newProgress * 100);
super.onProgressChanged(view, newProgress);
}
//設置應用程序的標題title
publicvoid onReceivedTitle(WebView view, String title) {
MainActivity.this.setTitle(title);
super.onReceivedTitle(view, title);
}
});
Android中的調試 通過JS代碼輸出log信息
Js代碼
Js代碼: console.log("Hello World");
Log信息: Console: Hello World http://www.example.com/hello.html :82
在WebChromeClient中實現onConsoleMesaage()回調方法,讓其在LogCat中打印信息
Java代碼
代碼如下:
WebView myWebView = (WebView) findViewById(R.id.webview);
myWebView.setWebChromeClient(new WebChromeClient() {
publicvoid onConsoleMessage(String message, int lineNumber, String sourceID) {
Log.d("MyApplication", message + " -- From line "
+ lineNumber + " of "
+ sourceID);
}
});
以及Java代碼
代碼如下:
WebView myWebView = (WebView) findViewById(R.id.webview);
myWebView.setWebChromeClient(new WebChromeClient() {
publicboolean onConsoleMessage(ConsoleMessage cm) {
Log.d("MyApplication", cm.message() + " -- From line "
+ cm.lineNumber() + " of "
+ cm.sourceId() );
returntrue;
}
});
*ConsoleMessage 還包括一個 MessageLevel 表示控制台傳遞信息類型。 您可以用messageLevel()查詢信息級別,以確定信息的嚴重程度,然後使用適當的Log方法或采取其他適當的措施。
HTML5本地存儲在Android中的應用 HTML5提供了2種客戶端存儲數據新方法: localStorage 沒有時間限制 sessionStorage 針對一個Session的數據存儲
Js代碼
代碼如下:
<script type="text/javascript">
localStorage.lastname="Smith";
document.write(localStorage.lastname);
</script>
<script type="text/javascript">
sessionStorage.lastname="Smith";
document.write(sessionStorage.lastname);
</script>
WebStorage的API:
Js代碼
代碼如下:
//清空storage
localStorage.clear();
//設置一個鍵值
localStorage.setItem(“yarin”,“yangfegnsheng”);
//獲取一個鍵值
localStorage.getItem(“yarin”);
//獲取指定下標的鍵的名稱(如同Array)
localStorage.key(0);
//return “fresh” //刪除一個鍵值
localStorage.removeItem(“yarin”);
注意一定要在設置中開啟哦
setDomStorageEnabled(true)
在Android中進行操作 Java代碼
//啟用數據庫
webSettings.setDatabaseEnabled(true);
String dir = this.getApplicationContext().getDir("database", Context.MODE_PRIVATE).getPath();
//設置數據庫路徑
webSettings.setDatabasePath(dir);
//使用localStorage則必須打開
webSettings.setDomStorageEnabled(true);
//擴充數據庫的容量(在WebChromeClinet中實現)
publicvoid onExceededDatabaseQuota(String url, String databaseIdentifier, long currentQuota,
long estimatedSize, long totalUsedQuota, WebStorage.QuotaUpdater quotaUpdater) {
quotaUpdater.updateQuota(estimatedSize * 2);
}
在JS中按常規進行數據庫操作 Js代碼
function initDatabase() {
try {
if (!window.openDatabase) {
alert('Databases are not supported by your browser');
} else {
var shortName = 'YARINDB';
var version = '1.0';
var displayName = 'yarin db';
var maxSize = 100000; // in bytes
YARINDB = openDatabase(shortName, version, displayName, maxSize);
createTables();
selectAll();
}
} catch(e) {
if (e == 2) {
// Version mismatch.
console.log("Invalid database version.");
} else {
console.log("Unknown error "+ e +".");
}
return;
}
}
function createTables(){
YARINDB.transaction(
function (transaction) {
transaction.executeSql('CREATE TABLE IF NOT EXISTS yarin(id INTEGER NOT NULL PRIMARY KEY, name TEXT NOT NULL,desc TEXT NOT NULL);', [], nullDataHandler, errorHandler);
}
);
insertData();
}
function insertData(){
YARINDB.transaction(
function (transaction) {
//Starter data when page is initialized
var data = ['1','yarin yang','I am yarin'];
transaction.executeSql("INSERT INTO yarin(id, name, desc) VALUES (?, ?, ?)", [data[0], data[1], data[2]]);
}
);
}
function errorHandler(transaction, error){
if (error.code==1){
// DB Table already exists
} else {
// Error is a human-readable string.
console.log('Oops. Error was '+error.message+' (Code '+error.code+')');
}
returnfalse;
}
function nullDataHandler(){
console.log("SQL Query Succeeded");
}
function selectAll(){
YARINDB.transaction(
function (transaction) {
transaction.executeSql("SELECT * FROM yarin;", [], dataSelectHandler, errorHandler);
}
);
}
function dataSelectHandler(transaction, results){
// Handle the results
for (var i=0; i<results.rows.length; i++) {
var row = results.rows.item(i);
var newFeature = new Object();
newFeature.name = row['name'];
newFeature.decs = row['desc'];
document.getElementByIdx_x_x_x("name").innerHTML="name:"+newFeature.name;
document.getElementByIdx_x_x_x("desc").innerHTML="desc:"+newFeature.decs;
}
}
function updateData(){
YARINDB.transaction(
function (transaction) {
var data = ['fengsheng yang','I am fengsheng'];
transaction.executeSql("UPDATE yarin SET name=?, desc=? WHERE id = 1", [data[0], data[1]]);
}
);
selectAll();
}
function ddeleteTables(){
YARINDB.transaction(
function (transaction) {
transaction.executeSql("DROP TABLE yarin;", [], nullDataHandler, errorHandler);
}
);
console.log("Table 'page_settings' has been dropped.");
}
注意onLoad中的初始化工作
代碼如下:
function initLocalStorage(){
if (window.localStorage) {
textarea.addEventListener("keyup", function() {
window.localStorage["value"] = this.value;
window.localStorage["time"] = new Date().getTime();
}, false);
} else {
alert("LocalStorage are not supported in this browser.");
}
}
window.onload = function() {
initDatabase();
initLocalStorage();
}
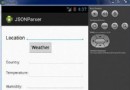
HTML5地理位置服務在Android中的應用 Android中Java代碼
代碼如下:
//啟用地理定位
webSettings.setGeolocationEnabled(true);
//設置定位的數據庫路徑
webSettings.setGeolocationDatabasePath(dir);
//配置權限(同樣在WebChromeClient中實現)
publicvoid onGeolocationPermissionsShowPrompt(String origin,
GeolocationPermissions.Callback callback) {
callback.invoke(origin, true, false);
super.onGeolocationPermissionsShowPrompt(origin, callback);
}
在Manifest中添加權限 Xml代碼
<uses-permissionandroid:name="android.permission.ACCESS_FINE_LOCATION"/>
<uses-permissionandroid:name="android.permission.ACCESS_COARSE_LOCATION"/>
HTML5中 通過navigator.geolocation對象獲取地理位置信息 常用的navigator.geolocation對象有以下三種方法: Js代碼
//獲取當前地理位置
navigator.geolocation.getCurrentPosition(success_callback_function, error_callback_function, position_options)
//持續獲取地理位置
navigator.geolocation.watchPosition(success_callback_function, error_callback_function, position_options)
//清除持續獲取地理位置事件
navigator.geolocation.clearWatch(watch_position_id)
其中success_callback_function為成功之後處理的函數,error_callback_function為失敗之後返回的處理函數,參數position_options是配置項 在JS中的代碼Js代碼
//定位
function get_location() {
if (navigator.geolocation) {
navigator.geolocation.getCurrentPosition(show_map,handle_error,{enableHighAccuracy:false,maximumAge:1000,timeout:15000});
} else {
alert("Your browser does not support HTML5 geoLocation");
}
}
function show_map(position) {
var latitude = position.coords.latitude;
var longitude = position.coords.longitude;
var city = position.coords.city;
//telnet localhost 5554
//geo fix -82.411629 28.054553
//geo fix -121.45356 46.51119 4392
//geo nmea $GPGGA,001431.092,0118.2653,N,10351.1359,E,0,00,,-19.6,M,4.1,M,,0000*5B
document.getElementByIdx_x_x_x("Latitude").innerHTML="latitude:"+latitude;
document.getElementByIdx_x_x_x("Longitude").innerHTML="longitude:"+longitude;
document.getElementByIdx_x_x_x("City").innerHTML="city:"+city;
}
function handle_error(err) {
switch (err.code) {
case 1:
alert("permission denied");
break;
case 2:
alert("the network is down or the position satellites can't be contacted");
break;
case 3:
alert("time out");
break;
default:
alert("unknown error");
break;
}
}
其中position對象包含很多數據 error代碼及選項 可以查看文檔
構建HTML5離線應用 需要提供一個cache manifest文件,理出所有需要在離線狀態下使用的資源
例如Manifest代碼
CACHE MANIFEST
#這是注釋
images/sound-icon.png
images/background.png
clock.html
clock.css
clock.js
NETWORK:
test.cgi
CACHE:
style/default.css
FALLBACK:
/files/projects /projects
在html標簽中聲明 <html manifest="clock.manifest"> HTML5離線應用更新緩存機制 分為手動更新和自動更新2種 自動更新: 在cache manifest文件本身發生變化時更新緩存 資源文件發生變化不會觸發更新 手動更新: 使用window.applicationCache
Js代碼
代碼如下:
if (window.applicationCache.status == window.applicationCache.UPDATEREADY) {
window.applicationCache.update();
}
在線狀態檢測 HTML5 提供了兩種檢測是否在線的方式:navigator.online(true/false) 和 online/offline事件。在Android中構建離線應用Java代碼
//開啟應用程序緩存
webSettingssetAppCacheEnabled(true);
String dir = this.getApplicationContext().getDir("cache", Context.MODE_PRIVATE).getPath();
//設置應用緩存的路徑
webSettings.setAppCachePath(dir);
//設置緩存的模式
webSettings.setCacheMode(WebSettings.LOAD_DEFAULT);
//設置應用緩存的最大尺寸
webSettings.setAppCacheMaxSize(1024*1024*8);
//擴充緩存的容量
publicvoid onReachedMaxAppCacheSize(long spaceNeeded,
long totalUsedQuota, WebStorage.QuotaUpdater quotaUpdater) {
quotaUpdater.updateQuota(spaceNeeded * 2);
}
 Android開發自學筆記(四):APP布局下
 Android登錄實例
 Android提高之BroadcastReceiver實例詳解
 Android ApiDemo示例解讀系列之四:App