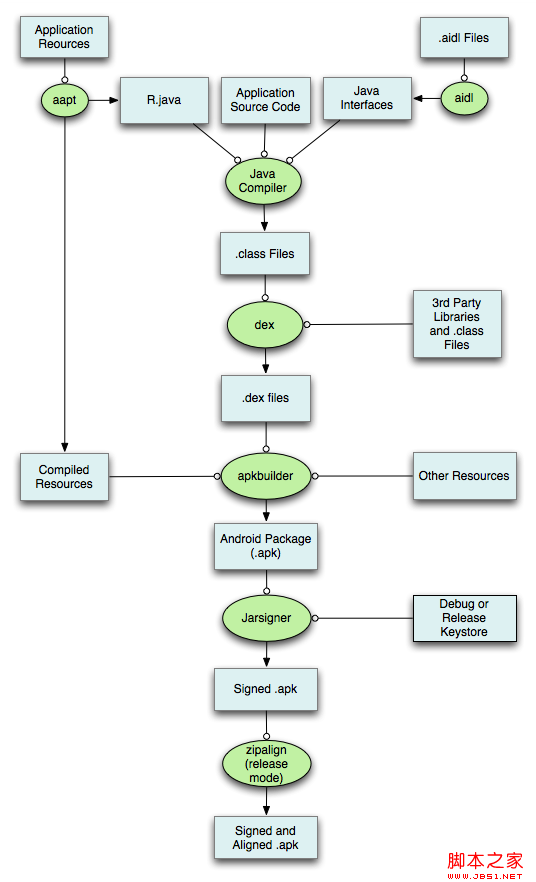
本文使用Matrix實現Android實現圖片縮放與旋轉。示例代碼如下:
代碼如下:
package com.android.matrix;
import android.app.Activity;
import android.graphics.Bitmap;
import android.graphics.BitmapFactory;
import android.graphics.Matrix;
import android.graphics.drawable.BitmapDrawable;
import android.os.Bundle;
import android.view.ViewGroup.LayoutParams;
import android.widget.ImageView;
import android.widget.LinearLayout;
import android.widget.ImageView.ScaleType;
/**
* Android實現圖片縮放與旋轉。
* @author Administrator
*
*/
public class MatixActivity extends Activity {
public void onCreate(Bundle icicle) {
super.onCreate(icicle);
setTitle("Android實現圖片縮放與旋轉。");
LinearLayout linLayout = new LinearLayout(this);
//加載需要操作的圖片,這裡是一張圖片
Bitmap bitmapOrg = BitmapFactory.decodeResource(getResources(),R.drawable.r);
//獲取這個圖片的寬和高
int width = bitmapOrg.getWidth();
int height = bitmapOrg.getHeight();
//定義預轉換成的圖片的寬度和高度
int newWidth = 200;
int newHeight = 200;
//計算縮放率,新尺寸除原始尺寸
float scaleWidth = ((float) newWidth) / width;
float scaleHeight = ((float) newHeight) / height;
// 創建操作圖片用的matrix對象
Matrix matrix = new Matrix();
// 縮放圖片動作
matrix.postScale(scaleWidth, scaleHeight);
//旋轉圖片 動作
matrix.postRotate(45);
// 創建新的圖片
Bitmap resizedBitmap = Bitmap.createBitmap(bitmapOrg, 0, 0,
width, height, matrix, true);
//將上面創建的Bitmap轉換成Drawable對象,使得其可以使用在ImageView, ImageButton中
BitmapDrawable bmd = new BitmapDrawable(resizedBitmap);
//創建一個ImageView
ImageView imageView = new ImageView(this);
// 設置ImageView的圖片為上面轉換的圖片
imageView.setImageDrawable(bmd);
//將圖片居中顯示
imageView.setScaleType(ScaleType.CENTER);
//將ImageView添加到布局模板中
linLayout.addView(imageView,
new LinearLayout.LayoutParams(
LayoutParams.FILL_PARENT, LayoutParams.FILL_PARENT
)
);
// 設置為本activity的模板
setContentView(linLayout);
}
}
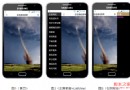
上例是靜態地實現圖片縮放,下例中可以通過鼠標滑輪和方向鍵實現圖片動態的放大與縮小。
程序結構如下圖:
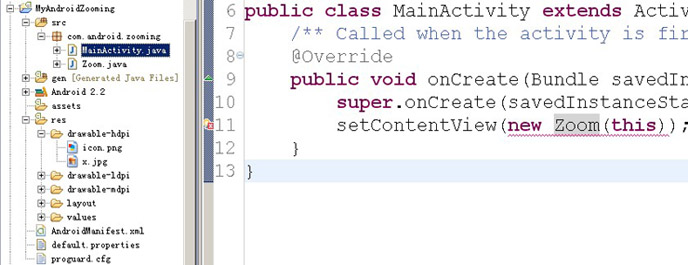 Zoom.java文件中代碼:
代碼如下:
package com.android.zooming;
import android.view.View;
import android.content.Context;
import android.graphics.Canvas;
import android.graphics.drawable.Drawable;
import android.view.KeyEvent;
public class Zoom extends View {
private Drawable image;
private int zoomControler=20;
public Zoom(Context context){
super(context);
image=context.getResources().getDrawable(R.drawable.x);
setFocusable(true);
}
@Override
protected void onDraw(Canvas canvas) {
// TODO Auto-generated method stub
super.onDraw(canvas);
//控制圖像的寬度和高度
image.setBounds((getWidth()/2)-zoomControler, (getHeight()/2)-zoomControler, (getWidth()/2)+zoomControler, (getHeight()/2)+zoomControler);
image.draw(canvas);
}
@Override
public boolean onKeyDown(int keyCode, KeyEvent event) {
if(keyCode==KeyEvent.KEYCODE_DPAD_UP)//放大
zoomControler+=10;
if(keyCode==KeyEvent.KEYCODE_DPAD_DOWN) //縮小
zoomControler-=10;
if(zoomControler<10)
zoomControler=10;
invalidate();
return true;
}
}
 Facebook Android閃光效果開源庫shimmer的用法
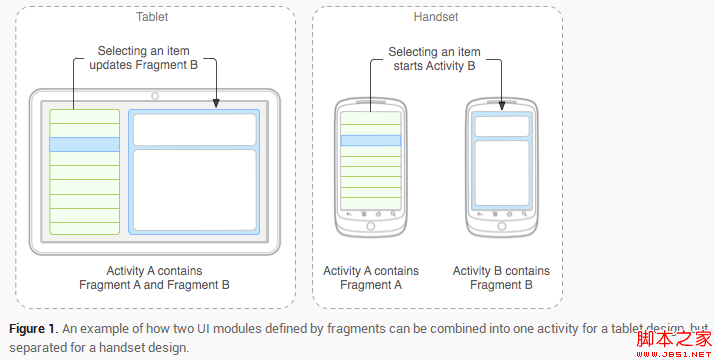 Android Fragment 基本了解(圖文介紹)
 Android 組件樣式定制方法詳解
 Android本地化