編輯:Android開發實例
本文實例講述了Android編程中TextView寬度過大導致Drawable無法居中問題解決方法。分享給大家供大家參考,具體如下:
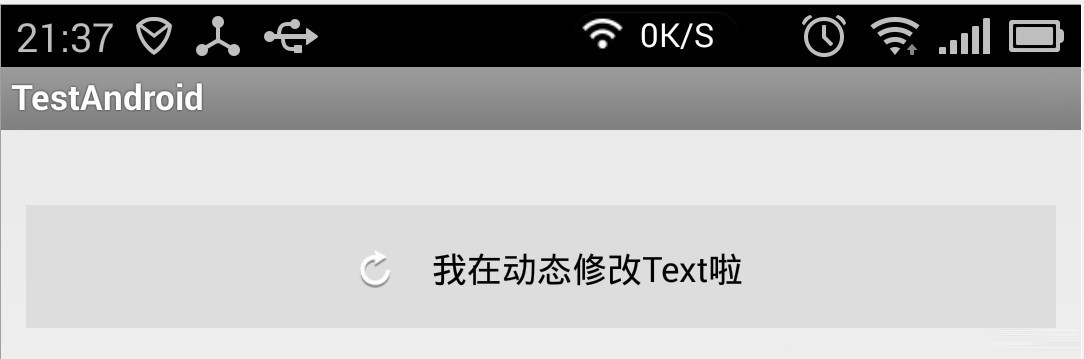
在做項目的時候,很多時候我們都要用到文字和圖片一起顯示,一般設置TextView的DrawableLeft、DrawableRight、DrawableTop、DrawableBottom就行了。但是有一種情況是當TextView的熟悉是fill_parent或者使用權重的時候並且設置了起Gravity的ceter的時候,Drawable圖片是無法一起居中的,為了解決其,我們一般再套一層布局,然後設置TextView的熟悉是wrap_content,但是有時候嵌套過多的布局的時候,有可能發生StackOverFlow,所以必須要優化,下面說一下其中的一個解決方案。先上圖
這個解決方案很粗糙,局限性很大,文字不能換行,換行之後就不准了,下面是源碼:
package com.example.testandroid;
import java.lang.ref.WeakReference;
import android.content.Context;
import android.graphics.Bitmap;
import android.graphics.BitmapFactory;
import android.graphics.Canvas;
import android.graphics.Color;
import android.graphics.Rect;
import android.util.AttributeSet;
import android.view.MotionEvent;
import android.widget.TextView;
public class DrawableTextView extends TextView {
 private WeakReference<Bitmap> normalReference;
 private WeakReference<Bitmap> pressReference;
 private WeakReference<Bitmap> showReference;
 private int normalColor = Color.WHITE, pressColor = Color.WHITE;
 private String text;
 private int textWidth = 0;
 private int textHeight = 0;
 public DrawableTextView(Context context) {
  super(context);
 }
 public DrawableTextView(Context context, AttributeSet attrs) {
  super(context, attrs);
 }
 public DrawableTextView(Context context, AttributeSet attrs, int defStyle) {
  super(context, attrs, defStyle);
 }
 @Override
 protected void onFinishInflate() {
  super.onFinishInflate();
  initText();
 }
 private void initText() {
  text = super.getText().toString();
  initVariable();
 }
 /**
  * 初始化,測量Textview內容的長度,高度
  */
 private void initVariable() {
  textWidth = (int) (getPaint().measureText(text));
  final Rect rect = new Rect();
  getPaint().getTextBounds(text, 0, 1, rect);
  textHeight = rect.height();
 }
 /**
  * 設置TextView的內容
  * @param text
  */
 public void setText(String text) {
  this.text = text;
  initVariable();
  invalidate();
 }
 /**
  * 獲取TextView內容
  */
 public String getText() {
  return text;
 }
 /**
  * 設置TextView的Drawable內容,目前僅支持DrawableLeft
  * @param normalDrawableId
  *    DrawableLeft的normal狀態Id
  * @param pressDrawableId
  *    DrawableLeft的press狀態的Id(沒有press狀態,請傳-1)
  */
 public void setDrawableLeftId(final int normalDrawableId, final int pressDrawableId) {
  normalReference = new WeakReference<Bitmap>(BitmapFactory.decodeResource(getResources(), normalDrawableId));
  if (pressDrawableId != -1) {
   pressReference = new WeakReference<Bitmap>(BitmapFactory.decodeResource(getResources(), pressDrawableId));
  }
  showReference = normalReference;
  invalidate();
 }
 /**
  * 設置TextView的Color
  * @param normalColor
  *    TextView normal狀態的Color值
  * @param pressDrawableId
  *    TextView press狀態的Color值(如果沒有press狀態,請傳與normal狀態的值)
  */
 public void setTextColor(final int normalColor, final int pressColor) {
  this.normalColor = normalColor;
  this.pressColor = pressColor;
  getPaint().setColor(normalColor);
  initVariable();
 }
 @Override
 protected void onDraw(Canvas canvas) {
  if (showReference != null && showReference.get() != null) {
   final int bitmapWidth = showReference.get().getWidth();
   final int bitmapHeight = showReference.get().getHeight();
   final int viewHeight = getHeight();
   final int drawablePadding = getCompoundDrawablePadding();
   final int start = (getWidth() - (bitmapWidth + drawablePadding + textWidth)) >> 1;
   canvas.drawBitmap(showReference.get(), start, (viewHeight >> 1) - (bitmapHeight >> 1), getPaint());
   /**
    * 注意改方法,第三個參數y,本人也被誤導了好久,原來在畫文字的時候,y表示文字最後的位置(不是下筆點的起始位置)
    * 所以為什麼 是TextView高度的一半(中間位置) + 文字高度的一半 = 文字居中
    */
   canvas.drawText(text, start + drawablePadding + bitmapWidth, (viewHeight >> 1) + (textHeight >> 1), getPaint());
  }
 }
 @Override
 public boolean onTouchEvent(MotionEvent event) {
  if (event.getAction() == MotionEvent.ACTION_DOWN) {
   if (pressReference != null && pressReference.get() != null) {
    showReference = pressReference;
   }
   getPaint().setColor(pressColor);
  } else if (event.getAction() == MotionEvent.ACTION_UP) {
   if (normalReference != null && normalReference.get() != null) {
    showReference = normalReference;
   }
   getPaint().setColor(normalColor);
  }
  invalidate();
  return super.onTouchEvent(event);
 }
}
xml布局:
<com.example.testandroid.DrawableTextView
android:id="@+id/my_textview"
android:layout_width="fill_parent"
android:layout_marginTop="20dp"
android:background="@drawable/text_selector"
android:drawablePadding="8dp"
android:textColor="@color/standard_orange"
android:layout_height="wrap_content"
android:padding="15dp"
android:textSize="16sp"
android:text="有Drawable的TextView" />
調用代碼:
DrawableTextView drawableTextView = (DrawableTextView) getView().findViewById(R.id.my_textview);
drawableTextView.setDrawableLeftId(R.drawable.bg_btn_delete_normal, R.drawable.bg_btn_delete_pressed);
drawableTextView.setTextColor(getResources().getColor(R.color.standard_orange), getResources().getColor(R.color.standard_white));
drawableTextView.setText("我在動態修改Text啦");
其實還有更加方便的方法,下面朋友借鑒某個網友的代碼(地址我就不知道了):
@Override
protected void onDraw(Canvas canvas) {
 Drawable[] drawables = getCompoundDrawables();
 if (drawables != null) {
  Drawable drawableLeft = drawables[0];
  if (drawableLeft != null) {
   final float textWidth = getPaint().measureText(getText().toString());
   final int drawablePadding = getCompoundDrawablePadding();
   final int drawableWidth = drawableLeft.getIntrinsicWidth();
   final float bodyWidth = textWidth + drawableWidth + drawablePadding;
   canvas.translate((getWidth() - bodyWidth) / 2, 0);
  }
 }
 super.onDraw(canvas);
}
xml布局:
<com.example.testandroid.DrawableTextView
android:id="@+id/my_textview"
android:layout_width="fill_parent"
android:layout_marginTop="20dp"
android:background="@drawable/text_selector"
android:drawablePadding="8dp"
android:drawableLeft="@drawable/clear_edittext_selector"
android:textColor="@color/text_color_selector"
android:layout_height="wrap_content"
android:padding="15dp"
android:textSize="16sp"
android:text="有Drawable的TextView" />
嗯,自己寫這個東西,也學到了一些東西,大家有什麼更好的方法,大家可以討論一下。
希望本文所述對大家Android程序設計有所幫助。
 Android本地化
Android應用程序可以在許多不同地區的許多設備上運行。為了使應用程序更具交互性,應用程序應該處理以適合應用程序將要使用的語言環境方面的文字,數字,文件等。在本章中,我
 Android MediaPlayer(多媒體播放)
Android提供了許多方法來控制播放的音頻/視頻文件和流。其中該方法是通過一類稱為MediaPlayer。Android是提供MediaPlayer類訪問內置的媒體播放
 android+json+php+mysql實現用戶反饋功能方法解析
相信每個項目都會有用戶反饋建議等功能,這個實現的方法很多,下面是我實現的方法,供大家交流。首先看具體界面,三個字段。名字,郵箱為選填,可以為空,建議不能為空。如有
 Android JSON解析器
JSON代表JavaScript對象符號。它是一個獨立的數據交換格式,是XML的最佳替代品。本章介紹了如何解析JSON文件,並從中提取所需的信息。Android提供了四個