前一節中將了貪吃蛇Snake游戲的暫停/繼續、穿牆和全屏功能的實現,本文繼續分析此示例程序中體現的Android Layout機制。
1、FrameLayout
先來看官方文檔的定義:FrameLayout是最簡單的一個布局對象。它被定制為你屏幕上的一個空白備用區域,之後你可以在其中填充一個單一對象 — 比如,一張你要發布的圖片。所有的子元素將會固定在屏幕的左上角;你不能為FrameLayout中的一個子元素指定一個位置。後一個子元素將會直接在前一個子元素之上進行覆蓋填充,把它們部份或全部擋住(除非後一個子元素是透明的)。
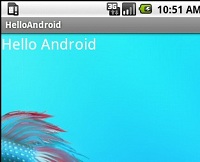
有點繞口而且難理解,下面還是通過一個實例來理解吧。我們仿照Snake項目中使用的界面一樣,建立一個簡單的FrameLayout,其中包含兩個Views元素:ImageView和TextView,而後面的TextView還包含在一個RelativeLayout中。
XML/HTML代碼
- <FrameLayout xmlns:android="http://schemas.android.com/apk/res/android"
- android:layout_width="fill_parent"
- android:layout_height="fill_parent">
- <ImageView
- android:layout_width="fill_parent"
- android:layout_height="fill_parent"
- android:scaleType="center" android:src="@drawable/img0"/>
- <RelativeLayout
- android:layout_width="fill_parent"
- android:layout_height="fill_parent" >
- <TextView
- android:text="Hello Android"
- android:visibility="visible"
- android:layout_width="wrap_content"
- android:layout_height="wrap_content"
- android:layout_centerInParent="true"
- android:gravity="center_horizontal"
- android:textColor="#ffffffff"
- android:textSize="24sp"/>
- </RelativeLayout>
- </FrameLayout>
效果如下圖所示:

2、UI優化
Android的tools目錄下提供了許多實用工具,這裡介紹其中一個用於查看當前UI結構視圖的工具hierarchyviewer。打開tools/hierarchyviewer.bat後,查看上面這個示例的UI結構圖可得:
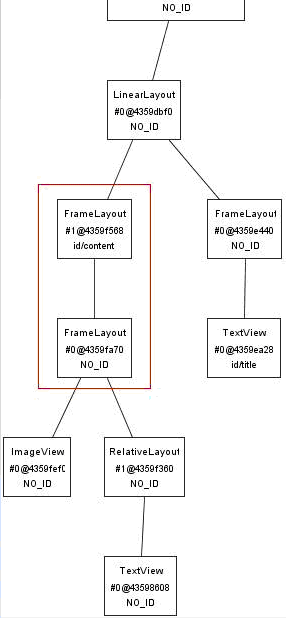
我們可以很明顯的看到由紅色線框所包含的結構出現了兩個framelayout節點,很明顯這兩個完全意義相同的節點造成了資源浪費(這裡可以提醒大家在開發工程中可以習慣性的通過hierarchyViewer查看當前UI資源的分配情況),那麼如何才能解決這種問題呢(就當前例子是如何去掉多余的frameLayout節點)?這時候就要用到<merge />標簽來處理類似的問題了。我們將上邊xml代碼中的framLayout替換成merge:
XML/HTML代碼
- <merge xmlns:android="http://schemas.android.com/apk/res/android">
- <ImageView
- android:layout_width="fill_parent"
- android:layout_height="fill_parent"
- android:scaleType="center" android:src="@drawable/img0"/>
- <RelativeLayout
- android:layout_width="fill_parent"
- android:layout_height="fill_parent" >
- <TextView
- android:text="Hello Android"
- android:visibility="visible"
- android:layout_width="wrap_content"
- android:layout_height="wrap_content"
- android:layout_centerInParent="true"
- android:gravity="center_horizontal"
- android:textColor="#ffffffff"
- android:textSize="24sp"/>
- </RelativeLayout>
- </merge >
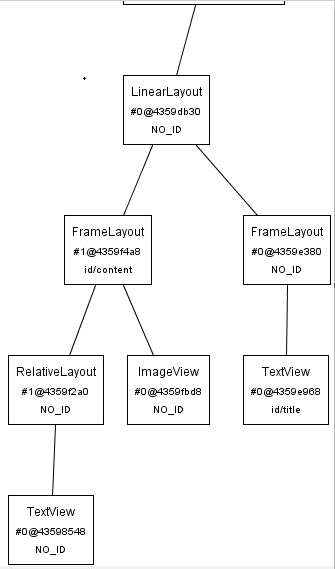
運行程序後在Emulator中顯示的效果是一樣的,可是通過hierarchyviewer查看的UI結構是有變化的,當初多余的FrameLayout節點被合並在一起了,或者可以理解為將merge標簽中的子集直接加到Activity的FrameLayout跟節點下(這裡需要提醒大家注意:所有的Activity視圖的根節點都是frameLayout)。如果你所創建的Layout並不是用framLayout作為根節點(而是應用LinerLayout等定義root標簽),就不能應用上邊的例子通過merge來優化UI結構。
3、RelativeLayout
RelativeLayout允許子元素指定他們相對於其它元素或父元素的位置(通過ID指定)。因此,你可以以右對齊,或上下,或置於屏幕中央的形式來排列兩個元素。元素按順序排列,因此如果第一個元素在屏幕的中央,那麼相對於這個元素的其它元素將以屏幕中央的相對位置來排列。如果使用XML來指定這個layout,在你定義它之前,被關聯的元素必須定義。
解釋起來也比較麻煩,不過我做個對比實驗可以明白它的用處了,試著把上面例子裡的RelativeLayout節點去掉看看,效果如下圖所示,可以看到由於FrameLayout的原因,都在左上角靠攏了,而使用了RelativeLayout,則可以讓TextView相對於屏幕居中。
4、Snake的界面分析
有了上述Layout的基礎知識,我們再來看Snake的布局文件就很好理解了,就是一個SnakeView和一個TextView,啟動後,後者會覆蓋在前者上面。
XML/HTML代碼
- <FrameLayout xmlns:android="http://schemas.android.com/apk/res/android"
- android:layout_width="fill_parent"
- android:layout_height="fill_parent">
- <com.example.android.snake.SnakeView
- android:id="@+id/snake"
- android:layout_width="fill_parent"
- android:layout_height="fill_parent"
- tileSize="24"
- />
- <RelativeLayout
- android:layout_width="fill_parent"
- android:layout_height="fill_parent" >
- <TextView
- android:id="@+id/text"
- android:text="@string/snake_layout_text_text"
- android:visibility="visible"
- android:layout_width="wrap_content"
- android:layout_height="wrap_content"
- android:layout_centerInParent="true"
- android:gravity="center_horizontal"
- android:textColor="#ff8888ff"
- android:textSize="24sp"/>
- </RelativeLayout>
- </FrameLayout>
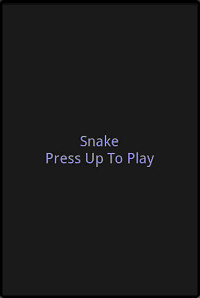
也就是這樣的效果:
那麼相應的代碼是如何實現這個效果的呢? SnakeView有一個私有變量存放覆蓋其上的TextView:
Java代碼
- private TextView mStatusText;
在Snake這個Activity的onCreate方法中,首先將Layout文件中的SnakeView和TextView關聯起來:
Java代碼
- setContentView(R.layout.snake_layout);
- mSnakeView = (SnakeView) findViewById(R.id.snake);
- mSnakeView.setTextView((TextView) findViewById(R.id.text));
然後設置SnakeView的狀態為Ready:
Java代碼
- mSnakeView.setMode(SnakeView.READY);
這一句代碼會調用下述函數:
Java代碼
- public void setMode(int newMode)
- {
- int oldMode = mMode;
- mMode = newMode;
- if (newMode == RUNNING & oldMode != RUNNING)
- {//游戲進入“運行”狀態,則隱藏文字信息
- mStatusText.setVisibility(View.INVISIBLE);
- update();
- return;
- }
- //根據新狀態,設置待顯示的文字信息
- Resources res = getContext().getResources();
- CharSequence str = "";
- if (newMode == PAUSE)
- {//新狀態為“暫停”
- str = res.getText(R.string.mode_pause);
- }
- if (newMode == READY)
- {//新狀態為“准備開始”
- str = res.getText(R.string.mode_ready);
- }
- if (newMode == LOSE)
- {//新狀態為“游戲失敗”
- str = res.getString(R.string.mode_lose_prefix) + mScore
- + res.getString(R.string.mode_lose_suffix);
- }
- //設置文字信息並顯示
- mStatusText.setText(str);
- mStatusText.setVisibility(View.VISIBLE);
- }
在mStatusText.setVisibility(View.VISIBLE);這一句後就顯示出上面這個游戲起始畫面了。
 Android本地化
 Android中通過Notification&NotificationManager實現消息通知
 Android MediaPlayer(多媒體播放)
 Android加載Spinner