Fragment是Android honeycomb 3.0新增的概念,在如何使用Android Fragment中做了關於Fragment的詳細介紹。本文則主要是通過實例的方式讓大家更直觀的了解Fragment的使用方法。
首先貼上實例的運行效果截圖:
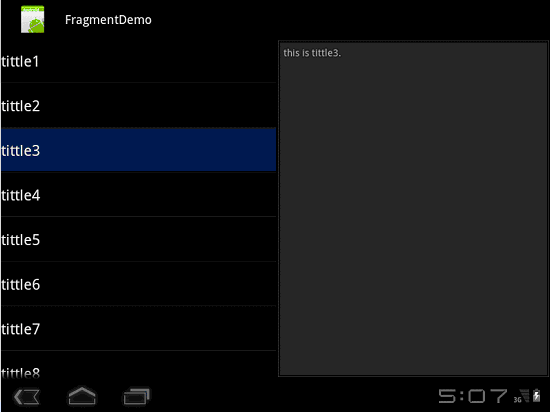
效果圖的左邊是一個列表,右邊是列表item的詳情。
先看一下布局文件(layout):
XML/HTML代碼
- <?xml version=“1.0″ encoding=“utf-8″?>
- <LinearLayout xmlns:android=“http://schemas.android.com/apk/res/android”
- android:orientation=“horizontal” android:layout_width=“match_parent”
- android:layout_height=“match_parent”>
- <fragment
- class=“com.fragment.main.TitlesFragment”
- android:id=“@+id/titles” android:layout_weight=“1″
- android:layout_width=“0px” android:layout_height=“match_parent” />
- <FrameLayout android:id=“@+id/details” android:layout_weight=“1″
- android:layout_width=“0px” android:layout_height=“match_parent”
- android:background=“?android:attr/detailsElementBackground” />
- </LinearLayout>
布局文件中使用了fragment標簽和FrameLayout標簽。如何使用Android Fragment中介紹了兩中嵌入Fragment的方法,這個實例中都用到,從布局文件看到有了fragment標簽,這是一種使用方法,FrameLayout標簽將會成為第二種加載fragment的載體view。
看一下程序實現(com.fragment.main.TitlesFragment):
Java代碼
- public class TitlesFragment extends ListFragment {
-
- int mCurCheckPosition = 0;
- int mShownCheckPosition = -1;
-
- @Override
- public void onActivityCreated(Bundle savedInstanceState) {
- super.onActivityCreated(savedInstanceState);
-
- setListAdapter(new ArrayAdapter<String>(getActivity(),
- android.R.layout.simple_list_item_activated_1,
- Shakespeare.TITLES)); //使用靜態數組填充列表
- if (savedInstanceState != null) {
- mCurCheckPosition = savedInstanceState.getInt(“curChoice”, 0);
- mShownCheckPosition = savedInstanceState.getInt(“shownChoice”, -1);
- }
- getListView().setChoiceMode(ListView.CHOICE_MODE_SINGLE);
- showDetails(mCurCheckPosition);
- }
-
- @Override
- public void onSaveInstanceState(Bundle outState) {
- super.onSaveInstanceState(outState);
-
- outState.putInt(“curChoice”, mCurCheckPosition);
- outState.putInt(“shownChoice”, mShownCheckPosition);
- }
-
- @Override
- public void onListItemClick(ListView l, View v, int position, long id) {
- showDetails(position);
- }
-
- /**
- *顯示listview item 詳情
- */
- void showDetails(int index) {
- mCurCheckPosition = index;
- getListView().setItemChecked(index, true);
-
- if (mShownCheckPosition != mCurCheckPosition) {
-
- DetailsFragment df = DetailsFragment.newInstance(index);
- FragmentTransaction ft = getFragmentManager()
- .beginTransaction();
- ft.replace(R.id.details, df);
- ft.setTransition(FragmentTransaction.TRANSIT_FRAGMENT_FADE);
- ft.commit();
- mShownCheckPosition = index;
- }
- }
-
- }
TitlesFragment繼承自Fragment的子類ListFragment,使用了一個靜態數組填充列表,重寫了onListItemClick方法,showDetails方法展示ListView item的詳情。
Java代碼
- DetailsFragment df = DetailsFragment.newInstance(index);//獲取詳情Fragment的實例
- FragmentTransaction ft = getFragmentManager().beginTransaction();//獲取FragmentTransaction 實例
- ft.replace(R.id.details, df); //使用DetailsFragment 的實例
- ft.setTransition(FragmentTransaction.TRANSIT_FRAGMENT_FADE);
- ft.commit();//提交
這裡就使用到了Android Fragment使用中介紹的第二種加載fragment的方法。看一下DetailsFragment :
Java代碼
- public class DetailsFragment extends Fragment {
-
- /** * Create a new instance of DetailsFragment, initialized to * show the text at ’index’. */
- public static DetailsFragment newInstance(int index) {
- DetailsFragment f = new DetailsFragment();
- // Supply index input as an argument.
- Bundle args = new Bundle();
- args.putInt(“index”, index);
- f.setArguments(args);
- return f;
- }
-
- @Override
- public View onCreateView(LayoutInflater inflater, ViewGroup container,
- Bundle savedInstanceState) {
- if (container == null) {
- return null;
- }
- ScrollView scroller = new ScrollView(getActivity());
- TextView text = new TextView(getActivity());
-
- int padding = (int) TypedValue.applyDimension(
- TypedValue.COMPLEX_UNIT_DIP, 4, getActivity().getResources()
- .getDisplayMetrics());
- text.setPadding(padding, padding, padding, padding);
- scroller.addView(text);
- text.setText(Shakespeare.DIALOGUE[getArguments().getInt("index", 0)]);
- return scroller;
- }
- }
DetailsFragment 中使用newInstance(int index)方法產生DetailsFragment 實例並接受整型參數,重載了onCreateView方法創建view。
這個例子基本完成了,主要介紹的是在3.0以後的使用方法,其實Fragment在SDK1.6之後就可以使用了,在1.6上使用需要借助 android-support-v4.jar包實現。android-support-v4.jar在:SDK根目錄\extras\android \compatibility\v4下可以找到。
 基於Android中手勢交互的實現方法
 Android加載Spinner
 Android JSON解析器
 Android JSON解析器