編輯:Android編程入門
如果你想要載入的頁面中用了JavaScript,你必須為你的WebView使能JavaScript。
一旦使能之後,你也可以自己創建接口在你的應用和JavaScript代碼間進行交互。
上一篇文章已經說過,可以通過getSettings()獲得WebSettings,然後用setJavaScriptEnabled()使能JavaScript:
WebView myWebView = (WebView) findViewById(R.id.webview);
WebSettings webSettings = myWebView.getSettings();
webSettings.setJavaScriptEnabled(true);
當你為你的Android應用中的WebView專門開發一個網頁應用時,你可以創建你的JavaScript代碼和你的客戶端的Android代碼之間的接口。
比如,你可以用JavaScript代碼調用Android代碼中的方法,來展現一個對話框之類,而不是使用alert()方法(JS中的對話框方法)。
在JS和Android代碼間綁定一個新的接口,需要調用 JELLY_BEAN 開始,只有被JavascriptInterface 注解標識的公有方法可以被JS代碼訪問。
另外,因為JS代碼和Java對象在這個WebView所私有的後台線程交互,所以還需要注意線程安全性問題。
注意,與JS代碼綁定的的這個Java對象運行在另一個線程中,與創建它的線程不是一個線程。
注意,這個Java對象的域是不可訪問的。
比如可以定義這麼一個類:
    /**
     * 自定義的Android代碼和JavaScript代碼之間的橋梁類
     *
     * @author 1
     *
     */
    public class WebAppInterface
    {
        Context mContext;

        /** Instantiate the interface and set the context */
        WebAppInterface(Context c)
        {
            mContext = c;
        }

        /** Show a toast from the web page */
        // 如果target 大於等於API 17,則需要加上如下注解
        // @JavascriptInterface
        public void showToast(String toast)
        {
            // Toast.makeText(mContext, toast, Toast.LENGTH_SHORT).show();
            Toast.makeText(mContext, toast, Toast.LENGTH_LONG).show();
        }
    }
然後將這個類和你的WebView中的JS代碼綁定:
WebView webView = (WebView) findViewById(R.id.webview);
webView.addJavascriptInterface(new WebAppInterface(this), "Android");
給這個對象起的別名叫“Android”。
這個就創立了一個接口名,叫“Android”,運行在WebView中的JS代碼可以通過這個名字調用WebAppInterface類中的showToast()方法:
<input type="button" value="Say hello" onClick="showAndroidToast('Hello Android!')" />

<script type="text/javascript">
    function showAndroidToast(toast)
    {
        Android.showToast(toast);
    }
</script>
這個問題讓我納悶了好久,因為開始的時候我寫的程序,JS代碼中的按鈕會出現在WebView中,但是點擊下去後,不會彈出相應的對話框之類。
也就是說JS代碼調用自己也沒有執行?
同樣的代碼在別的地方執行可以正常彈出啊。所以我還提問來著:http://q.cnblogs.com/q/47060/
後來找了半天原因,才發現兩個問題:
1.網頁按鈕按下後不出現JS對話框是因為沒有設置chrome handler,需要設置如下:
        // 如果不設置這個,JS代碼中的按鈕會顯示,但是按下去卻不彈出對話框
        // Sets the chrome handler. This is an implementation of WebChromeClient
        // for use in handling JavaScript dialogs, favicons, titles, and the
        // progress. This will replace the current handler.
        myWebView.setWebChromeClient(new WebChromeClient()
        {

            @Override
            public boolean onJsAlert(WebView view, String url, String message,
                    JsResult result)
            {
                // TODO Auto-generated method stub
                return super.onJsAlert(view, url, message, result);
            }

        });
2.調用Android代碼的那個按鈕也沒有出現Toast是因為我把別名寫錯了(大小寫沒有注意)。(這個錯誤可以忽略,但是大家也要引以為戒。。Orz。。。)
這個還比較簡單,需要調用的時候只需要一行代碼:
myWebView.loadUrl("javascript:myFunction()");
其中myFunction()是JS函數。
這裡要補充一下,如果JavaScript函數是帶參數的,那麼調用時要特別注意。
比如下面這個JS函數,在原來內容上加入一行:
    function writeLine(string)
    {
        console.log("Write a new Line");//調試信息
        document.getElementById("content").innerHTML += string + "<br />";//在content標簽段落加入新行
    }
注:其中content是自定義的標簽,html中有一個段落是:
<p id="content"></p>
那麼在Android代碼中調用這個writeLine()函數時,需要傳入一個字符串參數,比如,想要傳入一個叫name的String:
myWebView.loadUrl("javascript:writeLine('"+name+"')");//JS代碼要是帶參數
還有就是要注意雙引號中的函數名一定不要寫錯。
做了一個程序:
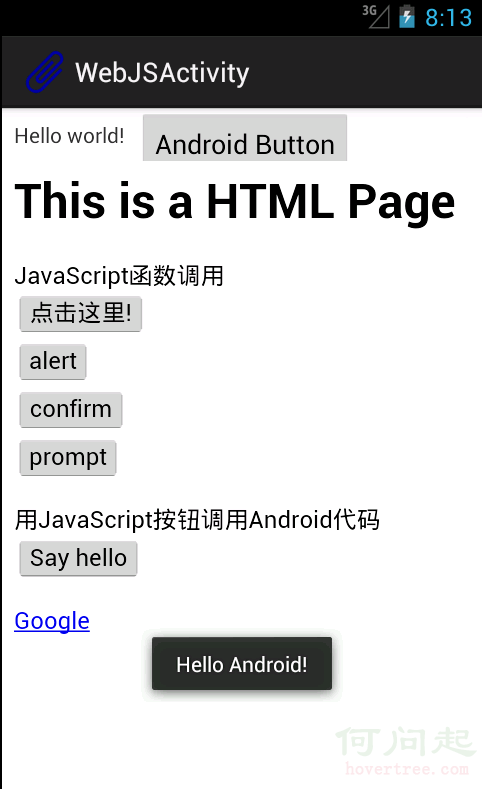
界面中包含一個TextView,旁邊一個Button,下面整個是一個WebView。
在WebView中載入了一個本地html文件,本地文件存放在assets文件夾中。
網頁中前四個按鈕調用的是JavaScript函數,顯示各種對話框。
SayHello按鈕調用Android代碼中的一個方法,顯示一個Toast,如圖中所示。
為了證明Android也可以調用JS代碼,最上方的Android Button按下後和“點擊這裡”那個按鈕的效果一致,都是出現JS的對話框。
Activity代碼:

package com.example.hellowebjs;

import android.annotation.SuppressLint;
import android.app.Activity;
import android.content.Context;
import android.os.Bundle;
import android.view.View;
import android.webkit.JsResult;
import android.webkit.WebChromeClient;
import android.webkit.WebSettings;
import android.webkit.WebView;
import android.webkit.WebViewClient;
import android.widget.Button;
import android.widget.Toast;

public class WebJSActivity extends Activity
{

    private WebView myWebView = null;
    private Button myButton = null;

    @SuppressLint("SetJavaScriptEnabled")
    @Override
    public void onCreate(Bundle savedInstanceState)
    {
        super.onCreate(savedInstanceState);
        setContentView(R.layout.activity_web_js);

        myWebView = (WebView) findViewById(R.id.myWebView);

        // 得到設置屬性的對象
        WebSettings webSettings = myWebView.getSettings();

        // 使能JavaScript
        webSettings.setJavaScriptEnabled(true);

        // 支持中文,否則頁面中中文顯示亂碼
        webSettings.setDefaultTextEncodingName("GBK");

        // 限制在WebView中打開網頁,而不用默認浏覽器
        myWebView.setWebViewClient(new WebViewClient());

        // 如果不設置這個,JS代碼中的按鈕會顯示,但是按下去卻不彈出對話框
        // Sets the chrome handler. This is an implementation of WebChromeClient
        // for use in handling JavaScript dialogs, favicons, titles, and the
        // progress. This will replace the current handler.
        myWebView.setWebChromeClient(new WebChromeClient()
        {

            @Override
            public boolean onJsAlert(WebView view, String url, String message,
                    JsResult result)
            {
                // TODO Auto-generated method stub
                return super.onJsAlert(view, url, message, result);
            }

        });

        // 用JavaScript調用Android函數:
        // 先建立橋梁類,將要調用的Android代碼寫入橋梁類的public函數
        // 綁定橋梁類和WebView中運行的JavaScript代碼
        // 將一個對象起一個別名傳入,在JS代碼中用這個別名代替這個對象,可以調用這個對象的一些方法
        myWebView.addJavascriptInterface(new WebAppInterface(this),
                "myInterfaceName");

        // 載入頁面:本地html資源文件
        myWebView.loadUrl("file:///android_asset/sample.html");

        // 這裡用一個Android按鈕按下後調用JS中的代碼
        myButton = (Button) findViewById(R.id.button1);
        myButton.setOnClickListener(new View.OnClickListener()
        {

            @Override
            public void onClick(View v)
            {
                // 用Android代碼調用JavaScript函數:
                myWebView.loadUrl("javascript:myFunction()");

                // 這裡實現的效果和在網頁中點擊第一個按鈕的效果一致

            }
        });

    }

    /**
     * 自定義的Android代碼和JavaScript代碼之間的橋梁類
     *
     * @author 1
     *
     */
    public class WebAppInterface
    {
        Context mContext;

        /** Instantiate the interface and set the context */
        WebAppInterface(Context c)
        {
            mContext = c;
        }

        /** Show a toast from the web page */
        // 如果target 大於等於API 17,則需要加上如下注解
        // @JavascriptInterface
        public void showToast(String toast)
        {
            // Toast.makeText(mContext, toast, Toast.LENGTH_SHORT).show();
            Toast.makeText(mContext, toast, Toast.LENGTH_LONG).show();
        }
    }

}
HTML文件:
<html>
<head>
<h1>
This is a HTML Page
</h1>
<!-- JavaScript腳本,主要包括了按鈕要執行的函數,顯示對話框等 -->
<script type="text/javascript">
    //JavaScript方法,彈出對話框顯示信息
    function myFunction()
    {
        alert("Hello World!");
    }
    function onAlert()
    {
        console.log("onAlert method");//顯示調試信息
        alert("This is a alert sample from html");
    }
    function onConfirm()
    {
        console.log("onConfirm method");
        var b = confirm("are you sure to login?");
        alert("your choice is " + b);
    }
    function onPrompt()
    {
        console.log("onPrompt method");
        var b = prompt("please input your password", "aaa");
        alert("your input is " + b);
    }

    //調用綁定的Java對象的方法,即調用Android代碼顯示對話框
    function showAndroidToast(toast)
    {
        console.log("showAndroidToast method");
        myInterfaceName.showToast(toast);//注意此處的myInterfaceName要和外部傳入的名字一致,大小寫正確
    }
</script>
</head>
<body>

    <p>
        <!-- 前四個按鈕調用JS函數 -->
        JavaScript函數調用 <br />
        <button onclick="myFunction()">點擊這裡!</button>
        <br />
        <input type="button" value="alert" onclick="onAlert()" /> <br />
        <input type="button" value="confirm" onclick="onConfirm()" /> <br />
        <input type="button" value="prompt" onclick="onPrompt()" /><br />
        <!-- 上面用了兩種定義按鈕的方式,效果一樣的 -->
    </p>

    <p>
        <!-- 這個Say hello 按鈕調用Android代碼中的方法 -->
        用JavaScript按鈕調用Android代碼 <br />
        <input type="button"
            value="Say hello" onClick="showAndroidToast('Hello Android!')" />
    </p>

    <a href="http://hovertree.com/url/?h=http://www.google.com" />Google
    </a>

</body>
</html>
Activity布局文件:
<RelativeLayout xmlns:android="http://schemas.android.com/apk/res/android"
    xmlns:tools="http://schemas.android.com/tools"
    android:id="@+id/myRelativeLayout"
    android:layout_width="match_parent"
    android:layout_height="match_parent" >

    <TextView
        android:id="@+id/textView1"
        android:layout_width="wrap_content"
        android:layout_height="wrap_content"
        android:padding="@dimen/padding_medium"
        android:text="@string/hello_world"
        tools:context=".WebJSActivity" />

    <Button
        android:id="@+id/button1"
        android:layout_width="wrap_content"
        android:layout_height="wrap_content"
        android:layout_toRightOf="@id/textView1"
        android:text="@string/btn1_text" />

    <WebView
        android:id="@+id/myWebView"
        android:layout_width="fill_parent"
        android:layout_height="fill_parent"
        android:layout_below="@id/textView1" />

</RelativeLayout>
 Android進階學習
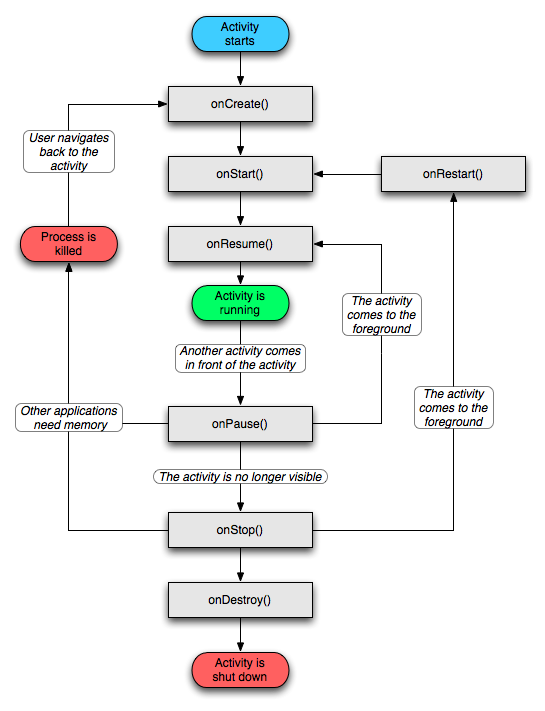
一、Android四大組件1. Activity生命周期:2. Service生命周期:Service的生命周期長,沒有用戶界面,可以用來開發監控程序。Service有兩
 Android Touch事件傳遞機制
1、基礎知識(1) 所有Touch事件都被封裝成了MotionEvent對象,包括Touch的位置、時間、歷史記錄以及第幾個手指(多指觸摸)等。 (2) 事件類
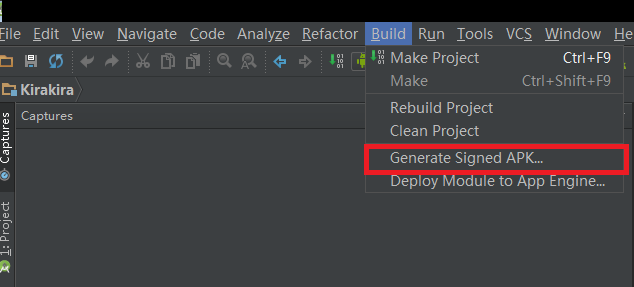
 解決Android Studio升級版本後恢復初始化設置的問題
今天把AndroidStudio升級到1.5後發現所有的個性設置全變為初始化了。包括皮膚啊,字體大小、顏色啊,以及快捷鍵等等。一瞬間就懵了。 升級完後好像有一個彈窗就是
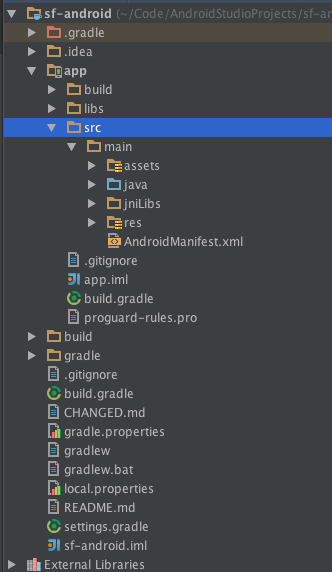
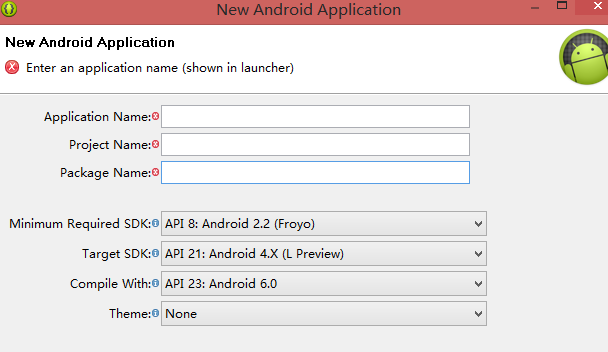 [android]android項目的目錄結構
1. HelloWorld項目Application Name : 應用名稱,展示在應用市場和設置中應用列表裡面Project N