編輯:中級開發
在一個Android應用中,主要是由四種組件組成的,這四種組件可參考“android應用的構成”。
而這四種組件是獨立的,它們之間可以互相調用,協調工作,最終組成一個真正的android應用。
在這些組件之間的通訊中,主要是由Intent協助完成的。
Intent 負責對應用中一次操作的動作、動作涉及數據、附加數據進行描述,android則根據此Intent的描述,負責找到對應的組件,將 Intent傳遞給調用的組件,並完成組件的調用。
因此,Intent在這裡起著一個媒體中介的作用,專門提供組件互相調用的相關信息,實現調用者與被調用者之間的解耦。
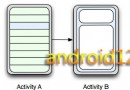
例如,在一個聯系人維護的應用中,當我們在一個聯系人列表屏幕(假設對應的Activity為listActivity)上,點擊某個聯系人後,希望能夠跳出此聯系人的詳細信息屏幕(假設對應的Activity為detailActivity)
為了實現這個目的,listActivity 需要構造一個 Intent,這個Intent用於告訴系統,我們要做“查看”動作,此動作對應的查看對象是“某聯系人”,然後調用startActivity (Intent intent),
將構造的Intent傳入,系統會根據此Intent中的描述,到ManiFest中找到滿足此 Intent要求的Activity,系統會調用找到的Activity,即為detailActivity,最終傳入 Intent,detailActivity則會根據此Intent中的描述,執行相應的操作。
一、抽象描述要描述什麼
在android參考文檔中,對Intent的定義是執行某操作的一個抽象描述(確實很抽象)。我們先來看看這裡的抽象描述,到底描述了什麼。
首先,是要執行的動作(action)的一個簡要描述,如 VIEW_ACTION(查看)、EDIT_ACTION(修改)等,android為我們定義了一套標准動作:
復制內容到剪貼板
代碼:
MAIN_ACTION
VIEW_ACTION
EDIT_ACTION
PICK_ACTION
GET_CONTENT_ACTION
DIAL_ACTION
CALL_ACTION
SENDTO_ACTION
ANSWER_ACTION
INSERT_ACTION
DELETE_ACTION
RUN_ACTION
LOGIN_ACTION
CLEAR_CREDENTIALS_ACTION
SYNC_ACTION
PICK_ACTIVITY_ACTION
WEB_SEARCH_ACTION
此外,我們還可以根據應用的需要,定義我們自己的動作,並可定義相應的Activity來處理我們的自定義動作。
其次,是執行動作要操作的數據(data),android中采用指向數據的一個 URI來表示,如在聯系人應用中,一個指向某聯系人的URI可能為:content://contacts/1。
這種URI表示,通過 ContentURI這個類來描述,具體可以參考android.Net.ContentURI類的文檔。
以聯系人應用為例,以下是一些action / data對,及其它們要表達的意圖:
復制內容到剪貼板
代碼:
VIEW_ACTION content://contacts/1-- 顯示標識符為"1"的聯系人的詳細信息
EDIT_ACTION content://contacts/1-- 編輯標識符為"1"的聯系人的詳細信息
VIEW_ACTION content://contacts/-- 顯示所有聯系人的列表
PICK_ACTION content://contacts/-- 顯示所有聯系人的列表,並且允許用戶在列表中選擇一個聯系人,然後把這個聯系人返回給父activity。例如:電子郵件客戶端可以使用這個 Intent,要求用戶在聯系人列表中選擇一個聯系人
另外,除了action和data這兩個重要屬性外,還有一些附加屬性:
category(類別),被執行動作的附加信息。例如 LAUNCHER_CATEGORY 表示Intent 的接受者應該在Launcher中作為頂級應用出現;而ALTERNATIVE_CATEGORY表示當前的Intent是一系列的可選動作中的一個,這些動作可以在同一塊數據上執行。
type(數據類型),顯式指定Intent的數據類型(MIME)。一般Intent的數據類型能夠根據數據本身進行判定,但是通過設置這個屬性,可以強制采用顯式指定的類型而不再進行推導。
component(組件),指定Intent 的的目標組件的類名稱。通常 android會根據Intent 中包含的其它屬性的信息,比如action、data/type、category進行查找,最終找到一個與之匹配的目標組件。但是,如果 component這個屬性有指定的話,將直接使用它指定的組件,而不再執行上述查找過程。指定了這個屬性以後,Intent的其它所有屬性都是可選的。
extras(附加信息),是其它所有附加信息的集合。使用extras可以為組件提供擴展信息,比如,如果要執行“發送電子郵件”這個動作,可以將電子郵件的標題、正文等保存在extras裡,傳給電子郵件發送組件。
總之,action、 data/type、category和extras 一起形成了一種語言。
這種語言使系統能夠理解諸如“查看某聯系人的詳細信息”之類的短語。
隨著應用不斷的加入到系統中,它們可以添加新的action、 data/type、category來擴展這種語言。
應用也可以提供自己的Activity來處理已經存在的這樣的“短語”,從而改變這些“短語”的行為。
二、 android如何解析Intent
在應用中,我們可以以兩種形式來使用Intent:
* 直接Intent:指定了component屬性的Intent(調用 setComponent(ComponentName)或者setClass(Context, Class)來指定)。通過指定具體的組件類,通知應用啟動對應的組件。
*
* 間接Intent:沒有指定comonent屬性的Intent。這些Intent需要包含足夠的信息,這樣系統才能根據這些信息,在在所有的可用組件中,確定滿足此Intent的組件。
對於直接Intent,Android不需要去做解析,因為目標組件已經很明確,android需要解析的是那些間接Intent,通過解析,將 Intent映射給可以處理此Intent的Activity、IntentReceiver或Service。
Intent解析機制主要是通過查找已注冊在androidManifest.XML中的所有IntentFilter及其中定義的Intent,最終找到匹配的Intent。在這個解析過程中,android是通過Intent的action、type、category這三個屬性來進行判斷的,判斷方法如下:
* 如果Intent指明定了action,則目標組件的IntentFilter的action列表中就必須包含有這個action,否則不能匹配;
*
* 如果Intent沒有提供type,系統將從data中得到數據類型。和action一樣,目標組件的數據類型列表中必須包含Intent的數據類型,否則不能匹配。
*
* 如果Intent中的數據不是content: 類型的URI,而且Intent也沒有明確指定它的type,將根據Intent中數據的scheme (比如 http: 或者mailto: ) 進行匹配。同上,Intent 的scheme必須出現在目標組件的scheme列表中。
*
* 如果Intent指定了一個或多個category,這些類別必須全部出現在組建的類別列表中。比如 Intent中包含了兩個類別:LAUNCHER_CATEGORY 和 ALTERNATIVE_CATEGORY,解析得到的目標組件必須至少包含這兩個類別。
三、應用例子
以下,以android SDK中的便箋例子來說明,Intent如何定義及如何被解析。這個應用可以讓用戶浏覽便箋列表、查看每一個便箋的詳細信息。
XML 代碼
復制內容到剪貼板
代碼:
XML代碼
1.<manifest XMLns:android="http://schemas.android.com/apk/res/android" package="com.google.android.notepad">
2. <application android:icon="@drawable/app_notes" android:label="@string/app_name">
3.
4. <provider class="NotePadProvider" android:authoritIEs="com.google.provider.NotePad"/>
5.
6. <activity class=".NotesList" android:label="@string/title_notes_list">
7. <intent-filter>
8. <action android:value="android.intent.action.MAIN"/>
9. <category android:value="android.intent.category.LAUNCHER"/>
10. </intent-filter>
11. <intent-filter>
12. <action android:value="android.intent.action.VIEW"/>
13. <action android:value="android.intent.action.EDIT"/>
14. <action android:value="android.intent.action.PICK"/>
15. <category android:value="android.intent.category.DEFAULT"/>
16. <type android:value="vnd.android.cursor.dir/vnd.google.note"/>
17. </intent-filter>
18. <intent-filter>
19. <action android:value="android.intent.action.GET_CONTENT"/>
20. <category android:value="android.intent.category.DEFAULT"/>
21. <type android:value="vnd.android.cursor.item/vnd.google.note"/>
22. </intent-filter>
23. </activity>
24.
25. <activity class=".NoteEditor" android:label="@string/title_note">
26. <intent-filter android:label="@string/resolve_edit">
27. <action android:value="android.intent.action.VIEW"/>
28. <action android:value="android.intent.action.EDIT"/>
29. <category android:value="android.intent.category.DEFAULT"/>
30. <type android:value="vnd.android.cursor.item/vnd.google.note"/>
31. </intent-filter>
32. <intent-filter>
33. <action android:value="android.intent.action.INSERT"/>
34. <category android:value="android.intent.category.DEFAULT"/>
35. <type android:value="vnd.android.cursor.dir/vnd.google.note"/>
36. </intent-filter>
37. </activity>
38.
39. <activity class=".TitleEditor" android:label="@string/title_edit_title" android:theme="@android:style/Theme.Dialog">
40. <intent-filter android:label="@string/resolve_title">
41. <action android:value="com.google.android.notepad.action.EDIT_TITLE"/>
42. <category android:value="android.intent.category.DEFAULT"/>
43. <category android:value="android.intent.category.ALTERNATIVE"/>
44. <category android:value="android.intent.category.SELECTED_ALTERNATIVE"/>
45. <type android:value="vnd.android.cursor.item/vnd.google.note"/>
46. </intent-filter>
47. </activity>
48.
49. </application>
50.</manifest>
<manifest XMLns:android="http://schemas.android.com/apk/res/android" package="com.google.android.notepad">
<application android:icon="@drawable/app_notes" android:label="@string/app_name">
<provider class="NotePadProvider" android:authoritIEs="com.google.provider.NotePad"/>
<activity class=".NotesList" android:label="@string/title_notes_list">
<intent-filter>
<action android:value="android.intent.action.MAIN"/>
<category android:value="android.intent.category.LAUNCHER"/>
</intent-filter>
<intent-filter>
<action android:value="android.intent.action.VIEW"/>
<action android:value="android.intent.action.EDIT"/>
<action android:value="android.intent.action.PICK"/>
<category android:value="android.intent.category.DEFAULT"/>
<type android:value="vnd.android.cursor.dir/vnd.google.note"/>
</intent-filter>
<intent-filter>
<action android:value="android.intent.action.GET_CONTENT"/>
<category android:value="android.intent.category.DEFAULT"/>
<type android:value="vnd.android.cursor.item/vnd.google.note"/>
</intent-filter>
</activity>
<activity class=".NoteEditor" android:label="@string/title_note">
<intent-filter android:label="@string/resolve_edit">
<action android:value="android.intent.action.VIEW"/>
<action android:value="android.intent.action.EDIT"/>
<category android:value="android.intent.category.DEFAULT"/>
<type android:value="vnd.android.cursor.item/vnd.google.note"/>
</intent-filter>
<intent-filter>
<action android:value="android.intent.action.INSERT"/>
<category android:value="android.intent.category.DEFAULT"/>
<type android:value="vnd.android.cursor.dir/vnd.google.note"/>
</intent-filter>
</activity>
<activity class=".TitleEditor" android:label="@string/title_edit_title" android:theme="@android:style/Theme.Dialog">
<intent-filter android:label="@string/resolve_title">
<action android:value="com.google.android.notepad.action.EDIT_TITLE"/>
<category android:value="android.intent.category.DEFAULT"/>
<category android:value="android.intent.category.ALTERNATIVE"/>
<category android:value="android.intent.category.SELECTED_ALTERNATIVE"/>
<type android:value="vnd.android.cursor.item/vnd.google.note"/>
</intent-filter>
</activity>
</application>
</manifest>
例子中的第一個Activity是 com.google.android.notepad.NotesList,它是應用的主入口,提供了三個功能,分別由三個 intent-filter進行描述:
1、第一個是進入便箋應用的頂級入口(action為android.app.action.MAIN)。類型為 android.app.category.LAUNCHER表明這個Activity將在Launcher中列出。
2、第二個是,當type為vnd.android.cursor.dir/vnd.google.note(保存便箋記錄的目錄)時,可以查看可用的便箋(action為android.app.action.VIEW),或者讓用戶選擇一個便箋並返回給調用者(action為 android.app.action.PICK)。
3、第三個是,當type為vnd.android.cursor.item/vnd.google.note時,返回給調用者一個用戶選擇的便箋(action為android.app.action.GET_CONTENT),而用戶卻不需要知道便箋從哪裡讀取的。有了這些功能,下面的 Intent就會被解析到NotesList這個activity:
復制內容到剪貼板
代碼:
{ action=android.app.action.MAIN }:與此Intent匹配的Activity,將會被當作進入應用的頂級入口。
{ action=android.app.action.MAIN, category=android.app.category.LAUNCHER }:這是目前Launcher實際使用的 Intent,用於生成Launcher的頂級列表。
{ action=android.app.action.VIEW data=content://com.google.provider.NotePad/notes }:顯示"content://com.google.provider.NotePad/notes"下的所有便箋的列表,使用者可以遍歷列表,並且察看某便箋的詳細信息。
{ action=android.app.action.PICK data=content://com.google.provider.NotePad/notes }:顯示"content://com.google.provider.NotePad/notes"下的便箋列表,讓用戶可以在列表中選擇一個,然後將選擇的便箋的 URL返回給調用者。
{ action=android.app.action.GET_CONTENT type=vnd.android.cursor.item/vnd.google.note }:和上面的action為pick的Intent類似,不同的是這個Intent允許調用者(在這裡指要調用NotesList的某個 Activity)指定它們需要返回的數據類型,系統會根據這個數據類型查找合適的 Activity(在這裡系統會找到NotesList這個Activity),供用戶選擇便箋。
第二個 Activity是com.google.android.notepad.NoteEditor,它為用戶顯示一條便箋,並且允許 用戶修改這個便箋。
它定義了兩個intent-filter,所以具有兩個功能。
第一個功能是,當數據類型為 vnd.android.cursor.item/vnd.google.note時,允許用戶查看和修改一個便簽(action為 android.app.action.VIEW和android.app.action.EDIT)。
第二個功能是,當數據類型為 vnd.android.cursor.dir/vnd.google.note,為調用者顯示一個新建便箋的界面,並將新建的便箋插入到便箋列表中(action為android.app.action.INSERT)。
有了這兩個功能,下面的Intent就會被解析到NoteEditor這個activity:
復制內容到剪貼板
代碼:
{ action=android.app.action.VIEW data=content://com.google.provider.NotePad/notes/{ID}} :向用戶顯示標識為 ID的便箋。
{ action=android.app.action.EDIT data=content://com.google.provider.NotePad/notes/{ID}}:允許用戶編輯標識為ID的便箋。
{ action=android.app.action.INSERT data=content://com.google.provider.NotePad/notes }:在“content://com.google.provider.NotePad/notes”這個便箋列表中創建一個新的空便箋,並允許用 戶編輯這個便簽。當用戶保存這個便箋後,這個新便箋的URI將會返回給調用者。
最後一個Activity是 com.google.android.notepad.TitleEditor,它允許用戶編輯便箋的標題。
它可以被實現為一個應用可以直接調用(在Intent中明確設置component屬性)的類,不過這裡我們將為你提供一個在現有的數據上發布可選操作的方法。
在這個 Activity的唯一的intent-filter中,擁有一個私有的action: com.google.android.notepad.action.EDIT_TITLE,表明允許用戶編輯便箋的標題。
和前面的 vIEw和edit 動作一樣,調用這個Intent 的時候,也必須指定具體的便箋(type為vnd.android.cursor.item/vnd.google.note)。不同的是,這裡顯示和編輯的只是便箋數據中的標題。
除了支持缺省類別(android.intent.category.DEFAULT),標題編輯器還支持另外兩個標准類別: android.intent.category.ALTERNATIVE和
android.intent.category.SELECTED_ALTERNATIVE。
實現了這兩個類別之後,其它 Activity就可以調用queryIntentActivityOptions(ComponentName, Intent[], Intent, int)查詢這個Activity提供的action,而不需要了解它的具體實現;
或者調用 addIntentOptions(int, int, ComponentName, Intent[], Intent, int, Menu.Item[])建立動態菜單。需要說明的是,在這個intent-filter中有一個明確的名稱(通過android:label= "@string/resolve_title"指定),在用戶浏覽數據的時候,如果這個Activity是數據的一個可選操作,指定明確的名稱可以為用戶提供一個更好控制界面。
有了這個功能,下面的Intent就會被解析到TitleEditor這個Activity:
復制內容到剪貼板
代碼:
{ action=com.google.android.notepad.action.EDIT_TITLE data=content://com.google.provider.NotePad/notes/{ID}}:顯示並且允許用戶編輯標識為ID的便箋的標題。
本文來自CSDN博客,轉載請標明出處:http://blog.csdn.Net/limx59/archive/2010/10/12/5935751.ASPx
 Android之Linux 調度器 BFS 簡介
簡介: BFS 是一款專門為 Linux 桌面環境所設計的內核調度器,它基於 Staircase Deadline 和 EEVDF 算法,支持 Linux 2
 Android開發調試工具TraceView多圖演示
有關android SDK自帶的性能分析調試工具TraceVIEw使用方法,我們在android.os.Debug調試工具使用方法 簡單的說過,有關實際使用如
 詳解 Android 的 Activity 組件
簡介: 本文詳細介紹了 Android 應用編程中 Activity 的生命周期、通信方式和 Intent Filter 等內容,並提供了一些日常開發中經常用
 Android之自定義背景按鈕、自定義形狀按鈕
在android開發應用中,默認的Button是由系統渲染和管理大小的。而我們看到的成功的移動應用,都是有著酷炫的外觀和使用體驗的。因此,我們在開發產品的時候,需要對默