在本練習中,你將學習如何構建一個能讓用戶添加新便箋但不能編輯的簡單便箋列表。具體練習目的如下:
簡單便箋列表ListActivitIEs的基本功能及其創建和控制菜單選項
如何使用數據庫存儲便箋。
如何通過調用SimpleCursorAdapter方法,用一個數據庫指針將數據綁定至ListVIEw(便箋列表視圖類對象)。
屏幕布局的基本知識,包括如何組織列表視圖的布局,如何添加便箋至Activity菜單,以及如何控制這些菜單選擇(操作)。
第一步
在Eclipse中打開Notepadv1工程.
Notepadv1 工程是本階段練習的一個起始入口。
1. 通過菜單File > New > Android Project新建一個android 工程。
2. 在該工程對話框中,選擇Create project from existing source。
3. 點擊浏覽,打開文件夾目錄對話框,選擇下載到本地的NotepadCodeLab NotepadCodeLab文件目錄,並將其加載到該工程中。
4. 若加載文件至該工程所配置路徑正確,則可以在你所選定的資源路徑下看到該工程名及配置路徑。
5. 單擊Finish。你將在Eclipse IDE的文件夾樹形目錄中看到Notepadv1 工程已打開。
如果你看到錯誤提示,或與某一Android壓縮包相關的錯誤提示信息的話,鼠標右鍵選擇工程並在彈出的右鍵菜單中選擇android Tools > Fix Project PropertIEs. (工程在所配置錯誤的路徑下查找庫文件,並修復。)
第二步
訪問和修改數據
在本練習中,我們用一個SQLite數據庫來存儲我們的數據。只要你的應用程序需要訪問或修改數據,就會發現這個數據庫給你的幫助極大。如果你想通過其它方式訪問或修改數據,你將不得不通過調用ContentProvider這一暴露數據的方法。
如果你對用數據庫訪問或修改數據的方法很感興趣的話,你可以學到有關提供數據內容或存儲、恢復及暴露數據的全部主題。SDK目錄下的samples文件夾目錄中的Notepad例子也給出了如何創建一個ContentProvider的例子。
關注一下NotesDbAdapter這個類——該類封裝了如何通過SQLite數據庫訪問其中數據的方法,此方法可以讓我們存儲並更新便箋於SQLite數據庫中。
在該類的最開始是一些常量定義,這些常量在應用程序需要“從數據庫中的樹形字段名中查找對應數據”時會用到。同時還有一個有關數據庫創建字符串的定義,用於創建一個尚不存在的數據庫的關系模型。
我們將有個名為’data’的數據庫,並有一個稱為’ notes’的單表。此單表有三個字段:_id, title和body。_id按以下劃線起始的命名慣例命名,在android SDK中的許多地方都會用到,有助於對某一狀態保持跟蹤。字段_id一般只有在查詢或更新數據庫(按列的方式等等)時才需定義。另外兩個是存儲數據的簡單文本字段。
類NotesDbAdapter的構造函數有一個允許其與Android操作系統的各方面交互的 Context(暫沒想到更好的譯法)。這對於一個需要用一些方式與android操作系統交互的類來說再常見不過了。Activity類內生成Context類,所以一般當你需要Context類時,只需從Activity類傳this指針即可。
類成員函數open()是調用DatabaseHelper類的一個實例,該成員函數是SQLiteOpenHelper類的局部實現。它調用getWritableDatabase(),此接口用於創建/打開一個數據庫。
類成員函數close()的功能即關閉數據庫,釋放數據庫與該類關聯的一些資源。
類成員函數createNote() 接收一個新便箋的標題及實體這兩個參數的字符串,用於在數據庫中創建一條新便箋。假定該新便箋創建成功,則該接口會返回此新創建的便箋在數據庫中的行_id值。
類成員函數deleteNote()是按某一便箋所對應的行id值,將數據庫中此便箋刪除。
類成員函數fetchAllNotes() 發出一個查詢並返回一個數據庫中所有記錄的一個指針。query()方法調用值得好好檢查和理解。第一個形參DATABASE_TABLE為將要查詢的數據庫單表表名(在本例中為"notes")。接下來形參是我們希望返回的一系列的信息,在本例中我們希望返回的是便箋行ID(_id), 標題(title)和 正文(body)這三列,所有這些在字符串型數組中已規定好了。剩下的形參按順序分別是:selection, selectionArgs, groupBy, having 和 orderBy。若該參數為空,則意味著我們想返回所有數據,不必分組,並按默認順序。具體細節請參看SQLiteDatabase。
注意: 返回的是一個指針而非一組行的集合。這樣能使android更有效地使用資源——不必將大量數據直接讀入內存——而是通過指針,這樣指針可以按需” 恢復和釋放數據”,這一點對於有許多行的表尤其有效。
類成員函數fetchNote() 與fetchAllNotes() 類似。但該方法的功能是”得到某一特定行的記錄”。第一個參數(置為true)表示只想得到一個明確的結果。參數(第四個參數)則按所傳入的特定行id查找指定行的記錄。所以我們返回的是一個只包含特定行的指針。
最後,類成員函數updateNote()傳入三個參數行號(rowId), 便箋標題(title)和 便箋正文(body),並用一個ContentValues實例去更新指定行號的記錄。
第三步
布局和事件
大多數Activity類都有一個布局與之關聯。對用戶而言,布局即是Activity的界面。在本例中我們的布局將覆蓋整個屏幕並提供便箋列表。全屏布局並非是一個Activity的唯一選擇。你也許也想使用一個浮動布局(例如,一個對話框或警告),或許你就根本不需要一個布局(這種情況下,Activity對用戶而言則是不可見的,除非某一特定類型的布局方可。)
打開res/layout目錄下的notepad_list.xml文件(為了查看XML 標記,你得點擊底部的XML Tab)
這是一個大部分為空的布局定義文件。這裡有些有關一個布局文件你必須了解的內容:
·所有的android布局文件都必須以XML 頭標記行作為起始行:<?XML version="1.0" encoding="utf-8"?>。
·緊接著的多為(但不一定總是)一個有關布局類型的定義,本例中即為LinearLayout。
·android的XML名字空間必須在XML中的組件或布局的最外層定義,這樣 android: tags就可以在該文件的其余部分使用:
XMLns:android="http://schemas.android.com/apk/res/android"
第四步
為存儲便箋列表,我們需要創建布局。在LinearLayout元素中添加如下代碼,則整個文件看起來如下:
<?XML version="1.0" encoding="utf-8"?>
<LinearLayout XMLns:android="http://schemas.android.com/apk/res/android"
android:layout_width="wrap_content"
android:layout_height="wrap_content">
<ListVIEw android:id="@android:id/list"
android:layout_width="wrap_content"
android:layout_height="wrap_content"/>
<TextVIEw android:id="@android:id/empty"
android:layout_width="wrap_content"
android:layout_height="wrap_content"
android:text="@string/no_notes"/>
</LinearLayout>
·在ListView和TextVIEw 標簽中,其id字符串中的符號@的意思是:XML 解析器要解析並擴展此id字符串@字符後的部分,並用到此ID對應的數據源。
·ListView和TextView可視為同一事物的兩種不同視圖,但一次只能顯示這兩者之一。當有便箋內容需要顯示時就是ListView,而TextVIEw (其默認值為"仍無便箋!" 該值作為一個字符串資源在res/values/strings.XML文件中定義 )則在沒有任何便箋內容顯示時顯示。
·由於Android開發平台已默認提供了列表(list)和空ID(empty id),所以,我們必須給id添加android:這一前綴(例如:@android:id/list )。
·如果公共接口ListAdapter沒有數據傳遞給ListView,則ListView將自動加載空id。默認為用ListAdapter查找,但這並非唯一(相應地),你可以通過對ListView調用setEmptyView(VIEw)改變默認視圖。更寬泛地說,類android.R是一個由android平台提供給開發者的一套預定義好的資源,而開發者自己工程的資源類自己的工程名.R則是開發者自己定義的。
在資源類android.R中的資源可以在XML文件中用名字空間前綴android: (正如我們通過上面的例子看到的)。
第五步
資源和R類
在Eclipse工程中res/目錄下的文件夾即用於存放資源。這個目錄下的文件夾及文件有特定結構。
該目錄下的文件夾及文件中定義的資源即為R類的入口,可以讓你的應用程序很方便地訪問和使用這些資源。R類是通過eclipse插件調用res/下的文件夾中的內容自動生成的(或是apprt,如果你使用命令行工具的話)。此外,這些資源將作為你應用程序的一部分而綁定並部署至你的工程中。
若想在ListVIEw中生成若干列的便箋的話,我們還需要為每一行定義一個視圖:
1. 在res/目錄下創建一個新文件,命名為notes_row.XML。
2. 添加如下內容(注意:再次用到XML標記頭,第一定義了android XML 名字空間)
3. <?XML version="1.0" encoding="utf-8"?>
4. <TextVIEw android:id="@+id/text1"
5. XMLns:android="http://schemas.android.com/apk/res/android"
6. android:layout_width="wrap_content"
android:layout_height="wrap_content"/>
這是每一個便箋標題行都會用到的視圖效果——這種便箋只有一條文本。
在本例中我們將創建一個名為text1的新id。在id字符串中@後的+指示該id若不存在的話則自動創建為一個資源,所以我們在fly上定義為text1並稍後使用它。
7. 保存文件。
打開並仔細觀察工程中的R.Java類,你將發現notes_row和text1有了一些新定義(我們自己的新定義),這意味著我們現在可以在代碼中訪問這些資源了。
第六步
接下來,打開資源中的Notepadv1類。在接下來的幾步中,我們將改變這個類使之成為一個列表容器,可以顯示並允許我們添加新的便箋。
Notepadv1 will inherit from a subclass of Activity called a ListActivity, which has extra functionality to accommodate the kinds of things you might want to do with a list, for example: displaying an arbitrary number of list items in rows on the screen, moving through the list items, and allowing them to be selected.
Take a look through the existing code in Notepadv1 class. There is a currently an unused private fIEld called mNoteNumber that we will use to create numbered note titles.
There are also three override methods defined: onCreate, onCreateOptionsMenu and onOptionsItemSelected; we need to fill these out:
·onCreate() is called when the activity is started — it is a little like the "main" method for an Activity. We use this to set up resources and state for the activity when it is running.
·onCreateOptionsMenu() is used to populate the menu for the Activity. This is shown when the user hits the menu button, and has a list of options they can select (like "Create Note").
·onOptionsItemSelected() is the other half of the menu equation, it is used to handle events generated from the menu (e.g., when the user selects the "Create Note" item).
第七步
將Notepadv1的繼承關系由Activity改為ListActivity:
public class Notepadv1 extends ListActivity
注意:你得通過Eclipse 將ListActivity導入到Notepadv1,在你按上述方式改寫代碼後,按組合鍵Ctrl-Shift-O(Windows或Linux),或者cmd-shift-O(Mac OS)即可將你改寫的繼承關系(按一定組織)導入到Notepadv1中。
第八步
方法 onCreate() 的實現代碼:
這裡我們將用在XML文件中創建的notepad_list
,為Activity設置一個標題(在屏幕頂部顯示),定義一個用於訪問便箋數據的NotesDbAdapter對象,並在便箋列表中設置可用的標題:
1. 在方法 onCreate 中, 以傳入的參數 savedInstance調用接口Statesuper()。
2. 在類中聲明一個私有成員變量。
3. At the top of the class, create a new private class fIEld called mDbHelper of class NotesDbAdapter.
4. Back in the onCreate method, construct a new NotesDbAdapter instance and assign it to the mDbHelper fIEld (pass this into the constructor for DBHelper)
5. Call the open() method on mDbHelper to open (or create) the database.
6. Finally, call a new method fillData(), which will get the data and populate the ListVIEw using the helper — we haven't defined this method yet.
onCreate() should now look like this:
@Override
public void onCreate(Bundle savedInstanceState) {
super.onCreate(savedInstanceState);
setContentVIEw(R.layout.notepad_list);
mDbHelper = new NotesDbAdapter(this);
mDbHelper.open();
fillData();
}
And be sure you have the mDbHelper fIEld definition (right under the mNoteNumber definition):
private NotesDbAdapter mDbHelper;
Step 9
關於菜單的屬性
T記事本應用程序中我們只是在界面添加了菜單。你還可以給每個菜單項添加快捷鍵,甚至將菜單項加入其它應用程序中。
Fill out the body of the onCreateOptionsMenu() method.
We will now create the "Add Item" button that can be Accessed by pressing the menu button on the device. We'll specify that it occupy the first position in the menu.
1. In strings.XML resource (under res/values), add a new string named "menu_insert" with its value set to Add Item:
<string name="menu_insert">Add Item</string>
Then save the file and return to Notepadv1.
2. Create a menu position constant at the top of the class:
public static final int INSERT_ID = Menu.FIRST;
3. In the onCreateOptionsMenu() method, change the super call so we capture the boolean return as result. We'll return this value at the end.
4. Then add the menu item with menu.add().
The whole method should now look like this:
@Override
public boolean onCreateOptionsMenu(Menu menu) {
boolean result = super.onCreateOptionsMenu(menu);
menu.add(0, INSERT_ID, 0, R.string.menu_insert);
return result;
}
The arguments passed to add() indicate: a group identifIEr for this menu (none, in this case), a unique ID (defined above), the order of the item (zero indicates no preference), and the resource of the string to use for the item.
Step 10
Fill out the body of the onOptionsItemSelected() method:
This is going to handle our new "Add Note" menu item. When this is selected, the onOptionsItemSelected() method will be called with the item.getId() set to INSERT_ID (the constant we used to identify the menu item). We can detect this, and take the appropriate actions:
1. The super.onOptionsItemSelected(item) method call goes at the end of this method — we want to catch our events first!
2. Write a switch statement on item.getItemId().
In the case of
INSERT_ID, call a new method, createNote(), and return true, because we have handled this event and do not want to propagate it through the system.
3. Return the result of the superclass' onOptionsItemSelected() method at the end.
The whole onOptionsItemSelect() method should now look like this:
@Override
public boolean onOptionsItemSelected(MenuItem item) {
switch (item.getItemId()) {
case INSERT_ID:
createNote();
return true;
}
return super.onOptionsItemSelected(item);
}
第十一步
添加一個新的方法createNote():
In this first version of our application, createNote() is not going to be very useful. We will simply create a new note with a title assigned to it based on a counter ("Note 1", "Note 2"...) and with an empty body. At present we have no way of editing the contents of a note, so for now we will have to be content making one with some default values:
1. Construct the name using "Note" and the counter we defined in the class: String noteName = "Note " + mNoteNumber++
2. Call mDbHelper.createNote() using noteName as the title and "" for the body
3. Call fillData() to populate the list of notes (inefficIEnt but simple) — we'll create this method next.
The whole createNote() method should look like this:
private void createNote() {
String noteName = "Note " + mNoteNumber++;
mDbHelper.createNote(noteName, "");
fillData();
}
Step 12
列表容器
我們練習的例子用法SimpleCursorAdapter將一個數據庫指針綁定到一個列表視圖(ListVIEw)中,而且這也是使用一個ListAdapter類對象最常用的方式。還有像ArrayAdapter這樣的,用於將一個列表或內存中數組形式的數據綁定至一個便箋列表中,以實現該類對象的其他使用方式。.
實現方法fillData()定義部分:
該方法用到接口SimpleCursorAdapter(),此接口將傳入的一個數據庫指針綁定至布局文件提供的字段中。這些字段定義了我們布局文件中行元素(本例中,我們用text1作為布局文件notes_row.XML的行元素),這樣,我們就可以很容易地根據列表行字段將數據庫中的數據填充至便箋列表中。
為做到這一點,我們得根據返回的指針中的標題字段(title),將其映射到我們的text1文本視圖中。這通過定義兩個數組實現,第一個數組是一組映射源字段對應的字符串(本例中即”標題”,來自於常量NotesDbAdapter.KEY_TITLE),第二個則是一個整形數組,保存我們所要綁定數據至其中的諸視圖的一個索引(本例中即為R.id.text1 文本視圖)。
這段實現代碼很長,讓我們先好好看看:
private void fillData() {
// Get all of the notes from the database and create the item list
Cursor c = mDbHelper.fetchAllNotes();
startManagingCursor(c);
String[] from = new String[] { NotesDbAdapter.KEY_TITLE };
int[] to = new int[] { R.id.text1 };
// Now create an array adapter and set it to display using our row
SimpleCursorAdapter notes =
new SimpleCursorAdapter(this, R.layout.notes_row, c, from, to);
setListAdapter(notes);
}
這裡我們所實現的有:
1. 在從接口mDbHelper.fetchAllNotes()得到一個指針後,我們用一個名為startManagingCursor()的方法來讓Android操作系統負責,而無需我們開發者勞心費神該指針的整個生命周期(在練習3中我們將涉足生命周期的實現這一話題,但現在我們暫且只需知道此方法可以讓android操作系統替我們做一些資源管理方面的工作)。
2. 接下來我們聲明一個字符串型數組,該數組包含我們想定義的列字段(本例中,我們就一個標題字段)。以及一個整形數組,該數組包含我們將要綁定按列組織的數據(這些列也得相應地按一定順序,本例中,由於我們每條便箋只定義了一個字段——標題)所至視圖的索引。
3. 下面就是方法SimpleCursorAdapter的實例化了。與android API中的很多類相似,該方法需要一個Context才能執行,所以我們傳遞一個this指針給該Context(來自於Activity實現Context的諸多派生類),我們傳遞notes_row視圖作為我們數據的容器,還有所創建的指針,接下來我們創建的若干數組。
以後,請記住從便箋列表的不同列到資源的映射關系與兩個數組的相對順序息息相關。如果我們需要將綁定更多列字段,至更多視圖,我們需要好好定義一下這兩個數組的順序。例如,我們可能用{ NotesDbAdapter.KEY_TITLE, NotesDbAdapter.KEY_BODY }和{ R.id.text1, R.id.text2 }兩個字段綁定其至便箋列表的某一行(並且我們還需在notes_row.XML文件中定義text2為其正文)。這就是如何將多個字段的數據綁定至便箋列表的某一行的方法。(同樣還可以得到自定義的行布局。)如果你得到一個類未找到的編譯錯誤的話,用組合鍵ctrl-shift-O (Windows或Linux)來cmd-shift-O(Mac)組織數據導入綁定的順序即可修正此編譯錯誤。
第十三步
運行吧!
1. 右擊Notepadv1工程。
2. 從右鍵彈出菜單中選擇
Run As >
android Application。
3. 如果你看到一個對話框彈出,選擇運行android可執行程序作為運行你的應用程序的方式(你也可以用靠近對話框頂部的鏈接來將此選項設置為你IDE的默認選項,推薦這種設置,以免你每次都收到來自插件的提示信息,否則你會不勝其煩)。
4. 通過單擊菜單按鈕並選擇添加新條目菜單項來添加一條新便箋。
答案和下一步學習
你可以從文件夾中看到本練習中涉及的類的答案,並可與你本地練習寫的代碼進行對比。
一旦你准備好了,就繼續進行下一個練習——
教程:記事本應用程序開發練習2——該練習教你如何為你的記事本應用程序添加創建、編輯及刪除便箋的功能。
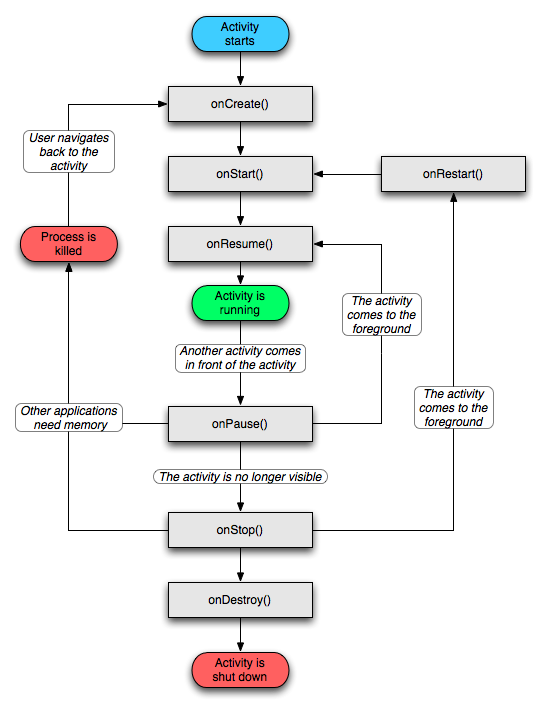
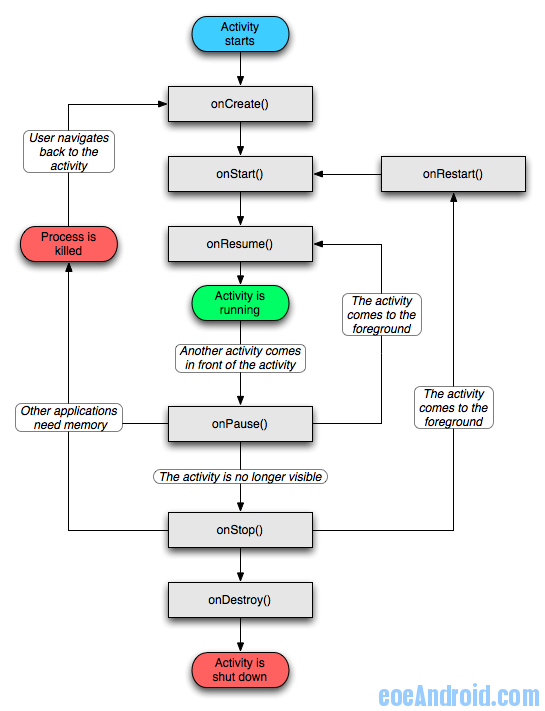 Activity生命周期
 使用 Eclipse 和 Android 小部件進行 Android 開發的簡介(四)
 使用 Eclipse 和 Android 小部件進行 Android 開發的簡介(一)
 Android之Ultra-light 模式和 Lotus iNotes 重定向器(二)