編輯:開發入門
簡介
難以想象還有哪種技術比移動電話更流行。大量的平台在銷售和心理份額方面爭占此行業的頂級市場。設備是高級的工程樣品,真正讓它們流行起來的動力在於這些平台上可用的大量應用程序帶來的用戶體驗。具體來說,iPhone 和 android 平台是最新的設備,點燃了人們的消費欲望。
對移動用戶可用的大部分應用程序是由移動開發人員通過各平台供應商提供的核心 SDK 編寫的。移動設備的流行離不開大量天才的 web 技術程序員,過去十年間,他們在 Web 上大獲成功,現在又開創了一種新型的應用程序 — 混合應用程序,即既使用 web 浏覽器接口又使用本地移動組件的應用程序。針對 iPhone 和 Android 都存在混合應用程序,不過本文的重點放在 android 混合應用程序及 JavaScript 和 JSON 的使用上。
混合應用程序是用 Android 的 WebVIEw 控件中的 WebKit 引擎構建的。這是一個用戶界面小部件,它向 Android 程序員提供 WebKit 的功能。此控件可用於在應用程序中呈現遠程 web 頁面,以便為開發人員和用戶等提供熟悉的用戶界面體驗,以及在本地 android 應用程序中利用強大且靈活的 JavaScript 環境。
混合應用程序通常利用 WebVIEw 小部件來為用戶界面元素充分利用 WebKit 的優勢,但是混合應用程序不僅僅是簡單地在小部件中顯示一些 HTML。混合應用程序是多才多藝的 — android SDK 中包含的廣泛功能加上 HTML、CSS 和 Javascript 等 web 技術,使得混合應用程序的功能不可限量。為了實際了解混合應用程序的概念,本文將介紹一個名為 androidJSON 的樣例應用程序,它實現了 Activity、WebVIEw 和 JSON 之間的很多交互,以交換數據。該應用程序演示了 Activity 和 WebVIEw 宿主的 Html 及 Javascript 之間的很多交互,主要特性是一個 JavaScript 計算器。
首先,我們來看直接在 android 應用程序中嵌入一個 WebKit 引擎。
回頁首
嵌入在 android 中的 JavaScript 計算器
大部分基於 SDK 的 android 應用程序都包含 Activity 類的一個或多個實現。Activity 類本質上是一個屏幕或頁面,其中包含由應用程序用戶體驗的用戶界面元素。
Activity 顯示一組由程序員定義的用戶界面元素,比如按鈕、標簽、文本輸入框、單選按鈕列表,等等。所有預期的條目都可在 android SDK 中找到。除了這些用戶界面元素之外,還有一個特殊的小部件,就是 WebVIEw。
JavaScript 計算器演示了 Activity 的 Java 環境和 WebVIEw 的 Javascript 環境之間相輔相成的關系。應用程序不僅僅是要求 WebVIEw 顯示 Html 內容 — 它實際上是連接 Java 環境,以向 Javascript 環境提供功能,這樣可以將兩者緊密地集成在一起,從而帶來獨特的用戶體驗。一旦兩個環境連接起來,就可以 JSON 形式交換數據,以交付各種特性,本文將全面解釋這些特性。我們首先來看 JavaScript 計算器如何利用 WebVIEw 小部件。
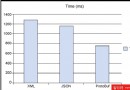
在深入應用程序是如何構造的細節之前,先花點時間回顧一下應用程序的各種特性。圖 1 展示了應用程序屏幕。
圖 1. 展示正在工作的 JavaScript 計算器
在名為 androidJSON 的樣例本地 android 應用程序中,屏幕是用Activity 組件定義的。它在屏幕的上半部分包含傳統的用戶界面元素,比如一個 TextVIEw(靜態標簽)、一個 EditText(文本框,用戶在這裡輸入公式)和三個按鈕(即 Simple、Complex 和 Make Red)。Activity 也具有 WebVIEw 控件的單個實例,用於顯示屏幕的下半部分。
WebVIEw 顯示一個與 android 應用程序打包在一起的 HTML 文件 (index.Html),不過您也可以從 Internet 單獨下載此文件。該 web 頁面包含標題、一些樣例文本、計算結果和六個執行各種功能的按鈕(Log Info、Log Error、Dynamic、How Many Calls、History 和 Kill This App)。
這個項目中最有趣的文件是 androidJSON.Java(android 應用程序代碼)、index.Html(web 頁面)和 main.XML(一個 UI 布局文件,後面將會介紹)。參見 下載 部分到這些文件的鏈接。
首先,來看 Activity 中三個按鈕的功能:
<body> 標記中的文本元素變成紅色。現在來看 index.Html 文件中的函數,該文件由嵌入的 WebVIEw 控件在運行時啟用。
eval 函數。但是,我們這裡將重點放在基本的示例應用程序上,而不是介紹完善的生產性應用程序。
finish() 而終止 android 活動的回調函數。跟很多不完善的應用程序一樣,此 Android 應用程序也使用了內置在 Android 中的日志功能。本文中展示的一些屏幕截圖來自 Eclipse 中的 Dalvik Debug Monitor Service (DDMS) 視圖,其中 LogCat 窗口是可見的。要獲得更多關於如何使用 android 開發工具的信息,請參考 參考資料 中的鏈接。
剛才解釋了應用程序的函數,現在來看用戶界面是如何構造的。
回頁首
設置用戶界面
為該應用程序創建用戶界面要調用前面介紹過的三個文件。首先是布局文件 main.XML,如 清單 1 所示。
清單 1. main.XML,用戶界面布局文件
<?xml version="1.0" encoding="utf-8"?>
<LinearLayout xmlns:android="http://schemas.android.com/apk/res/android"
    android:orientation="vertical"
    android:layout_width="fill_parent"
    android:layout_height="fill_parent"
    >
    <TextVIEw android:layout_width="fill_parent"
android:layout_height="wrap_content" android:text="@string/title" />
    <EditText android:id="@+id/formula" android:layout_width="fill_parent"
android:layout_height="wrap_content" android:text="" android:visible="False" />
    <LinearLayout XMLns:android="http://schemas.android.com/apk/res/android"
        android:orientation="horizontal"
        android:layout_width="fill_parent"
        android:layout_height="wrap_content">
        <Button android:text="Simple" android:id="@+id/btnSimple"
android:layout_width="wrap_content" android:layout_height="wrap_content">
</Button>
        <Button android:text="Complex" android:id="@+id/btnComplex"
 android:layout_width="wrap_content" android:layout_height="wrap_content">
</Button>
        <Button android:text="Make Red" android:id="@+id/btnRed"
android:layout_width="wrap_content" android:layout_height="wrap_content">
</Button>
    </LinearLayout>
    <WebVIEw android:layout_width="fill_parent" android:layout_height="fill_parent"
 android:id="@+id/calculator" android:layout_weight="1" />
</LinearLayout>
在 清單 1 中,布局包含各種用戶界面元素。注意,android:id 屬性使得應用程序可以引用布局中的特定小部件。例如,WebVIEw 包含calculator 的一個 id;但是 TextVIEw 不包含 id,因為它的值在應用程序的整個生命期內是不變的。
androidJSON.Java 中的 onCreate() 方法負責搭建布局,如 清單 2所示。
清單 2. 設置用戶界面
public class AndroidJSON extends Activity {
    private final String tag = "androidJSON";
    private WebView browser = null;
    private int flipflop = 0;

    /** Called when the activity is first created. */
    @Override
    public void onCreate(Bundle savedInstanceState) {
        super.onCreate(savedInstanceState);
        setContentView(R.layout.main);


        final EditText formula = (EditText) this.findViewById(R.id.formula);
        final Button btnSimple = (Button) this.findViewById(R.id.btnSimple);
        final Button btnComplex = (Button) this.findViewById(R.id.btnComplex);
        final Button btnRed = (Button) this.findVIEwById(R.id.btnRed);
    // remaining code removed for brevity - shown in next listings
}
通過調用 setContentVIEw() 搭建布局。注意,通過調用findVIEwById() 方法設置用戶界面元素。每次保存 main.XML 文件時會自動產生 R.Java 文件。包含 android:id 屬性的布局元素變成R.id 類中的值,如 清單 3 所示。
清單 3. R.Java
/* AUTO-GENERATED FILE.  DO NOT MODIFY.
 *
 * This class was automatically generated by the
 * aapt tool from the resource data it found.  It
 * should not be modifIEd by hand.
 */

package com.msi.androidJSon;

public final class R {
    public static final class attr {
    }
    public static final class drawable {
        public static final int icon=0x7f020000;
    }
    public static final class id {
        public static final int btnComplex=0x7f050002;
        public static final int btnRed=0x7f050003;
        public static final int btnSimple=0x7f050001;
        public static final int calculator=0x7f050004;
        public static final int formula=0x7f050000;
    }
    public static final class layout {
        public static final int main=0x7f030000;
    }
    public static final class string {
        public static final int app_name=0x7f040001;
        public static final int title=0x7f040000;
    }
}
本文稍後還會詳細介紹 Button 設置代碼,現在將重點放在 WebView 控件或小部件的設置上。盡管 Button 和其他用戶界面元素相當直觀,但是 WebVIEw 還是得稍微費點功夫。但是不必擔心 — 它也不是那麼難,具體來說重點就是使用常用的剪切粘貼技術!來看一下清單 4 中的代碼段,它還是來自 androidJSON.Java 中的onCreate() 方法。
清單 4. 設置 WebVIEw 小部件
        // connect to our browser so we can manipulate it
        browser = (WebView) findViewById(R.id.calculator);

        // set a webview client to override the default functionality
        browser.setWebViewClient(new wvClient());

        // get settings so we can config our WebView instance
        WebSettings settings = browser.getSettings();

        // JavaScript?  Of course!
        settings.setJavaScriptEnabled(true);

        // clear cache
        browser.clearCache(true);

        // this is necessary for "alert()" to work
        browser.setWebChromeClient(new WebChromeClIEnt());

        // add our custom functionality to the Javascript environment
        browser.addJavascriptInterface(new CalculatorHandler(), "calc");

        // uncomment this if you want to use the webview as an invisible calculator!
        //browser.setVisibility(VIEw.INVISIBLE);

        // load a page to get things started
        browser.loadUrl("file:///android_asset/index.Html");

        // allows the control to receive focus
        // on some versions of Android the webvIEw doesn't handle input focus properly
        // this seems to make things work with android 2.1, but not 2.2
       // browser.requestFocusFromTouch();
注意,在 清單 4 中,您將一個名為 browser 的 Activity 范圍變量捆綁到了 WebVIEw 控件。WebVIEw 是一個相當復雜的類,可高度定制。例如,您需要設置幾個類,以得到與 web 浏覽器相關的預期函數。這是程序員必須投入一定精力來得到一些有用函數的地方之一。但是,此定制是沒有限制的。對於此應用程序的目的來說,WebVIEw 控件已經進行了最低限度的部署。
WebViewClIEnt 提供用於捕獲各種事件的鉤子,這些事件包括頁面加載開始和結束、表單重新提交、鍵盤截取以及程序員喜歡跟蹤並操縱的很多其他事件。類似地,您需要 WebChromeClIEnt 的一個實例,用於允許諸如非常有用的 alert() JavaScript 函數之類的函數。使用 WebSettings 來為控件啟用 JavaScript。
要導致 WebVIEw 控件導航到一個頁面,可以采用幾種不同的方式。在這個應用程序中,您采用 loadurl() 方法,帶有到打包為項目資產的 index.Html 文件的全限定路徑。要獲得更多關於設置 WebVIEw 控件的信息,請在線查看 android.webkit 包的文檔(參見 參考資料)。名為 index.Html 的文件直接從應用程序隨帶的資源加載到 WebvIEw 控件中。注意 圖 2 中資源下面的 assets 文件夾。此文件夾是存儲混合應用程序中使用的 Html 文件的理想位置。(查看 圖 2 的文本版本。)
圖 2. Eclipse 中的項目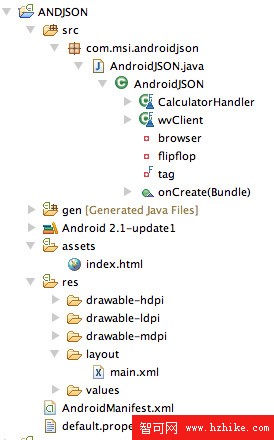
處理 WebView 最重要且有趣的方面是下一步:將 WebVIEw 的 JavaScript 環境連接到 android Activity 代碼。
 Android 動畫框架詳解,第 2 部分
簡介: 這是由兩部分組成的 Android 動畫框架詳解的第二部分實例篇。在閱讀本篇之前,建議您首先閱讀本系列的第一部分 Android 動畫框架詳解之原理篇
 android 單元測試方法 類繼承 Instrumentation
之所以有那麼多XXXTestCase主要是為了簡化工作。例如當你想對一個訪問數據庫的功能進行測試時,首先需要自己啟動並初始化數據庫。在 這裡是類似的,如果你想測試一
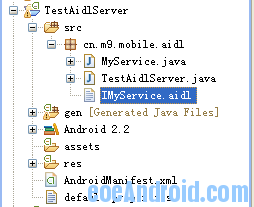 什麼是AIDL服務
跨進程訪問(AIDL服務)android系統中的進程之間不能共享內存,因此,需要提供一些機制在不同進程之間進行數據通信。我們知道4個Android應用程序組件中的3個(
 Android 動畫框架詳解,第 1 部分
簡介: Android 平台提供了一套完整的動畫框架,使得開發者可以用它來開發各種動畫效果。Android 動畫框架詳解由原理篇和實例篇兩部分組成。本文是第一