編輯:開發入門
使用小部件的樣例應用程序
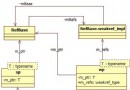
現在我們要修改現有應用程序,使其像圖 8 中所示的那樣。本例的目的在於讓讀者熟悉在真實應用程序中對 textVIEw、editText、Button 和 Toast 等一些基本小部件的使用。
我們的應用程序將包含一個標題欄,其中含有 “WELCOME!!!” 消息。它將有三個 textVIEw 小部件,從頂部開始垂直排列:一個是用默認字體表示的 “Hello World, how're you?”;第二個是 “Welcome to my first android app”,斜體襯線文本,居中對齊,帶白色背景;第三個是 “Type anything and press the button”,粗體等寬文本,帶紅色背景。這些之後是一個 editText小部件,用於接受用戶輸入,然後是一個按鈕小部件(按鈕上顯示 “Click Me!” 消息)。按下按鈕時,在 editText 小部件中輸入的任何內容都會出現在屏幕底部中心的 Toast 小部件中。
這裡不需要太多的實現代碼。讀者應當注意如何使用 ADT 的 GUI 編輯器為 XML 文件輕松將小部件放到應用程序中,以及如何使用由 Eclipse 提供的 “屬性” 視圖方便地設置小部件屬性。本例將展示如何對 UI 和實現部分進行獨立編碼。
圖 8. 帶有小部件的 android Virtual Device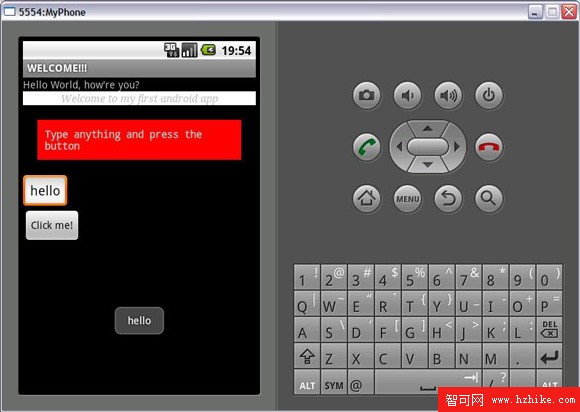
string.XML
讓我們在 string.XML 文件中添加一些新的字符串,更改現有的 welcome 字符串,最後是標題字符串。另外為兩個 textVIEws 分別定義白色和紅色背景。
清單 2. string.XML 文件
<?XML version="1.0" encoding="utf-8"?>
<resources>
    <string name="hello">Hello World, how\'re you?</string>
    <string name="app_name">Hello Android</string>
    <string name="title">WELCOME!!!</string>
    <string name="mainText">Welcome to my first android app</string>
    <string name="subText">Type anything and press the button</string>
    <color name="White">#FFFFFF</color>
    <color name="Red">#FF0000</color>
</resources>
我們將 “hello” 字符串更改為包含 “Hello World, how're you?”。注意,這裡的單引號需要轉義字符('\')。我們還定義了兩個新的字符串:mainText 和 subText,分別用白色和紅色背景。
main.XML
讓我們使用 main.XML 的布局選項卡來拖放兩個新的 textVIEws:一個 editText 小部件和一個按鈕小部件。然後我們將使用 main.XML 中的屬性選項卡來編輯每個小部件的屬性。
清單 3. main.XML 文件
<?xml version="1.0" encoding="utf-8"?>
<LinearLayout XMLns:android="http://schemas.android.com/apk/res/android"
    android:orientation="vertical"
    android:layout_width="fill_parent"
    android:layout_height="fill_parent"
    >
<TextView
    android:layout_width="fill_parent"
    android:layout_height="wrap_content"
    android:text="@string/hello"
    />
<TextView
    android:layout_height="wrap_content"
    android:layout_width="fill_parent"
    android:id="@+id/mainTextView"
    android:gravity="center"
    android:text="@string/mainText"
    android:textStyle="italic"
    android:typeface="serif"
    android:background="@color/White">
</TextView>
<TextView
    android:layout_height="wrap_content"
    android:layout_width="fill_parent"
    android:layout_margin="20sp"
    android:gravity="left"
    android:id="@+id/subTextView"
    android:padding="10sp"
    android:text="@string/subText"
    android:textStyle="bold"
    android:typeface="monospace"
    android:background="@color/Red">
</TextVIEw>
<EditText
    android:text="Enter text here"
    android:id="@+id/EditText01"
    android:layout_width="wrap_content"
    android:layout_height="wrap_content">
</EditText>
<Button
    android:text="Click me!"
    android:id="@+id/Button01"
    android:layout_width="wrap_content"
    android:layout_height="wrap_content">
</Button>
</LinearLayout>
至此,我們定義了我們的 UI。現在需要將我們的活動代碼與它相鏈接。
MainActivity.Java
這是將 UI 鏈接到實現的文件。如同 HelloWorld 應用程序,我們使用 Activity.onCreate(Bundle) 方法來裝飾屏幕上的所有 UI。已重寫的 onClick(VIEw) 方法將包含按鈕點擊的功能,其中用戶輸入文本會被讀取並顯示在 toast 小部件中的屏幕上。
清單 4. MainActivity.Java 文件
package com.example.helloandroid;

import android.app.Activity;
import android.os.Bundle;
import android.view.VIEw;
import android.widget.Button;
import android.widget.EditText;
import android.widget.Toast;

public class MainActivity extends Activity {
    /** Called when the activity is first created. */
    @Override
    public void onCreate(Bundle savedInstanceState) {
        super.onCreate(savedInstanceState);
        setContentView(R.layout.main);

        String title = getString(R.string.title);
        setTitle(title);    // done so that we can change the default title

        //get handles to editText and button widgets
        final EditText eText = (EditText) findViewById(R.id.EditText01);
        final Button button = (Button) findViewById(R.id.Button01);

        button.setOnClickListener(new Button.OnClickListener(){

            @Override
            public void onClick(VIEw v) {
                //get the String entered into the editText widget
                CharSequence editText = eText.getText();

                //display the toast
                Toast.makeText(MainActivity.this, editText, Toast.LENGTH_LONG).show();
            }
        });

    }
}
使用該代碼,我們會得到如圖 8 所示的應用程序。
 Android學習之Android的智能指針
在android的源代碼中,經常會看到形如:sp<xxx>、wp<xxx>這樣的類型定義,這其實是android中的智能指針。智能指針是C++中
 在 Android 應用程序中使用 Internet 數據(三)
使用 JSONXML 是 android 上的一等公民,鑒於依賴於 XML 的 Web 服務的數量,這是個好事。很多服務還支持另一個流行格式 JSON。它通常比 XML
 Android XML中自定義菜單
和android UI layout一樣,我們也可以在XML中定義應用程序的菜單。通過在菜單的onCreateOptionsMenu方法中膨脹菜單layout
 Android開發教程之並發性和聯網
Android 應用程序一個最常見的任務就是檢索數據或通過網絡將數據發送到遠程服務器。這一操作的結果通常是一些您想要展示給用戶的新數據。這意味著您需要修改用戶界面。大多