編輯:開發入門
簡介: Android 平台提供了一套完整的動畫框架,使得開發者可以用它來開發各種動畫效果。Android 動畫框架詳解由原理篇和實例篇兩部分組成。本文是第一部分原理篇,主要分析 Tween 動畫的實現原理, 最後簡單介紹在 android 中如何通過播放 Gif 文件來實現動畫。第二部分實例篇將在原理篇的基礎上,向您展示一個動畫實例的實現。
Android 平台提供了一套完整的動畫框架,使得開發者可以用它來開發各種動畫效果,本文將向讀者闡述 Android 的動畫框架是如何實現的。任何一個框架都有其優勢和局限性,只有明白了其實現原理,開發者才能知道哪些功能可以利用框架來實現,哪些功能須用其他途徑實現。Android 平台提供了兩類動畫,一類是 Tween 動畫,即通過對場景裡的對象不斷做圖像變換 ( 平移、縮放、旋轉 ) 產生動畫效果;第二類是 Frame 動畫,即順序播放事先做好的圖像,跟電影類似。本文是由兩部分組成的有關 Android 動畫框架詳解的第一部分原理篇, 主要分析 Tween 動畫的實現原理, 最後簡單介紹在 android 中如何通過播放 Gif 文件來實現動畫。我們先看一下動畫示例來一點感性認識。
android 動畫使用示例
使用動畫示例程序的效果是點擊按鈕,TextView 旋轉一周。讀者也可以參看 Apidemos 中包 com.example.android.apis.animationvIEw 下面的 Transition3d 和 com.example.android.apis.vIEw 下面的 Animation1/Animation2/Animation3 示例代碼。
清單 1. 代碼直接使用動畫
 package com.ray.animation;
 import android.app.Activity;
 import android.os.Bundle;
 import android.view.View;
 import android.view.View.OnClickListener;
 import android.view.animation.AccelerateDecelerateInterpolator;
 import android.view.animation.Animation;
 import android.vIEw.animation.RotateAnimation;
 import android.widget.Button;
 public class TestAnimation extends Activity implements OnClickListener{
     public void onCreate(Bundle savedInstanceState){
     super.onCreate(savedInstanceState);
     setContentView(R.layout.main);
     Button btn =(Button)findViewById(R.id.Button);
     btn.setOnClickListener(this);
 }
    public void onClick(View v){
    Animation anim=null;
    anim=new?RotateAnimation(0.0f,+360.0f);
    anim.setInterpolator(new AccelerateDecelerateInterpolator());
    anim.setDuration(3000);
    findViewById(R.id.TextVIEw01).startAnimation(anim);
 }
 }
使用 XML 文件方式,在打開 Eclipse 中新建的 android 工程的 res 目錄中新建 anim 文件夾,然後在 anim 目錄中新建一個 myanim.XML( 注意文件名小寫 ),內容如下 :
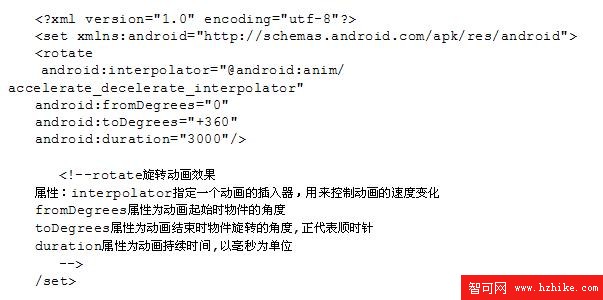
其中的 Java 代碼如下:
 package com.ray.animation;
 import android.app.Activity;
 import android.os.Bundle;
 import android.view.View;
 import android.view.View.OnClickListener;
 import android.view.animation.Animation;
 import android.vIEw.animation.AnimationUtils;
 import android.widget.Button;
 import android.widget.TextView;
 public class TestAnimation extends Activity implements OnClickListener{
 public void onCreate(Bundle savedInstanceState){
 super.onCreate(savedInstanceState);
 setContentView(R.layout.main);
 Button btn =(Button)findViewById(R.id.Button01);
 btn.setOnClickListener(this);
 }

 @Override
 public void onClick(View v){
 Animation anim=AnimationUtils.loadAnimation(this,R.anim.my_rotate_action);
 findViewById(R.id.TextVIEw01).startAnimation(anim);
 }
 }
回頁首
android 動畫框架原理
現有的 android 動畫框架是建立在 View 的級別上的,在 View 類中有一個接口 startAnimation 來使動畫開始,startAnimation 函數會將一個 Animation 類別的參數傳給 VIEw,這個 Animation 是用來指定我們使用的是哪種動畫,現有的動畫有平移,縮放,旋轉以及 alpha 變換等。如果需要更復雜的效果,我們還可以將這些動畫組合起來,這些在下面會討論到。
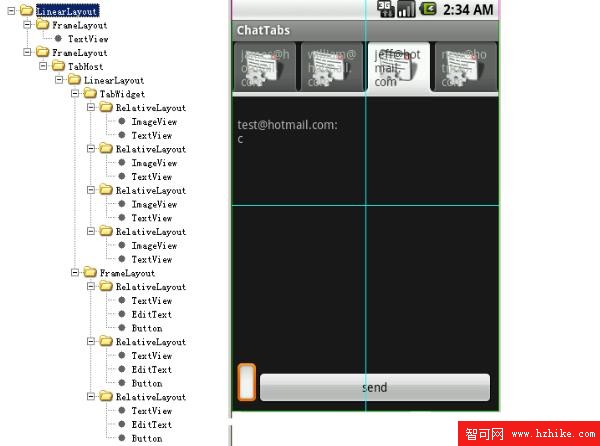
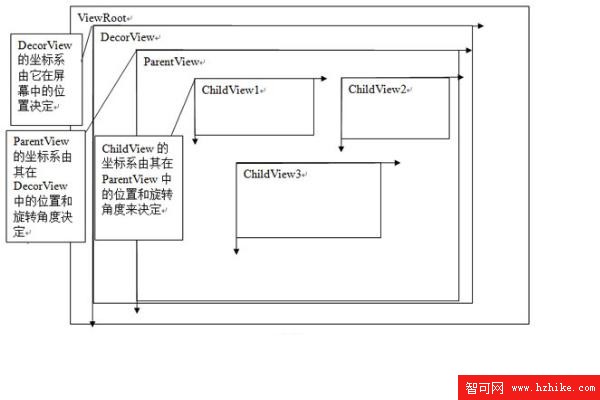
要了解 Android 動畫是如何畫出來的,我們首先要了解 Android 的 View 是如何組織在一起,以及他們是如何畫自己的內容的。每一個窗口就是一棵 VIEw 樹,下面以我們寫的 android_tabwidget_tutorial.doc 中的 tab 控件的窗口為例,通過 android 工具 hierarchyviewer 得到的窗口 VIEw Tree 如下圖 1 所示:
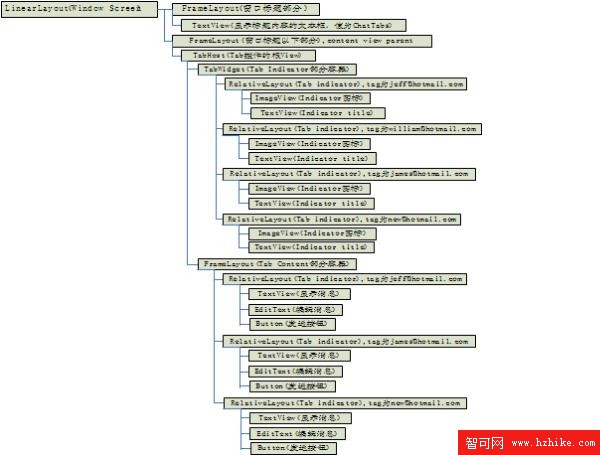
其實這個圖不是完整的,沒有把 RootView 和 DecorView 畫出來,RootView 只有一個孩子就是 DecorView,這裡整個 View Tree 都是 DecorView 的子 VIEw,它們是從 android1.5/frameworks/base/core/res/res/layout/screen_title.XML 這個 layout 文件 infalte 出來的,感興趣的讀者可以參看 frameworks\policIEs\base\phone\com\android\internal\policy\Imp\PhoneWindow.java 中 generateLayout 函數部分的代碼。我們可以修改布局文件和代碼來做一些比較 cool 的事情,如象 Windows 的縮小 / 關閉按鈕等。標題窗口以下部分的 FrameLayou 就是為了讓程序員通過 setContentView 來設置用戶需要的窗口內容。因為整個 View 的布局就是一棵樹,所以繪制的時候也是按照樹形結構遍歷來讓每個 View 進行繪制。ViewRoot.java 中的 draw 函數准備好 Canvas 後會調用 mView.draw(canvas),其中 mView 就是調用 ViewRoot.setView 時設置的 DecorView。然後看一下 VIEw.Java 中的 draw 函數:
遞歸的繪制整個窗口需要按順序執行以下幾個步驟:
當一個 ChildView 要重畫時,它會調用其成員函數 invalidate() 函數將通知其 ParentView 這個 ChildView 要重畫,這個過程一直向上遍歷到 ViewRoot,當 ViewRoot 收到這個通知後就會調用上面提到的 ViewRoot 中的 draw 函數從而完成繪制。VIEw::onDraw() 有一個畫布參數 Canvas, 畫布顧名思義就是畫東西的地方,android 會為每一個 View 設置好畫布,View 就可以調用 Canvas 的方法,比如:drawText, drawBitmap, drawPath 等等去畫內容。每一個 ChildView 的畫布是由其 ParentView 設置的,ParentView 根據 ChildView 在其內部的布局來調整 Canvas,其中畫布的屬性之一就是定義和 ChildVIEw 相關的坐標系,默認是橫軸為 X 軸,從左至右,值逐漸增大,豎軸為 Y 軸,從上至下,值逐漸增大 , 見下圖 :
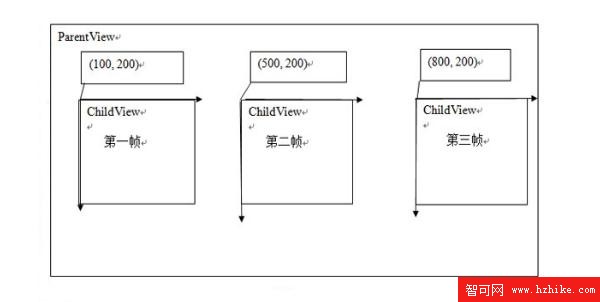
android 動畫就是通過 ParentView 來不斷調整 ChildView 的畫布坐標系來實現的,下面以平移動畫來做示例,見下圖 4,假設在動畫開始時 ChildView 在 ParentView 中的初始位置在 (100,200) 處,這時 ParentView 會根據這個坐標來設置 ChildView 的畫布,在 ParentView 的 dispatchDraw 中它發現 ChildView 有一個平移動畫,而且當前的平移位置是 (100, 200),於是它通過調用畫布的函數 traslate(100, 200) 來告訴 ChildView 在這個位置開始畫,這就是動畫的第一幀。如果 ParentView 發現 ChildView 有動畫,就會不斷的調用 invalidate() 這個函數,這樣就會導致自己會不斷的重畫,就會不斷的調用 dispatchDraw 這個函數,這樣就產生了動畫的後續幀,當再次進入 dispatchDraw 時,ParentVIEw 根據平移動畫產生出第二幀的平移位置 (500, 200),然後繼續執行上述操作,然後產生第三幀,第四幀,直到動畫播完。具體算法描述如清單 2:
清單 2. 算法
 dispatchDraw()
 {
 ....
 Animation a = ChildView.getAnimation()
 Transformation tm = a.getTransformation();
 Use tm to set ChildVIEw's Canvas;
 Invalidate();
 ....
 }
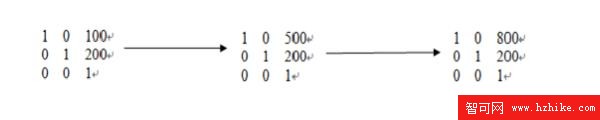
以上是以平移動畫為例子來說明動畫的產生過程,這其中又涉及到兩個重要的類型,Animation 和 Transformation,這兩個類是實現動畫的主要的類,Animation 中主要定義了動畫的一些屬性比如開始時間、持續時間、是否重復播放等,這個類主要有兩個重要的函數:getTransformation 和 applyTransformation,在 getTransformation 中 Animation 會根據動畫的屬性來產生一系列的差值點,然後將這些差值點傳給 applyTransformation,這個函數將根據這些點來生成不同的 Transformation,Transformation 中包含一個矩陣和 alpha 值,矩陣是用來做平移、旋轉和縮放動畫的,而 alpha 值是用來做 alpha 動畫的(簡單理解的話,alpha 動畫相當於不斷變換透明度或顏色來實現動畫),以上面的平移矩陣為例子,當調用 dispatchDraw 時會調用 getTransformation 來得到當前的 Transformation,這個 Transformation 中的矩陣如下:
所以具體的動畫只需要重載 applyTransformation 這個函數即可,類層次圖如下:
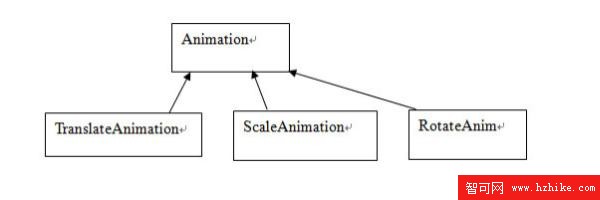
用戶可以定義自己的動畫類,只需要繼承 Animation 類,然後重載 applyTransformation 這個函數。對動畫來說其行為主要靠差值點來決定的,比如,我們想開始動畫是逐漸加快的或者逐漸變慢的,或者先快後慢的,或者是勻速的,這些功能的實現主要是靠差值函數來實現的,android 提供了 一個 Interpolator 的基類,你要實現什麼樣的速度可以重載其函數 getInterpolation,在 Animation 的 getTransformation 中生成差值點時,會用到這個函數。
從上面的動畫機制的分析可知某一個 View 的動畫的繪制並不是由他自己完成的而是由它的父 view 完成,所有我們要注意上面 TextView 旋轉一周的動畫示例程序中動畫的效果並不是由 TextView 來繪制的,而是由它的父 View 來做的。findViewById(R.id.TextView01).startAnimation(anim) 這個代碼其實是給這個 TextVIEw 設置了一個 animation,而不是進行實際的動畫繪制,代碼如下 :
public void startAnimation(Animation animation) { animation.setStartTime(Animation.START_ON_FIRST_FRAME); setAnimation(animation); invalidate(); }
其他的動畫機制的代碼感興趣的讀者請自己閱讀,希望通過原理的講解以後看起來會輕松點,呵呵。
以上就是 android 的動畫框架的原理,了解了原理對我們的開發來說就可以清晰的把握動畫的每一幀是怎樣生成的,這樣便於開發和調試。它把動畫的播放 / 繪制交給父 View 去處理而不是讓子 View 本身去繪制,這種從更高的層次上去控制的方式便於把動畫機制做成一個易用的框架,如果用戶要在某個 vIEw 中使用動畫,只需要在 XML 描述文件或代碼中指定就可以了,從而把動畫的實現和 View 本身內容的繪制(象 TextVIEw 裡面的文字顯示)分離開了,起到了減少耦合和提高易用性的效果。
動畫實現示例
在這個例子中,將要實現一個繞 Y 軸旋轉的動畫,這樣可以看到 3D 透視投影的效果,代碼如下 ( 清單 4):
清單 3. 實現一個繞 Y 軸旋轉的動畫
package com.example.android.apis.animation;
 import android.view.animation.Animation;
 import android.vIEw.animation.Transformation;
 import android.graphics.Camera;
 import android.graphics.Matrix;
 /**
 * An animation that rotates the view on the Y axis between two specified angles.
 * This animation also adds a translation on the Z axis (depth) to improve the effect.
 */
 public class Rotate3dAnimation extends Animation {
    private final float mFromDegrees;
    private final float mToDegrees;
    private final float mCenterX;
    private final float mCenterY;
    private final float mDepthZ;
    private final boolean mReverse;
    private Camera mCamera;
    /**
     * Creates a new 3D rotation on the Y axis. The rotation is defined by its
     * start angle and its end angle. Both angles are in degrees. The rotation
     * is performed around a center point on the 2D space, definied by a pair
     * of X and Y coordinates, called centerX and centerY. When the animation
     * starts, a translation on the Z axis (depth) is performed. The length
     * of the translation can be specifIEd, as well as whether the translation
     * should be reversed in time.
     *
     * @param fromDegrees the start angle of the 3D rotation
     * @param toDegrees the end angle of the 3D rotation
     * @param centerX the X center of the 3D rotation
     * @param centerY the Y center of the 3D rotation
     * @param reverse true if the translation should be reversed, false otherwise
     */
    public Rotate3dAnimation(float fromDegrees, float toDegrees,
            float centerX, float centerY, float depthZ, boolean reverse) {
        mFromDegrees = fromDegrees;
        mToDegrees = toDegrees;
        mCenterX = centerX;
        mCenterY = centerY;
        mDepthZ = depthZ;
        mReverse = reverse;
    }

    @Override
    public void initialize(int width, int height, int parentWidth, int parentHeight) {
        super.initialize(width, height, parentWidth, parentHeight);
        mCamera = new Camera();
    }

    @Override
    protected void applyTransformation(float interpolatedTime, Transformation t) {
        final float fromDegrees = mFromDegrees;
        float degrees = fromDegrees + ((mToDegrees - fromDegrees) * interpolatedTime);
        final float centerX = mCenterX;
        final float centerY = mCenterY;
        final Camera camera = mCamera;
        final Matrix matrix = t.getMatrix();
        camera.save();
        if (mReverse) {
            camera.translate(0.0f, 0.0f, mDepthZ * interpolatedTime);
        } else {
            camera.translate(0.0f, 0.0f, mDepthZ * (1.0f - interpolatedTime));
        }
        camera.rotateY(degrees);
        camera.getMatrix(matrix);
        camera.restore();
        matrix.preTranslate(-centerX, -centerY);
        matrix.postTranslate(centerX, centerY);
    }
 }
在這個例子中我們重載了 applyTransformation 函數,interpolatedTime 就是 getTransformation 函 數傳下來的差值點,在這裡做了一個線性插值算法來生成中間角度:float degrees = fromDegrees + ((mToDegrees - fromDegrees) * interpolatedTime); Camera 類是用來實現繞 Y 軸旋轉後透視投影的,我們只需要其返回的 Matrix 值 , 這個值會賦給 Transformation 中的矩陣成員,當 ParentView 去為 ChildView 設置畫布時,就會用它來設置坐標系,這樣 ChildVIEw 畫出來的效果就是一個繞 Y 軸旋轉同時帶有透視投影的效果。利用這個動畫便可以作出像立體翻頁等比較酷的效果。如何使用這個 animation 請見 ApiDemos 程序包 com.example.android.apis.animation 中的 Transition3d.Java 代碼。
android 中顯示 Gif 格式圖
有關這一部分,本文將不做詳細介紹。 感興趣的讀者請參看 Apidemos 中 com.example.android.apis.graphics 下面的 BitmapDecode.Java 中的示例代碼。
這裡先簡單說明一下,它的實現是通過 Movie 這個類來對 Gif 文件進行讀取和解碼的,同時在 onDraw 函數中不斷的繪制每一幀圖片完成的,這個示例代碼在 onDraw 中調用 invalidate 來反復讓 View 失效來讓系統不斷調用 SampleView 的 onDraw 函數;至於選出哪一幀圖片進行繪制則是傳入系統當前時間給 Movie 類,然後讓它根據時間順序來選出幀圖片。反復讓 View 失效的方式比較耗資源,繪制效果允許的話可以采取延時讓 VIEw 失效的方式來減小 CPU 消耗。
目前使用這個方式播放一些 Gif 格式的動畫時會出現花屏的現象,這是因為 Android 中使用的 libgif 庫是比較老的版本,新的 tag 不支持,所以導致花屏,解決辦法有制作 Gif 圖片時別使用太新的 tag 或完善 android 中對應的 libgif 庫。
結束語
本文介紹了 Android 動畫框架的基本原理,可以幫助開發者深入理解 Android 的動畫是如何實現的,從而能夠充分利用 android 現有框架來做出夠眩、夠酷的動畫效果。
 android中點中overlay彈出帶尾巴的氣泡的實現
就是上面的樣子做這個過程中我碰到兩個問題:1:如何做帶尾巴的氣泡VIEw2:如何把這個View添加到MapVIEw中.1:如何做帶尾巴的氣泡VIEw我是采用背景圖的方式
 Android PreferenceActivity 詳解教程
為了引入這個概率 首先從需求說起 即:現有某Activity專門用於手機屬性設置 那麼應該如何做呢?根據已學知識 很快一個念頭閃過 即:Activity + Prefe
 Android2.2 開發環境搭建
配置環境:操作系統:Windows 7操作系統JDK:Java version 1.6.0_13
 Android 2.2開發初學者快速入門十一大秘技
編者按:本文為一位第一線的android開發者在經過三周學習Android收集整理的一份android 2.2開發初學者的入門培訓教程。文章深淺得當,對於剛剛學習and