編輯:關於android開發
首先是控件輪換
一.創建主布局
1.用到的控件是 TextSwitcher (文本輪換)
那麼其他對應的也就是 ImageSwitcher (圖片輪換)

二.主要代碼
1.聲明一下控件 TextSwitcher
private TextSwitcher textSwitcher1;
2.定義一個String類型的數組用來做數據
private String[] strs = new String[] { "1", "2", "3" };
3.創建一個int型的變量用來記錄下標
private int index = 0;
4.創建兩個int型的值用來保存下面會用到的觸摸事件手機按下和松開的X值
private int startx;

private int endx;
5.在初始化事件裡開始寫代碼把!
textSwitcher1 = (TextSwitcher) findViewById(R.id.textSwitcher1);

                // 創建工廠 匿名內部類
        textSwitcher1.setFactory(new ViewFactory() {

            @Override
                        // 用這個方法創建TextView
            public View makeView() {

                return new TextView(MainActivity.this);
            }
        });

                // 定義一個動畫(可有可無)
        TranslateAnimation animation = new TranslateAnimation(
                Animation.RELATIVE_TO_PARENT, 1.0f,
                Animation.RELATIVE_TO_PARENT, 0.0f, Animation.RELATIVE_TO_SELF,
                0.0f, Animation.RELATIVE_TO_SELF, 0.0f);

        animation.setDuration(1500);
        animation.setFillAfter(true);

        textSwitcher1.setInAnimation(animation);
        textSwitcher1.setText(strs[0]);

        textSwitcher1.setOnTouchListener(new OnTouchListener() {

            @Override
                        // 設置觸摸事件
            public boolean onTouch(View v, MotionEvent event) {
                                // 按下
                if (event.getAction() == MotionEvent.ACTION_DOWN) {

                    startx = event.getX();

                }
                                // 松開
                if (event.getAction() == MotionEvent.ACTION_UP) {

                    endx = event.getX();
                                        // 滑動一定距離才執行
                    if (startx - endx > 100) {
                                                // 判斷下標
                        if (index == strs.length) {
                            index = 0;
                        }
                                                // 設置文本 下標加1
                        textSwitcher1.setText(strs[index]);
                        index = index + 1;
                    }

                }
                return true;
            }
        });
然後是圖片輪換 其實大致上是一樣的 直接上代碼
首先在主布局文件中添加一個 ImageSwitcher 控件
然後進入代碼編寫
1.聲明一下控件 ImageSwitcher
private ImageSwitcher imageSwitcher1;
2.定義一個int類型的數組用來保存所需圖片的ID
private int[] imgs = new int[] { android.R.drawable.alert_dark_frame,
            android.R.drawable.arrow_down_float,
            android.R.drawable.btn_dropdown, };
3.創建一個int型的變量用來記錄下標 (同上)
4.創建兩個int型的值用來保存下面會用到的觸摸事件手機按下和松開的X值 (同上)
5.在初始化事件裡開始寫代碼把!
imageSwitcher1 = (ImageSwitcher) findViewById(R.id.imageSwitcher1);

        imageSwitcher1.setFactory(new ViewFactory() {

            @Override
                        // 創建 ImageView 這裡我們需要處理一下背景
            public View makeView() {

                ImageView lv = new ImageView(MainActivity.this);
                lv.setBackgroundColor(Color.RED);
                FrameLayout.LayoutParams params = new FrameLayout.LayoutParams(LayoutParams.WRAP_CONTENT, LayoutParams.WRAP_CONTENT);
                params.gravity = Gravity.CENTER_VERTICAL;
                lv.setLayoutParams(params);
                return lv;
            }
        });

        TranslateAnimation inanimation = new TranslateAnimation(
                Animation.RELATIVE_TO_PARENT, 1.0f,
                Animation.RELATIVE_TO_PARENT, 0.0f, Animation.RELATIVE_TO_SELF,
                0.0f, Animation.RELATIVE_TO_SELF, 0.0f);

        inanimation.setDuration(1500);
        inanimation.setFillAfter(true);

        imageSwitcher1.setInAnimation(inanimation);
        imageSwitcher1.setImageResource(imgs[index]);

        imageSwitcher1.setOnTouchListener(new OnTouchListener() {

            @Override
            public boolean onTouch(View v, MotionEvent event) {
                if (event.getAction() == MotionEvent.ACTION_DOWN) {

                    startx = event.getX();

                }
                if (event.getAction() == MotionEvent.ACTION_UP) {

                    endx = event.getX();

                    if (startx - endx > 100) {
                        if (index == strs.length) {
                            index = 0;
                        }

                        imageSwitcher1.setImageResource(imgs[index]);
                        index = index + 1;
                    }

                }
                return true;
            }
        });
最後寫一寫頁面間的輪換
首先放上主布局代碼
下面的直接附上主代碼
package com.yuxuan.lunhuanym;

import java.util.ArrayList;
import java.util.List;

import android.app.Activity;
import android.os.Bundle;
import android.support.v4.view.PagerAdapter;
import android.support.v4.view.ViewPager;
import android.view.View;
import android.view.ViewGroup;

public class MainActivity extends Activity {

    private ViewPager pager;

    private int[] pagids = new int[] { R.layout.activity_view1,
            R.layout.activity_view2, R.layout.activity_view3, };

    private PagerAdapter adapter;

    @Override
    protected void onCreate(Bundle savedInstanceState) {
        super.onCreate(savedInstanceState);
        initView();
    }

    private void initView() {
        setContentView(R.layout.activity_main);

        pager = (ViewPager) findViewById(R.id.vp);

        adapter = new MyPageAdapter();

        pager.setAdapter(adapter);
    }

    // 自定義適配器
    private class MyPageAdapter extends PagerAdapter {

        private List<View> vs;

        public MyPageAdapter() {
            vs = new ArrayList<View>();
            for (int i = 0; i < pagids.length; i++) {
                View view = View.inflate(MainActivity.this, pagids[i], null);
                vs.add(view);
            }
        }

        @Override
        // 要輪放的頁面總共有多少
        public int getCount() {

            return pagids.length;
        }

        @Override
        public boolean isViewFromObject(View view, Object object) {

            return view == object;
        }

        @Override
        // 初始化一個條目
        // container viewpager 本身
        // position 馬上出來的試圖
        public Object instantiateItem(ViewGroup container, int position) {

            container.addView(vs.get(position));

            return vs.get(position);
        }

        @Override
        // 銷毀一個條目
        // container 容器本身
        // position 銷毀的下標
        // object 銷毀的page
        public void destroyItem(ViewGroup container, int position, Object object) {
            container.removeView((View) object);
        }

    }
}
感覺稍微牛逼點的控件都和適配器有關 有木有~
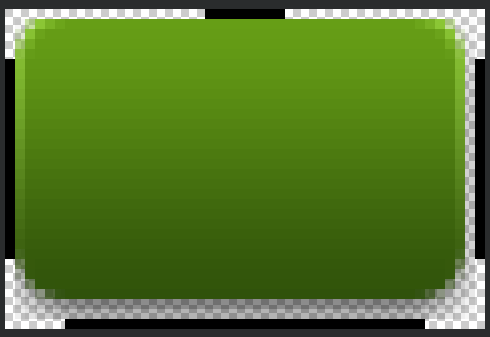 Android 手機衛士--9patch圖,
Android 手機衛士--9patch圖,本文主要介紹9patch圖 *.9.png:android手機上,可以按需求自動拉伸的圖片 本文地址:http:/
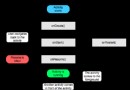 Android Activity生命周期與啟動模式,androidactivity
Android Activity生命周期與啟動模式,androidactivityActivity的完整生命周期如下圖: Activity的加載模式有四種: stand
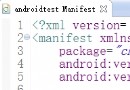 Android APP 讀取 AndroidManifest.xml 中的版本信息詳解,androidmanifest.xml
Android APP 讀取 AndroidManifest.xml 中的版本信息詳解,androidmanifest.xmlAPP都會涉及到版本的問題,Android
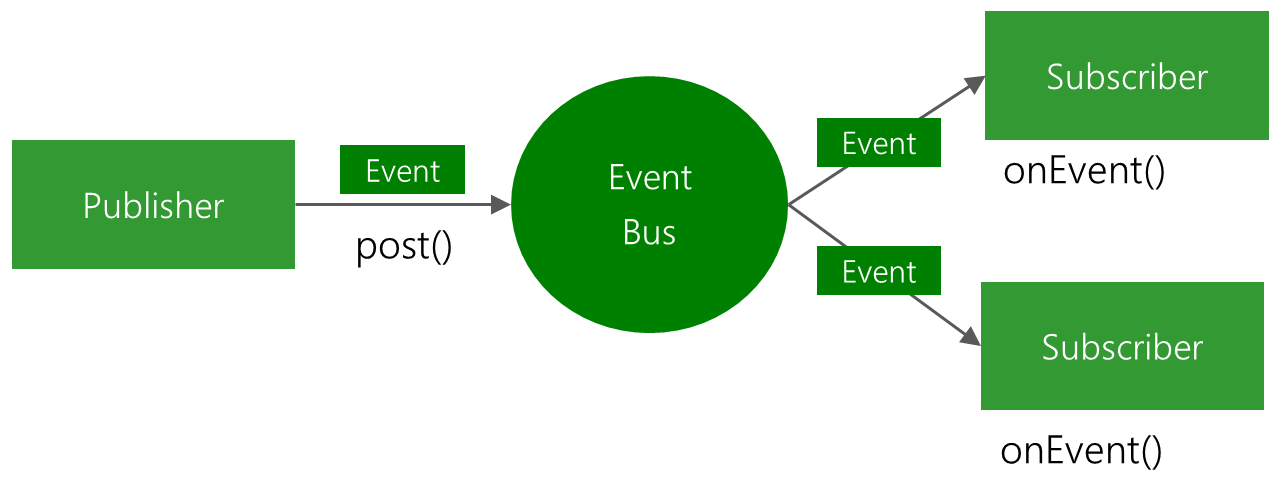 Android開發學習之路-EventBus使用,android-eventbus
Android開發學習之路-EventBus使用,android-eventbusEventBus是一個通過發布、訂閱事件實現組件間消息傳遞的工具。 它存在的目的,就是為