編輯:關於android開發
Android 使用微信登錄、分享功能
具體的文檔詳情微信官網上介紹(微信官網文檔),本人直接按照項目部署步驟進行講解:
第一步:申請你的AppID;
第二步:依賴
dependencies {
    compile 'com.tencent.mm.opensdk:wechat-sdk-android-with-mta:1.0.2'
}
或者:
dependencies {
    compile 'com.tencent.mm.opensdk:wechat-sdk-android-without-mta:1.0.2'
}
這兩個依賴包的區別是前者包含統計功能,後者沒有。
第三步:在AndroidManifest.xml中加入必須的權限
<uses-permission android:name="android.permission.INTERNET"/>
<uses-permission android:name="android.permission.ACCESS_NETWORK_STATE"/>
<uses-permission android:name="android.permission.ACCESS_WIFI_STATE"/>
<uses-permission android:name="android.permission.READ_PHONE_STATE"/>
<uses-permission android:name="android.permission.WRITE_EXTERNAL_STORAGE"/>
第四步:注冊到微信,微信的SDK在使用之前需要調用代碼進行注冊,注冊可以是在調用微信SDK的Activity,但最好還是放到入口Activity或者Application中;
WxApplication.java
public static String APP_ID="你的APPID";
public static IWXAPI api;
public void onCreate() {
        super.onCreate();
        api = WXAPIFactory.createWXAPI(this, APP_ID, true);
        api.registerApp(APP_ID);
}
第五步:微信登錄。
5.1 點擊你的微信登錄按鈕,進行微信授權,首先需要獲取一個code值,在包名下新建一個包,這裡必須這樣,不能隨意命名,比如你的項目包名是:come.shenhua.wx則新建的包為come.shenhua.wx.wxapi在該包下創建一個WXEntryActivity繼承IWXAPIEventHandler;(注意Activity的命名也不能隨意更改)
LoginActivity.java
private void onClickWeChatLogin() {
        if (WxApplicaiton.api == null) {
            WxApplication.api = WXAPIFactory.createWXAPI(this, WxApplication.APP_ID, true);
        }
        if (!WxApplication.api.isWXAppInstalled()) {
            ToastUtils.toast("您手機尚未安裝微信,請安裝後再登錄");
            return;
        }
        WxApplication.api.registerApp(WxApplication.APP_ID);
        SendAuth.Req req = new SendAuth.Req();
        req.scope = "snsapi_userinfo";
        req.state = "wechat_sdk_xb_live_state";//官方說明:用於保持請求和回調的狀態,授權請求後原樣帶回給第三方。該參數可用於防止csrf攻擊(跨站請求偽造攻擊),建議第三方帶上該參數,可設置為簡單的隨機數加session進行校驗
        WxApplication.api.sendReq(req);
    }
在AndroidManifest.xml中加入,(android:exported="true" 一定不能少)
<activity
            android:name=".wxapi.WXEntryActivity"
            android:exported="true" />
WXEntryActivity.java
public class WXEntryActivity extends AppCompatActivity implements IWXAPIEventHandler {
    public static final String TAG = WXEntryActivity.class.getSimpleName();
    public static String code;
    public static BaseResp resp = null;

    @Override
    protected void onCreate(Bundle savedInstanceState) {
        super.onCreate(savedInstanceState);
        setContentView(R.layout.activity_wxentry);
        boolean handleIntent = XBLiveApplication.api.handleIntent(getIntent(), this);
     //下面代碼是判斷微信分享後返回WXEnteryActivity的,如果handleIntent==false,說明沒有調用IWXAPIEventHandler,則需要在這裡銷毀這個透明的Activity;
        if(handleIntent==false){
            Log.d(TAG, "onCreate: "+handleIntent);
            finish();
        }
    }

    @Override
    protected void onNewIntent(Intent intent) {
        super.onNewIntent(intent);
        setIntent(intent);
        XBLiveApplication.api.handleIntent(intent, this);
    }

    @Override
    public void onReq(BaseReq baseReq) {
        Log.d(TAG, "onReq: ");
        finish();
    }

    @Override
    public void onResp(BaseResp baseResp) {
        if (baseResp != null) {
            resp = baseResp;
            code = ((SendAuth.Resp) baseResp).code; //即為所需的code
        }
        switch (baseResp.errCode) {
            case BaseResp.ErrCode.ERR_OK:
                Log.d(TAG, "onResp: 成功");
                finish();
                break;
            case BaseResp.ErrCode.ERR_USER_CANCEL:
                Log.d(TAG, "onResp: 用戶取消");
                finish();
                break;
            case BaseResp.ErrCode.ERR_AUTH_DENIED:
                Log.d(TAG, "onResp: 發送請求被拒絕");
                finish();
                break;
        }
    }
resp和code定義成全局變量,在WXEntryWActivity頁面銷毀後登錄頁面會走onResume()方法,在這裡開始其他操作
5.2 拿到code後在登錄頁面通過code獲取access_token,官網的說法是:“access_token是調用授權關系接口的調用憑證,由於access_token有效期(目前為2個小時)較短,當access_token超時後,可以使用refresh_token進行刷新”,所以拿到access_token後再次請求進行refresh_token,刷新後拿到access_token即可發送請求獲取微信用戶信息了;
獲取access_token的URL:AccessTokenUrl = "https://api.weixin.qq.com/sns/oauth2/access_token?appid=你的appid&secret=你的AppSecret&code=授權獲取到的code&grant_type=authorization_code";
刷新access_token的URL:Refresh_tokenUrl = "https://api.weixin.qq.com/sns/oauth2/refresh_token?appid=你的appid&grant_type=refresh_token&refresh_token=上一步請求到的access_token;
獲取用戶信息URL:UserInfoUrl = "https://api.weixin.qq.com/sns/userinfo?access_token=刷新的access_token&openid=刷新access_token時獲取的openid;
 @Override
    protected void onResume() {
        Log.d(TAG, "onResume: 1");
        super.onResume();
        //這裡的判斷是為了區分如果不是不是從WXEntryActivity頁面銷毀重啟的,不走下面的代碼
        if (WXEntryActivity.resp != null) {
            if (WXEntryActivity.resp.getType() == ConstantsAPI.COMMAND_SENDAUTH) {
                Thread thread = new Thread(downloadRun);
                thread.start();
                try {
                    thread.join();
                } catch (InterruptedException e) {
                    // TODO Auto-generated catch block
                    e.printStackTrace();
                }
            }
        }
    }

    public Runnable downloadRun = new Runnable() {

        @Override
        public void run() {
            WXGetAccessToken();
        }
    };

    //根據code獲取access_token,這裡用第三方volley框架進行post請求
    private void WXGetAccessToken() {
        String getAccessTokenUrl = AccessTokenUrl;
        StringRequest request = new StringRequest(Request.Method.GET, getAccessTokenUrl, new Response.Listener<String>() {
            @Override
            public void onResponse(String response) {
                Log.d(TAG, "onResponse: " + response);
                Gson gson = new Gson();
                WeChatLoginTokenModel tokenModel = gson.fromJson(response, WeChatLoginTokenModel.class);
                refresh_token = tokenModel.getRefresh_token();
                WXGetRefreshAccessToken();
            }
        }, new Response.ErrorListener() {
            @Override
            public void onErrorResponse(VolleyError error) {

            }
        });
        request.setTag("weChatGetToken");
        XBLiveApplication.getHttpRequestQueue().add(request);
    }

    //拿到access_token後再次發送請求進行刷新access_token,拿到access_refresh和openid
    private void WXGetRefreshAccessToken() {
        String getRefresh_tokenUrl =Refresh_tokenUrl ;
        StringRequest request = new StringRequest(Request.Method.GET, getRefresh_tokenUrl, new Response.Listener<String>() {
            @Override
            public void onResponse(String response) {
                Gson gson = new Gson();
                WeChatLoginTokenModel tokenModel = gson.fromJson(response, WeChatLoginTokenModel.class);
                String access_token = tokenModel.getAccess_token();
                String openid = tokenModel.getOpenid();
                WXGetUserInfo(access_token, openid);
            }
        }, new Response.ErrorListener() {
            @Override
            public void onErrorResponse(VolleyError error) {

            }
        });
        request.setTag("weChatGetRefreshToken");
        XBLiveApplication.getHttpRequestQueue().add(request);
    }

    //獲取用戶信息
    private void WXGetUserInfo(String access_token, String openid) {
        String getUserInfoUrl =UserInfoUr;
        StringRequest request = new StringRequest(Request.Method.GET, getUserInfoUrl, new Response.Listener<String>() {
            @Override
            public void onResponse(String response) {
                Log.d(TAG, "onResponse3: " + response);
                Gson gson = new Gson();
                WeChatUserInfoModel userInfoModel = gson.fromJson(response, WeChatUserInfoModel.class);
                String city = userInfoModel.getCity();
                String userName = userInfoModel.getNickname();
                String userIcon = userInfoModel.getHeadimgurl();
                int sex = userInfoModel.getSex();//1:男;0:女;2:未知
                String province = userInfoModel.getProvince();
                openId_WX = userInfoModel.getOpenid();
                ToastUtils.toast("登錄成功");
            }
        }, new Response.ErrorListener() {
            @Override
            public void onErrorResponse(VolleyError error) {

            }
        });
    //下面代碼是volley框架注冊,請忽視
        request.setTag("weChatGetUserInfo");
        XBLiveApplication.getHttpRequestQueue().add(request);
    }
注意一點:在做測試時,微信的應用簽名必須要保持一致,比如你在官網填寫的是沒有打包簽名的應用簽名,你測試的APP也沒有打包簽名,那麼是沒有問題,但是如果你微信官網上填寫的是已經上線經過打包簽名的應用簽名,那你在做測試時必須要用打包簽名的應用去做測試。
第六步:微信分享到朋友圈:
第七步:微信分享到微信好友:
 Android--Dialog對話框
Android--Dialog對話框 在Android開發當中,在界面上彈出一個Dialog對話框使我們經常需要做的,本篇做一下記錄,以備遺忘時查詢。 dialog就
 Android學習指南之三十四:Android定時器Timer的使用
我們將JDK中自帶的Timer和TimerTask兩個類結合使用,可以實現執行
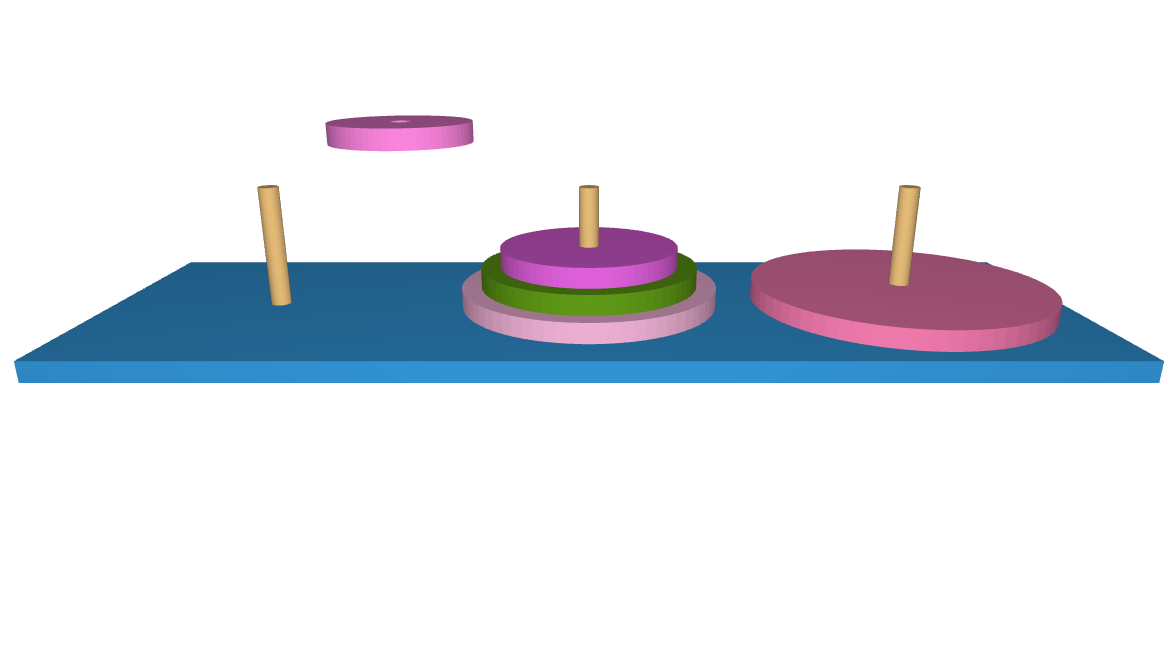 基於HTML5的WebGL設計漢諾塔3D游戲
基於HTML5的WebGL設計漢諾塔3D游戲在這裡我們將構造一個基於HT for Web的HTML5+JavaScript來實現漢諾塔游戲。http://hightopo
 神馬視頻應用安卓項目源碼,神馬安卓項目源碼
神馬視頻應用安卓項目源碼,神馬安卓項目源碼SMTVLauncher 神馬視頻是一款包含直播、回看、點播、設置於一體的TVLauncher 注意:大家導入工程時,遇到報錯。