上次簡單地介紹了AudioRecord和AudioTrack的使用,這次就結合SurfaceView實現一個Android版的手機模擬信號示波器。最近物聯網炒得很火,作為手機軟件開發者,如何在不修改手機硬件電路的前提下實現與第三方傳感器結合呢?麥克風就是一個很好的ADC接口,通過麥克風與第三方傳感器結合,再在軟件裡對模擬信號做相應的處理,就可以提供更豐富的傳感化應用。
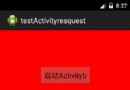
先來看看本文程序運行的效果圖(屏幕錄像速度較慢,真機實際運行起來會更加流暢):

本文程序使用8000hz的采樣率,對X軸方向繪圖的實時性要求較高,如果不降低X軸的分辨率,程序的實時性較差,因此程序對X軸數據縮小區間為8倍~16倍。由於采用16位采樣,因此Y軸數據的高度相對於手機屏幕來說也偏大,程序也對Y軸數據做縮小,區間為1倍~10倍。在SurfaceView的OnTouchListener方法裡加入了波形基線的位置調節,直接在SurfaceView控件上觸摸即可控制整體波形偏上或偏下顯示。
main.xml源碼如下:
XML/HTML代碼
- <linearlayout xmlns:android="http://schemas.android.com/apk/res/android"
- android:orientation="vertical" android:layout_width="fill_parent"
- android:layout_height="fill_parent">
- <linearlayout android:id="@+id/LinearLayout01"
- android:layout_height="wrap_content" android:layout_width="fill_parent"
- android:orientation="horizontal">
- <button android:layout_height="wrap_content" android:id="@+id/btnStart"
- android:text="開始" android:layout_width="80dip">
- <button android:layout_height="wrap_content" android:text="停止"
- android:id="@+id/btnExit" android:layout_width="80dip">
- <zoomcontrols android:layout_width="wrap_content"
- android:layout_height="wrap_content" android:id="@+id/zctlX">
- <zoomcontrols android:layout_width="wrap_content"
- android:layout_height="wrap_content" android:id="@+id/zctlY">
-
- <surfaceview android:id="@+id/SurfaceView01"
- android:layout_height="fill_parent" android:layout_width="fill_parent">
ClsOscilloscope.java是實現示波器的類庫,包含AudioRecord操作線程和SurfaceView繪圖線程的實現,兩個線程同步操作,代碼如下:
Java代碼
- package com.testOscilloscope;
- import java.util.ArrayList;
- import android.graphics.Canvas;
- import android.graphics.Color;
- import android.graphics.Paint;
- import android.graphics.Rect;
- import android.media.AudioRecord;
- import android.view.SurfaceView;
- public class ClsOscilloscope {
- private ArrayList inBuf = new ArrayList();
- private boolean isRecording = false;// 線程控制標記
- /**
- * X軸縮小的比例
- */
- public int rateX = 4;
- /**
- * Y軸縮小的比例
- */
- public int rateY = 4;
- /**
- * Y軸基線
- */
- public int baseLine = 0;
- /**
- * 初始化
- */
- public void initOscilloscope(int rateX, int rateY, int baseLine) {
- this.rateX = rateX;
- this.rateY = rateY;
- this.baseLine = baseLine;
- }
- /**
- * 開始
- *
- * @param recBufSize
- * AudioRecord的MinBufferSize
- */
- public void Start(AudioRecord audioRecord, int recBufSize, SurfaceView sfv,
- Paint mPaint) {
- isRecording = true;
- new RecordThread(audioRecord, recBufSize).start();// 開始錄制線程
- new DrawThread(sfv, mPaint).start();// 開始繪制線程
- }
- /**
- * 停止
- */
- public void Stop() {
- isRecording = false;
- inBuf.clear();// 清除
- }
- /**
- * 負責從MIC保存數據到inBuf
- *
- * @author GV
- *
- */
- class RecordThread extends Thread {
- private int recBufSize;
- private AudioRecord audioRecord;
- public RecordThread(AudioRecord audioRecord, int recBufSize) {
- this.audioRecord = audioRecord;
- this.recBufSize = recBufSize;
- }
- public void run() {
- try {
- short[] buffer = new short[recBufSize];
- audioRecord.startRecording();// 開始錄制
- while (isRecording) {
- // 從MIC保存數據到緩沖區
- int bufferReadResult = audioRecord.read(buffer, 0,
- recBufSize);
- short[] tmpBuf = new short[bufferReadResult / rateX];
- for (int i = 0, ii = 0; i < tmpBuf.length; i++, ii = i
- * rateX) {
- tmpBuf[i] = buffer[ii];
- }
- synchronized (inBuf) {//
- inBuf.add(tmpBuf);// 添加數據
- }
- }
- audioRecord.stop();
- } catch (Throwable t) {
- }
- }
- };
- /**
- * 負責繪制inBuf中的數據
- *
- * @author GV
- *
- */
- class DrawThread extends Thread {
- private int oldX = 0;// 上次繪制的X坐標
- private int oldY = 0;// 上次繪制的Y坐標
- private SurfaceView sfv;// 畫板
- private int X_index = 0;// 當前畫圖所在屏幕X軸的坐標
- private Paint mPaint;// 畫筆
- public DrawThread(SurfaceView sfv, Paint mPaint) {
- this.sfv = sfv;
- this.mPaint = mPaint;
- }
- public void run() {
- while (isRecording) {
- ArrayList buf = new ArrayList();
- synchronized (inBuf) {
- if (inBuf.size() == 0)
- continue;
- buf = (ArrayList) inBuf.clone();// 保存
- inBuf.clear();// 清除
- }
- for (int i = 0; i < buf.size(); i++) {
- short[] tmpBuf = buf.get(i);
- SimpleDraw(X_index, tmpBuf, rateY, baseLine);// 把緩沖區數據畫出來
- X_index = X_index + tmpBuf.length;
- if (X_index > sfv.getWidth()) {
- X_index = 0;
- }
- }
- }
- }
- /**
- * 繪制指定區域
- *
- * @param start
- * X軸開始的位置(全屏)
- * @param buffer
- * 緩沖區
- * @param rate
- * Y軸數據縮小的比例
- * @param baseLine
- * Y軸基線
- */
- void SimpleDraw(int start, short[] buffer, int rate, int baseLine) {
- if (start == 0)
- oldX = 0;
- Canvas canvas = sfv.getHolder().lockCanvas(
- new Rect(start, 0, start + buffer.length, sfv.getHeight()));// 關鍵:獲取畫布
- canvas.drawColor(Color.BLACK);// 清除背景
- int y;
- for (int i = 0; i < buffer.length; i++) {// 有多少畫多少
- int x = i + start;
- y = buffer[i] / rate + baseLine;// 調節縮小比例,調節基准線
- canvas.drawLine(oldX, oldY, x, y, mPaint);
- oldX = x;
- oldY = y;
- }
- sfv.getHolder().unlockCanvasAndPost(canvas);// 解鎖畫布,提交畫好的圖像
- }
- }
- }
testOscilloscope.java是主程序,控制UI和ClsOscilloscope,代碼如下:
Java代碼
- package com.testOscilloscope;
- import android.app.Activity;
- import android.graphics.Color;
- import android.graphics.Paint;
- import android.media.AudioFormat;
- import android.media.AudioRecord;
- import android.media.MediaRecorder;
- import android.os.Bundle;
- import android.view.MotionEvent;
- import android.view.SurfaceView;
- import android.view.View;
- import android.view.View.OnTouchListener;
- import android.widget.Button;
- import android.widget.ZoomControls;
- public class testOscilloscope extends Activity {
- /** Called when the activity is first created. */
- Button btnStart,btnExit;
- SurfaceView sfv;
- ZoomControls zctlX,zctlY;
-
- ClsOscilloscope clsOscilloscope=new ClsOscilloscope();
-
- static final int frequency = 8000;//分辨率
- static final int channelConfiguration = AudioFormat.CHANNEL_CONFIGURATION_MONO;
- static final int audioEncoding = AudioFormat.ENCODING_PCM_16BIT;
- static final int xMax = 16;//X軸縮小比例最大值,X軸數據量巨大,容易產生刷新延時
- static final int xMin = 8;//X軸縮小比例最小值
- static final int yMax = 10;//Y軸縮小比例最大值
- static final int yMin = 1;//Y軸縮小比例最小值
-
- int recBufSize;//錄音最小buffer大小
- AudioRecord audioRecord;
- Paint mPaint;
- @Override
- public void onCreate(Bundle savedInstanceState) {
- super.onCreate(savedInstanceState);
- setContentView(R.layout.main);
- //錄音組件
- recBufSize = AudioRecord.getMinBufferSize(frequency,
- channelConfiguration, audioEncoding);
- audioRecord = new AudioRecord(MediaRecorder.AudioSource.MIC, frequency,
- channelConfiguration, audioEncoding, recBufSize);
- //按鍵
- btnStart = (Button) this.findViewById(R.id.btnStart);
- btnStart.setOnClickListener(new ClickEvent());
- btnExit = (Button) this.findViewById(R.id.btnExit);
- btnExit.setOnClickListener(new ClickEvent());
- //畫板和畫筆
- sfv = (SurfaceView) this.findViewById(R.id.SurfaceView01);
- sfv.setOnTouchListener(new TouchEvent());
- mPaint = new Paint();
- mPaint.setColor(Color.GREEN);// 畫筆為綠色
- mPaint.setStrokeWidth(1);// 設置畫筆粗細
- //示波器類庫
- clsOscilloscope.initOscilloscope(xMax/2, yMax/2, sfv.getHeight()/2);
-
- //縮放控件,X軸的數據縮小的比率高些
- zctlX = (ZoomControls)this.findViewById(R.id.zctlX);
- zctlX.setOnZoomInClickListener(new View.OnClickListener() {
- @Override
- public void onClick(View v) {
- if(clsOscilloscope.rateX>xMin)
- clsOscilloscope.rateX--;
- setTitle("X軸縮小"+String.valueOf(clsOscilloscope.rateX)+"倍"
- +","+"Y軸縮小"+String.valueOf(clsOscilloscope.rateY)+"倍");
- }
- });
- zctlX.setOnZoomOutClickListener(new View.OnClickListener() {
- @Override
- public void onClick(View v) {
- if(clsOscilloscope.rateX<xmax)
- clsOscilloscope.rateX++;
- setTitle("X軸縮小"+String.valueOf(clsOscilloscope.rateX)+"倍"
- +","+"Y軸縮小"+String.valueOf(clsOscilloscope.rateY)+"倍");
- }
- });
- zctlY = (ZoomControls)this.findViewById(R.id.zctlY);
- zctlY.setOnZoomInClickListener(new View.OnClickListener() {
- @Override
- public void onClick(View v) {
- if(clsOscilloscope.rateY>yMin)
- clsOscilloscope.rateY--;
- setTitle("X軸縮小"+String.valueOf(clsOscilloscope.rateX)+"倍"
- +","+"Y軸縮小"+String.valueOf(clsOscilloscope.rateY)+"倍");
- }
- });
-
- zctlY.setOnZoomOutClickListener(new View.OnClickListener() {
- @Override
- public void onClick(View v) {
- if(clsOscilloscope.rateY<ymax)
- clsOscilloscope.rateY++;
- setTitle("X軸縮小"+String.valueOf(clsOscilloscope.rateX)+"倍"
- +","+"Y軸縮小"+String.valueOf(clsOscilloscope.rateY)+"倍");
- }
- });
- }
- @Override
- protected void onDestroy() {
- super.onDestroy();
- android.os.Process.killProcess(android.os.Process.myPid());
- }
-
- /**
- * 按鍵事件處理
- * @author GV
- *
- */
- class ClickEvent implements View.OnClickListener {
- @Override
- public void onClick(View v) {
- if (v == btnStart) {
- clsOscilloscope.baseLine=sfv.getHeight()/2;
- clsOscilloscope.Start(audioRecord,recBufSize,sfv,mPaint);
- } else if (v == btnExit) {
- clsOscilloscope.Stop();
- }
- }
- }
- /**
- * 觸摸屏動態設置波形圖基線
- * @author GV
- *
- */
- class TouchEvent implements OnTouchListener{
- @Override
- public boolean onTouch(View v, MotionEvent event) {
- clsOscilloscope.baseLine=(int)event.getY();
- return true;
- }
-
- }
- }
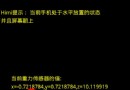 面面具到!android重力傳感器,
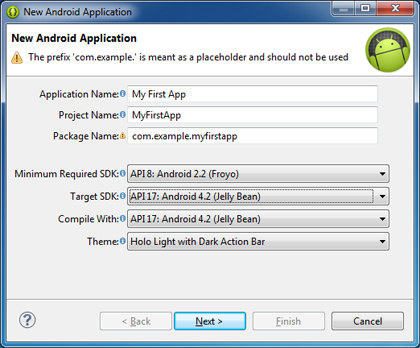 Android開發學習之——第一個Android程序(各種參數的意義),第一個android
 Android Design Support Library——Snackbar,androidsnackbar
 WebView的簡單使用,