今天就借助官方 API的動畫來擴展總結下之前學習與使用過的一些知識點,風格不變,先看效果,再看代碼:
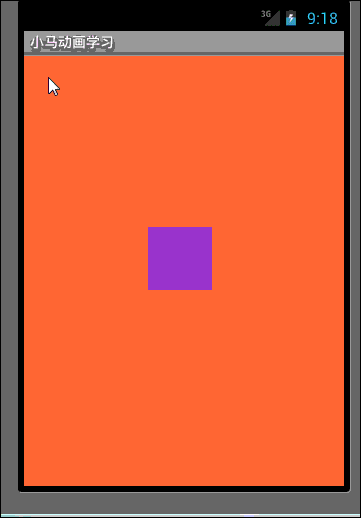
動畫效果一:
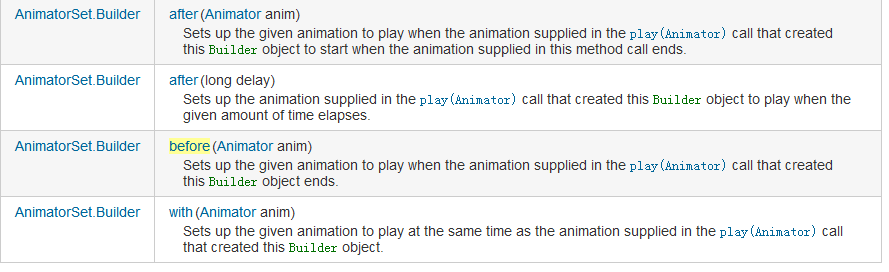
AnimatorSet.Builderl:
好了,效果看完了,但這篇文章主要看的不是這個簡單的效果,大家來看下文章中的注釋與解釋吧。
Java代碼
- package com.xiaoma.www;
-
- import java.util.ArrayList;
-
- import android.animation.Animator;
- import android.animation.AnimatorListenerAdapter;
- import android.animation.AnimatorSet;
- import android.animation.ObjectAnimator;
- import android.animation.ValueAnimator;
- import android.app.Activity;
- import android.content.Context;
- import android.graphics.Canvas;
- import android.graphics.Paint;
- import android.graphics.RadialGradient;
- import android.graphics.Shader;
- import android.graphics.drawable.ShapeDrawable;
- import android.graphics.drawable.shapes.OvalShape;
- import android.os.Bundle;
- import android.view.MotionEvent;
- import android.view.View;
- import android.view.animation.AccelerateInterpolator;
- import android.view.animation.DecelerateInterpolator;
- import android.widget.LinearLayout;
-
- /**
- * @Title: BoundAnimationActivity.java
- * @Package com.xiaoma.www
- * @Description: 小馬API動畫學習擴展
- * @author XiaoMa
- */
- public class BallAnimationActivity extends Activity {
-
- /**定義小球要顯示的窗口*/
- private LinearLayout xiaoMaLayout = null ;
-
- /** Called when the activity is first created. */
- @Override
- public void onCreate(Bundle savedInstanceState) {
- super.onCreate(savedInstanceState);
- setContentView(R.layout.main);
-
- init();
- }
-
- /**
- * 初始化實現
- */
- private void init(){
-
- //定位動畫容器資源
- xiaoMaLayout = (LinearLayout)findViewById(R.id.xiaoma);
- xiaoMaLayout.addView(new BallAnimationView(this));
- }
-
- /**
- * @Title: BallAnimationActivity.java
- * @Package com.xiaoma.www
- * @Description:自定義View, 文章中我會擴展一些東西,大家要仔細看注釋哦
- * @author XiaoMa
- */
- public class BallAnimationView extends View{
-
- //由於文章排版問題,小馬在此處稍微違背下注釋規范,多行注釋暫時用“//”來代替,大家見諒
- //這個地方大家先考慮下三個問題:(答案小馬會在後面解答)
- //1:為什麼要用static ?
- //2:為什麼要用final ?
- //3:為什麼不用注釋中的Color類而用十六進制來定義這些顏色值,不是更方便嗎 ?
-
- /**定義背景顏色更換色值*/
- private static final int RED = 0xffFF8080;
- private static final int BLUE = 0xff8080FF;
- private static final int CYAN = 0xff80ffff;
- private static final int GREEN = 0xff80ff80;
-
- /**private static final int RED1 = Color.RED;
- private static final int BLUE1 = Color.BLUE;
- private static final int CYAN1 = Color.CYAN;
- private static final int GREEN1 = Color.GREEN;*/
-
- /**
- * 這個地方解釋下吧,上面三個問題的答案:1:用static可以加快訪問速度,達到高效訪問變量; 2:用final簡單, 就是不常變;3:不用Color是因為已經是static final了,如果用了Color.XXX的話,會長期在內存中導入一個沒必要的包,占用內存,浪費內存資源;這個地方小馬順帶著說下,在應用中如果你經常用static來定義一些變量時,很多的變量時就會出OOM的問題啦,比如:
- * public class ClassName {
- private static Context mContext;
- }
- 上面的代碼是很惡心的,我以前就在項目中就這樣寫過,以構造方法傳遞過來,以為寫成靜態可以方便調用對吧?其實是錯的!!!如果將Activity賦值到麼mContext的話。即使該Activity已經onDestroy,但是由於仍有對象保存它的引用,因此該Activity依然不會被釋放。擴展擴展有效避免OOM的幾種情況:
- 第一,應該盡量避免static成員變量引用資源耗費過多的實例,比如Context。
- 第二、Context盡量使用Application Context,因為Application的Context的生命周期比較長,引用它不會出現內存洩露的問題。
- 第三、使用WeakReference代替強引用。比如可以使用WeakReference<Context> mContextRef;
- 第四、將線程的內部類,改為靜態內部類。
- 第五、在線程內部采用弱引用保存Context引用。
-
- */
-
- /**聲明並初始化一個小球的容器*/
- public final ArrayList<ShapeHolder> balls = new ArrayList<ShapeHolder>();
-
- //AnimatorSet類與AnimationSet別搞混,而且必須在3.0以上版本中才有哦...
- //此類可以根據一個特殊的順序來播放Animator對象中的動畫,而Animator則是一個
- //可以支持set結點設置動畫的詳細信息,如:開始、結束等...,set相信大家不是很陌生了吧
- //以下形式即:set結點動畫
- /**<setandroid:ordering=["together" ¦ "sequentially"]>
- <objectAnimator
- android:propertyName="string"
- android:duration="int"
- android:valueFrom="float ¦ int ¦ color"
- android:valueTo="float ¦ int ¦ color"
- android:startOffset="int"
- android:repeatCount="int"
- android:repeatMode=["repeat" ¦ "reverse"]
- android:valueType=["intType" ¦ "floatType"]/>
- <animator
- android:duration="int"
- android:valueFrom="float ¦ int ¦ color"
- android:valueTo="float ¦ int ¦ color"
- android:startOffset="int"
- android:repeatCount="int"
- android:repeatMode=["repeat" ¦ "reverse"]
- android:valueType=["intType" ¦ "floatType"]/>
- <set>
- ...
- </set>
- </set>*/
-
- /**
- * 既然在文章開頭說了要擴展很多東西的話,不僅僅是看個效果那麼簡單啦,順帶著學習回顧下動畫中的詳細屬性:
- * 四種主要的動畫類型:
- alpha 漸變透明度動畫效果
- scale 漸變尺寸伸縮動畫效果
- translate 畫面轉換位置移動動畫效果
- rotate 畫面轉移旋轉動畫效果
-
- 四種主要的動畫類型相對應的類:
- AlphaAnimation 漸變透明度動畫效果
- ScaleAnimation 漸變尺寸伸縮動畫效果
- TranslateAnimation 畫面轉換位置移動動畫效果
- RotateAnimation 畫面轉移旋轉動畫效果
- 動畫的XML文件在工程中res/anim目錄,這個文件必須包含一個根元素,可以使<alpha><scale> <translate> <rotate>
- 插值元素或者是把上面的元素都放入<set>元素組中,默認情況下,所有的動畫指令都是同時發生的,為了讓他們按序列發生,需要設置一個
- 特殊的屬性startOffset。動畫的指令定義了你想要發生什麼樣的轉換,當他們發生了,應該執行多長時間,轉換可以是連續的也可以使同時的
-
- 四大節點共同屬性匯總:
-
- 屬性[類型] 功能
- Duration[long] 屬性為動畫持續時間 時間以毫秒為單位
- fillAfter [boolean] 當設置為true ,該動畫轉化在動畫結束後被應用
- fillBefore[boolean] 當設置為true ,該動畫轉化在動畫開始前被應用
- */
-
- /**聲明播放動畫控制器*/
- AnimatorSet animator = null ;
-
- //這個地方大家應該發現了點什麼吧?想想為什麼用這個構造不用下面注釋的構造?
- public BallAnimationView(Context context) { //方式一
- super(context);
- //上一篇講ObjectAnimator,這個地方大家現在應該知道ValueAnimator是干嗎的了吧?吼吼
- ValueAnimator backAnim = ObjectAnimator.ofInt(this, "backgroundColor", RED,BLUE,CYAN,GREEN);
- //設置自動更換背景色的時間為每隔2秒更換一次
- backAnim.setDuration(2000);
- backAnim.setRepeatCount(ValueAnimator.INFINITE);
- backAnim.setRepeatMode(ValueAnimator.REVERSE);
- backAnim.start();
- }
-
- /**public BallAnimationView(Context context, AttributeSet attrs) { //方式二
- super(context, attrs);
- // TODO Auto-generated constructor stub
- }*/
-
- /**
- * 這個地方給出上面選擇構造方法時是為什麼用第一個不用第二個構造方法的原因:
- * 一:如果是用純代碼的方式加載自定義的控制到而已中時用第一種方式,
- * 二:如果是XML文件加載的方式使用自定義控件到布局中是用第二種方式,
- */
-
- @Override
- protected void onDraw(Canvas canvas) {
- for (int i = 0; i < balls.size(); ++i) {
- ShapeHolder shapeHolder = balls.get(i);
- canvas.save();
- //這個地方的translate()這個方法,如果朋友們要深究的話可以自行學習下,不想的話只知道怎麼用就行了...
- //矩陣轉換在這不多說了,因為我懂的矩陣不多,只記下這個小點:Matrix的基本操作包括:+、*。Matrix的乘法不滿足交換律,也就是說A*B ≠B*A。
- canvas.translate(shapeHolder.getX(), shapeHolder.getY());
- shapeHolder.getShape().draw(canvas);
- canvas.restore(); //重置畫布
- }
- super.onDraw(canvas);
- }
-
- /**
- * 監聽觸屏事件,以此來播放動畫
- * */
- @Override
- public boolean onTouchEvent(MotionEvent event) {
- if(event.getAction() != MotionEvent.ACTION_DOWN
- && event.getAction() != MotionEvent.ACTION_MOVE){
- return false;
- }
- ShapeHolder newBall = addBall(event.getX(), event.getY());
-
- // Bouncing animation with squash and stretch
- float startY = newBall.getY();
- float endY = getHeight() - 50f;
- //獲取的這個高度是當前View的高度
- float h = (float)getHeight();
- float eventY = event.getY();
- int duration = (int)(500 * ((h - eventY)/h));
- ValueAnimator bounceAnim = ObjectAnimator.ofFloat(newBall, "y", startY, endY);
- bounceAnim.setDuration(duration);
- //這個地方使用到插值器,順帶講下幾種插值器
- //打過人家門窗玻璃的人都知道,石頭剛扔出時的狀態是:先快先慢,以下講到使用的插值器就是這個道理,
- //所以說有些事還是小時候練成的哦!!
-
- /**accelerate_decelerate_interpolator
- 加速-減速 動畫插入器
-
- accelerate_interpolator
- 加速-動畫插入器
-
- decelerate_interpolator
- 減速- 動畫插入器*/
-
- //下面這些實現細節的代碼小馬就不一條條加注釋 了,只加下比較特殊的地方
- bounceAnim.setInterpolator(new AccelerateInterpolator());
- ValueAnimator squashAnim1 = ObjectAnimator.ofFloat(newBall, "x", newBall.getX(),
- newBall.getX() - 25f);
- squashAnim1.setDuration(duration/4);
- squashAnim1.setRepeatCount(1);
- squashAnim1.setRepeatMode(ValueAnimator.REVERSE);
- squashAnim1.setInterpolator(new DecelerateInterpolator());
- ValueAnimator squashAnim2 = ObjectAnimator.ofFloat(newBall, "width", newBall.getWidth(),
- newBall.getWidth() + 50);
- squashAnim2.setDuration(duration/4);
- squashAnim2.setRepeatCount(1);
- squashAnim2.setRepeatMode(ValueAnimator.REVERSE);
- squashAnim2.setInterpolator(new DecelerateInterpolator());
- ValueAnimator stretchAnim1 = ObjectAnimator.ofFloat(newBall, "y", endY,
- endY + 25f);
- stretchAnim1.setDuration(duration/4);
- stretchAnim1.setRepeatCount(1);
- stretchAnim1.setInterpolator(new DecelerateInterpolator());
- stretchAnim1.setRepeatMode(ValueAnimator.REVERSE);
- ValueAnimator stretchAnim2 = ObjectAnimator.ofFloat(newBall, "height",
- newBall.getHeight(), newBall.getHeight() - 25);
- stretchAnim2.setDuration(duration/4);
- stretchAnim2.setRepeatCount(1);
- stretchAnim2.setInterpolator(new DecelerateInterpolator());
- stretchAnim2.setRepeatMode(ValueAnimator.REVERSE);
- ValueAnimator bounceBackAnim = ObjectAnimator.ofFloat(newBall, "y", endY,
- startY);
- bounceBackAnim.setDuration(duration);
- bounceBackAnim.setInterpolator(new DecelerateInterpolator());
- // Sequence the down/squash&stretch/up animations
- AnimatorSet bouncer = new AnimatorSet();
-
- //下面三個之前、之後、同一時間來添加動畫,此處什麼意思,我就不一句句翻譯了,大家直接看官方解釋就可以了,截圖在動畫效果三後一張:
- //如果大家想詳細了解學習AnimatorSet.Builder的話可以看下下面官方這個鏈接...
- //http://developer.android.com/reference/android/animation/AnimatorSet.Builder.html
- bouncer.play(bounceAnim).before(squashAnim1);
- bouncer.play(squashAnim1).with(squashAnim2);
- bouncer.play(squashAnim1).with(stretchAnim1);
- bouncer.play(squashAnim1).with(stretchAnim2);
- bouncer.play(bounceBackAnim).after(stretchAnim2);
-
- // 看到alpha漸變了吧?當小球反彈到最後時變為全透明,並從容器中remove透明的小球
- ValueAnimator fadeAnim = ObjectAnimator.ofFloat(newBall, "alpha", 1f, 0f);
- fadeAnim.setDuration(250);
- fadeAnim.addListener(new AnimatorListenerAdapter() {
- @Override
- public void onAnimationEnd(Animator animation) {
- balls.remove(((ObjectAnimator)animation).getTarget());
-
- }
- });
-
- // 按順序排列好其它小球的動畫
- AnimatorSet animatorSet = new AnimatorSet();
- animatorSet.play(bouncer).before(fadeAnim);
-
- animatorSet.start();
- return true;
- }
-
- /***
- * 將小球添加到容器中方法實現
- * @param x
- * @param y
- * @return 添加的小球對象
- */
- private ShapeHolder addBall(float x, float y) {
- OvalShape circle = new OvalShape();
- circle.resize(50f, 50f);
- ShapeDrawable drawable = new ShapeDrawable(circle);
- ShapeHolder shapeHolder = new ShapeHolder(drawable);
- shapeHolder.setX(x - 25f);
- shapeHolder.setY(y - 25f);
- //隨機取RGB三種顏色
- int red = (int)(Math.random() * 255);
- int green = (int)(Math.random() * 255);
- int blue = (int)(Math.random() * 255);
- //下面是:得到一個16進制表示的顏色,相當於:0xff(red的16進制值)(green的16進制值)(blue的16進制值)
- //比如 0xff886644 88 = red 66 = green 44 = blue這樣的,第一次見到這個東西,大家記得記下哦
- int color = 0xff000000 ¦ red << 16 ¦ green << 8 ¦ blue;
- Paint paint = drawable.getPaint(); //得到畫筆
- int darkColor = 0xff000000 ¦ red/4 << 16 ¦ green/4 << 8 ¦ blue/4;
- //用給定的圓心、半徑、顏色和展示模式來繪制小球,這裡使用的模式是:平鋪模式:
- //展示模式有三種分別是:平鋪模式、 平鋪模式非重疊模式、 非重疊模式
- RadialGradient gradient = new RadialGradient(37.5f, 12.5f,
- 50f, color, darkColor, Shader.TileMode.CLAMP);
- //設置畫筆要繪制的圖片
- paint.setShader(gradient);
- //設置畫筆開
- shapeHolder.setPaint(paint);
- balls.add(shapeHolder);
- return shapeHolder;
- }
-
- }
- }
主控制類看完了,下面來看下這個簡單的輔助類,如果下:
Java代碼
- package com.xiaoma.www;
-
- import android.graphics.Paint;
- import android.graphics.RadialGradient;
- import android.graphics.drawable.ShapeDrawable;
- import android.graphics.drawable.shapes.Shape;
-
- /**
- * @Title: ShapeHolder.java
- * @Package com.xiaoma.www
- * @Description: 動畫輔助類
- * @author XiaoMa
- */
- public class ShapeHolder {
- private float x = 0, y = 0;
- private ShapeDrawable shape;
- private int color;
- private RadialGradient gradient;
- private float alpha = 1f;
- private Paint paint;
-
- public void setPaint(Paint value) {
- paint = value;
- }
- public Paint getPaint() {
- return paint;
- }
-
- public void setX(float value) {
- x = value;
- }
- public float getX() {
- return x;
- }
- public void setY(float value) {
- y = value;
- }
- public float getY() {
- return y;
- }
- public void setShape(ShapeDrawable value) {
- shape = value;
- }
- public ShapeDrawable getShape() {
- return shape;
- }
- public int getColor() {
- return color;
- }
- public void setColor(int value) {
- shape.getPaint().setColor(value);
- color = value;
- }
- public void setGradient(RadialGradient value) {
- gradient = value;
- }
- public RadialGradient getGradient() {
- return gradient;
- }
-
- public void setAlpha(float alpha) {
- this.alpha = alpha;
- shape.setAlpha((int)((alpha * 255f) + .5f));
- }
-
- public float getWidth() {
- return shape.getShape().getWidth();
- }
- public void setWidth(float width) {
- Shape s = shape.getShape();
- s.resize(width, s.getHeight());
- }
-
- public float getHeight() {
- return shape.getShape().getHeight();
- }
- public void setHeight(float height) {
- Shape s = shape.getShape();
- s.resize(s.getWidth(), height);
- }
-
- public ShapeHolder(ShapeDrawable s) {
- shape = s;
- }
- }
好啦,擴展看完了,如果大家有好的建議或者需要什麼地方需要整理總結的,記得留言提出,看到留言會第一時間回復並總結整理出來的,謝謝啦,每天進步一點點,也算一種進步,大家加油,把工作當成自己的興趣,才能獲得源源不斷的動力,加油加油!!!一起學習一起進步,這就是編程的快樂!加油…..O_O!
 AndroidAnnnotations注入框架使用之第三方框架集成RoboGuice(十三)
 使用android.support.design.widget.TabLayout出現java.lang.reflect.InvocationTargetException,androidtablayout
 Android 手機衛士15--程序鎖,android衛士15--
 App單個頁面的最佳文本框個數是多少個?,app文本框個數