編輯:關於android開發
我們知道我們創建的每一個Activity,系統默認為我們提供了一下黑色的標題,本篇我將帶領大家接觸一下如何實現自定義標題樣式。相比系統為我們提供的樣式,自定義標題可以滿足我們唯心所欲的自定義設計,使我們的界面看上去更加的高端上檔次,以便更好的吸引用戶的使用。下面開始今天的內容介紹:
1、既然是自定義標題樣式,首先我們需要設計一個自定義標題布局,通過這個布局文件,我們可以隨心所欲的設計我們的標題樣式(title.xml):
<?xml version="1.0" encoding="utf-8"?>
<LinearLayout xmlns:android="http://schemas.android.com/apk/res/android"
    android:layout_width="match_parent"
    android:layout_height="match_parent"
    android:orientation="horizontal"
    >

    <TextView
        android:layout_width="wrap_content"
        android:layout_height="wrap_content"
        android:textColor="#aa0000"
        android:text="這是我的自定義標題"
        />
    <Button
        android:id="@+id/button"
        android:layout_width="wrap_content"
        android:layout_height="wrap_content"
        android:text="更多"
        />

</LinearLayout>
2、寫好布局文件了,下面我們開始設計標題的樣式,項目res目錄下styles.xml:
<resources>

    <style name="itcastTheme" parent="android:Theme">
         <item name="android:windowContentOverlay">@color/nonecolor</item>
         <item name="android:windowTitleSize">44dp</item><!-- 設置自定義標題的寬度 -->
         <item name="android:windowTitleBackgroundStyle">@style/itcastbg</item><!-- 自定義標題的樣式 -->
    </style>

    <style name="itcastbg">
        <item name="android:background">@drawable/rectangle</item>
    </style>

</resources>
3、紅色字體部分,是我通過drawable文件下的rectangle.xml文件實現的一個標題背景:
<?xml version="1.0" encoding="utf-8"?>
<shape
    xmlns:android="http://schemas.android.com/apk/res/android"
    android:shape="rectangle" >
    <gradient
        android:angle="270"
        android:endColor="#1DC9CD"
        android:startColor="#A2E0FB" />
    <padding
        android:left="2dp"
        android:top="2dp"
        android:right="2dp"
        android:bottom="2dp" />
</shape>
4、到這裡我麼就可以開始修改我們的主Activity:
public class MainActivity extends Activity {

    @Override
    protected void onCreate(Bundle savedInstanceState) {
        super.onCreate(savedInstanceState);

        requestWindowFeature(Window.FEATURE_CUSTOM_TITLE);

        setContentView(R.layout.activity_main);

        getWindow().setFeatureInt(Window.FEATURE_CUSTOM_TITLE, R.layout.title);//設置我們自定義標題
        Button  mybutton = (Button)findViewById(R.id.button);
        mybutton.setOnClickListener(new OnClickListener() {
            @Override
            public void onClick(View v) {
                Toast.makeText(MainActivity.this, "盡請期待", Toast.LENGTH_SHORT).show();
            }
        });
    }
}
需要注意的是紅色部分必須寫在引用布局文件之前,不然達不到效果。
5、最後我們需要在AndroidManifest.xml文件中,為我們的Activity設置一下樣式:
<?xml version="1.0" encoding="utf-8"?>
<manifest xmlns:android="http://schemas.android.com/apk/res/android"
    package="cn.edu.hpu.activity_title"
    android:versionCode="1"
    android:versionName="1.0" >

    <uses-sdk
        android:minSdkVersion="8"
        android:targetSdkVersion="21" />

    <application
        android:icon="@drawable/ic_launcher"
        android:label="@string/app_name">
        <activity
            android:name=".MainActivity"
            android:theme="@style/itcastTheme">
            <intent-filter>
                <action android:name="android.intent.action.MAIN" />

                <category android:name="android.intent.category.LAUNCHER" />
            </intent-filter>
        </activity>
    </application>

</manifest>
好了,關於Android自定義標題的介紹就說完了,感興趣的小童鞋可以實現一下。新手學習,高手交流。
 Android開發的初學者快速創建一個項目,android開發初學者
Android開發的初學者快速創建一個項目,android開發初學者因為gwf的原因,大陸連不上google所以AndroidSDK是無法更新的 而且設置代
 仿QQ空間根據位置彈出PopupWindow顯示更多操作效果,popupwindow
仿QQ空間根據位置彈出PopupWindow顯示更多操作效果,popupwindow我們打開QQ空間的時候有個箭頭按鈕點擊之後彈出PopupWindow會根據位置的變化顯
 Android 主頁面頂部欄的通知Notification ,可以自定義通知消息欄的風格,並且點擊通知欄進人本程序。,android自定義消息欄
Android 主頁面頂部欄的通知Notification ,可以自定義通知消息欄的風格,並且點擊通知欄進人本程序。,android自定義消息欄常用的程序通知,顯示到主頁
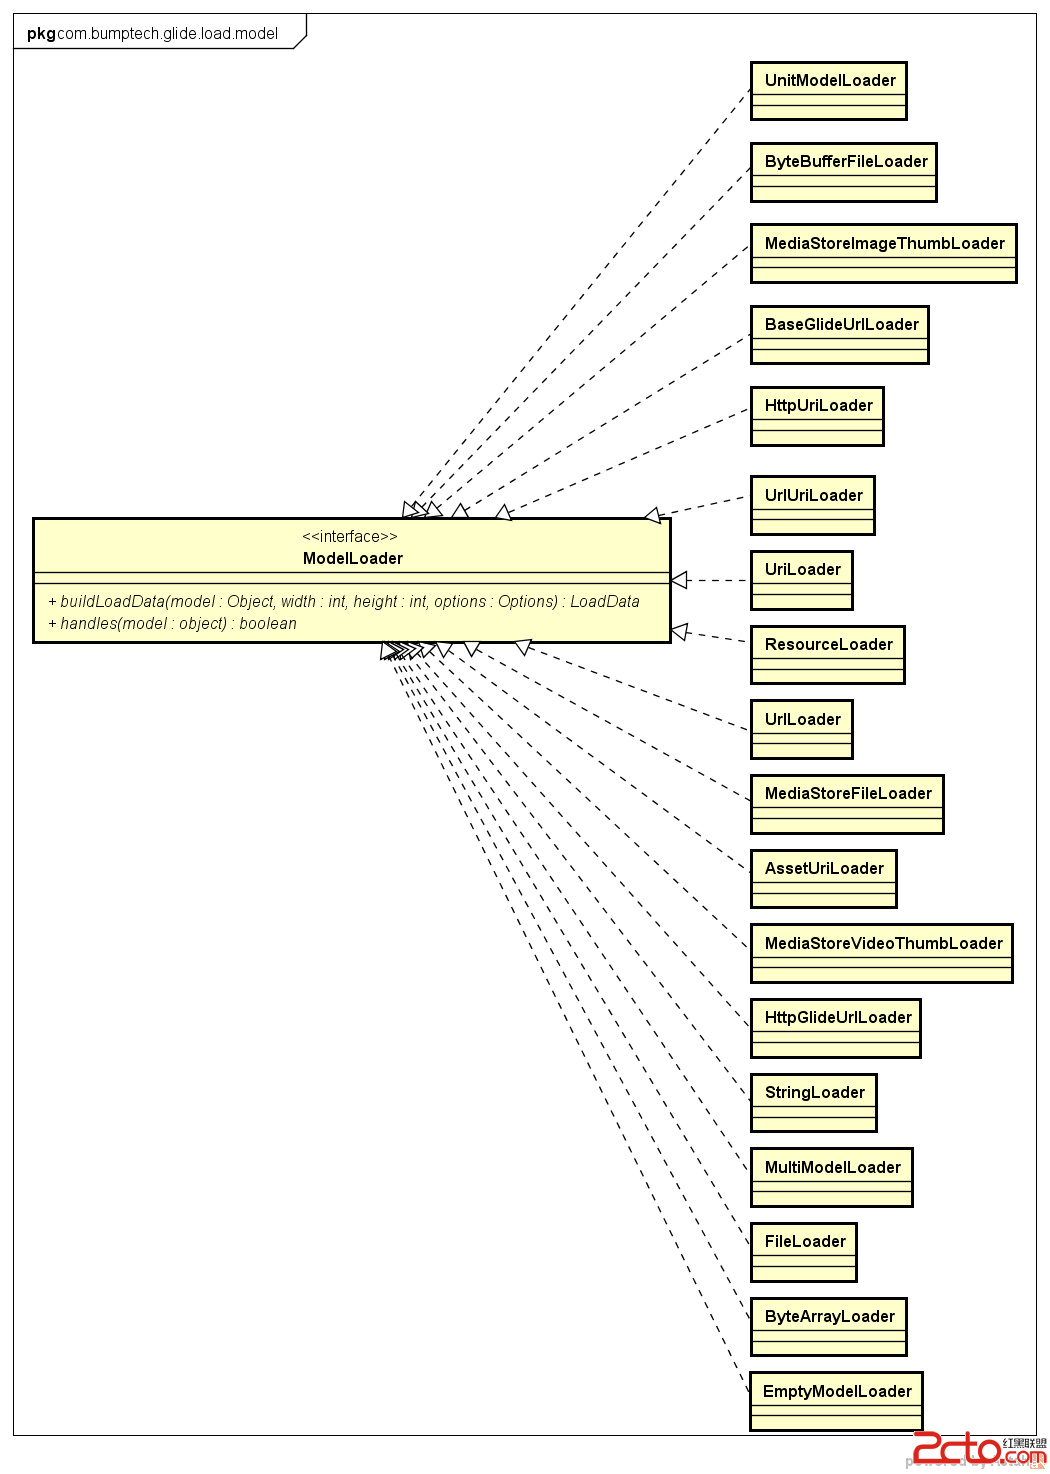 Android Glide源碼解析
Android Glide源碼解析 功能介紹 使用文章介紹以及和Picasso的對比分析請參考Introduction to Glide, Image Loader