編輯:關於android開發
我的微信公眾號:

如果你喜歡我的文章,歡迎關注我的微信公眾號。
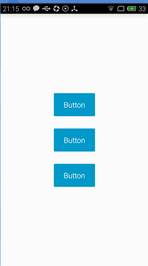
今天給大家介紹的是一款可以動態變化的按鈕,如矩形變為圓形、圓形變為矩形、矩形先變為進度條然後再變為圓形,我們還是先看看效果圖吧。
 vce+2NDOoaM8YnIgLz4NCrXatv649rC0xaXTyb7Y0M6x5M6q1LLQzqGjPGJyIC8+DQq12sj9uPawtMWl08m+2NDOseTOqr34tsjM9aOsvfi2yMz1veHK+LrzseTOqtSy0M6hozwvcD4NCjxwPtTatMvJ+cP30rvPwqOs0Ke5+8q1z9bO0tXiwO+yorfH1K20tKOsztLSssrH1NpnaXRodWLJz8Pmv7S1vbTL0Ke5+6OsyLu689TEtsHUtMLro6y+9bXDsru07aOsvs3NqLn919S8urXEwO294rDRtMvQp7n719S8utKyyrXP1sHL0rvPwqGjPC9wPg0KPHA+tMu/2Lz+tcTM2NCn1vfSqsrH0M7XtLXEtq/MrLHku7ujrLHIyOexs76wyaujrL/ttsi6zbjftsijrNSyvce7obbItcjK9NDUo6zTydPa1eLA78nmvLCx5Lu7tcTK9NDUsci9z7bgo6zL+dLU1eLA78q508PBy0J1aWxkZXLJ6LzGxKPKvaGjPC9wPg0KPHA+zazR+aOsztLDx7u5ysfQ6NKq19S2qNLl0rvQqcjnz8LK9NDUo7o8L3A+DQo8cHJlIGNsYXNzPQ=="brush:java;">
各屬性意義如下:
dybtn_color:按鈕的正常狀態下的背景色
dybtn_corner_radius:按鈕的圓角弧度
dybtn_stroke_color:按鈕的邊緣顏色
dybtn_stroke_width:按鈕的邊緣寬度
dybtn_pressed_color:按鈕按下時的顏色
pbtn_progresscolor:進度條按鈕的顏色
pbtn_maxvalue:進度條的最大值
pbtn_minvalue:進度條的最小值
pbtn_progress:進度條的當前進度
既然定義了屬性,那麼必然需要解析自定義屬性,自定義屬性通常在構造函數中進行,所以通常的做法是定義一個方法在所有構造函數中調用:
public void initView(Context mContext, AttributeSet attrs, int defStyleAttr) {
        TypedArray array = mContext.obtainStyledAttributes(attrs, R.styleable.DynamicButton, defStyleAttr, 0);
        mColor = array.getColor(R.styleable.DynamicButton_dybtn_color, DEFUALT_DYB_COLOR);
        mPressedColor = array.getColor(R.styleable.DynamicButton_dybtn_pressed_color, DEFAULT_DYB_PRESSED_COLOR);
        mCornerRadius = array.getDimensionPixelOffset(R.styleable.DynamicButton_dybtn_corner_radius, dp2px(DEFUALT_DYB_CORNER_RADIUS));
        mStrokeColor = array.getColor(R.styleable.DynamicButton_dybtn_stroke_color, DEFAULT_DYB_STROKE_COLOR);
        mStrokeWidth = array.getDimensionPixelOffset(R.styleable.DynamicButton_dybtn_stroke_width, dp2px(DEFAULT_DYB_STROKE_WIDTH));

        mNormalDrawable = createDrawable(mColor, mCornerRadius, mStrokeWidth, mStrokeColor);
        mPressedDrawable = createDrawable(mPressedColor, mCornerRadius, mStrokeWidth, mStrokeColor);

        StateListDrawable mListDrawable = new StateListDrawable();
        mListDrawable.addState(new int[]{android.R.attr.state_pressed}, mPressedDrawable);
        mListDrawable.addState(new int[]{android.R.attr.state_focused}, mPressedDrawable);
        mListDrawable.addState(new int[]{android.R.attr.state_selected}, mPressedDrawable);
        mListDrawable.addState(new int[]{}, mNormalDrawable);
        setBackground(mListDrawable);
        array.recycle();
    }
這裡我只想說明一點就是StateListDrawable 的用法,平時我們如果想實現一個控件在按下和正常狀態下有不同的背景色時,都是通過selecter實現,而這裡我們通過StateListDrawable 實現,其實selecter也是通過此類實現的。這裡分別定義了正常狀態和獲取焦點以及按下狀態的背景色。
我們進入到createDrawable() 方法看看:
    public CustomGradientDrawable createDrawable(int mColor, float mCornerRadius, int mStrokeWidth, int mStrokeColor) {
        CustomGradientDrawable drawable = new CustomGradientDrawable();
        drawable.setShape(GradientDrawable.RECTANGLE);
        drawable.setStrokeColor(mStrokeColor);
        drawable.setStrokeWidth(mStrokeWidth);
        drawable.setColor(mColor);
        drawable.setRadius(mCornerRadius);
        return drawable;
    }
這裡我們並沒有直接使用GradientDrawable 這個類,而是自己定義了一個它的子類,並且子類中僅僅是新增一些屬性,而且有些屬性還是父類中已經存在的,為什麼要這麼做呢?因為這裡我們需要使用屬性動畫,使用屬性動畫需要具備一個條件,就是該屬性必須有對應的get/set方法,如屬性color,那麼必須具有setColor、getColor才能使用屬性動畫完成color屬性的漸變。
正如前面所說,這裡涉及的屬性太多,所以使用Builder模式管理屬性。
    /**
     * 使用Build模式構建該按鈕的屬性
     */
    public static class PropertyParam {

        public int mHeight;
        public int mWidth;
        public int mColor;
        public int mPressedColor;
        public float mCornerRadius;
        public int mStrokeWidth;
        public int mStrokeColor;
        public long duration;
        public String text;
        public Drawable icon;
        public static PropertyParam build() {
            return new PropertyParam();
        }

        public PropertyParam setHeight(int mHeight) {
            this.mHeight = mHeight;
            return this;
        }

        public PropertyParam setWidth(int mWidth) {
            this.mWidth = mWidth;
            return this;
        }

        public PropertyParam setColor(int mColor) {
            this.mColor = mColor;
            return this;
        }

        public PropertyParam setCornerRadius(int mCornerRadius) {
            this.mCornerRadius = mCornerRadius;
            return this;
        }

        public PropertyParam setStrokeWidth(int mStrokeWidth) {
            this.mStrokeWidth = mStrokeWidth;
            return this;
        }

        public PropertyParam setStrokeColor(int mStrokeColor) {
            this.mStrokeColor = mStrokeColor;
            return this;
        }

        public PropertyParam setPressedColor(int mPressedColor) {
            this.mPressedColor = mPressedColor;
            return this;
        }

        public PropertyParam duration(long duration) {
            this.duration = duration;
            return this;
        }

        public PropertyParam text(String text) {
            this.text = text;
            return this;
        }

        public PropertyParam icon(Drawable icon) {
            this.icon = icon;
            return this;
        }
    }
如果你接觸過Builder模式,那麼這段代碼非常好理解,如果不知道的,可以先上網查查什麼是Build模式,這裡我就不解釋了。
我們使用PropertyParam 這個類來存放按鈕想要變成形狀的屬性,按鈕當前形狀的對應屬性我們也非常容易拿到,我們將這些數據組裝成另一個數據結構AnimatorParams ,這個類存放了當前形狀的屬性,以及想要變成形狀的對應屬性,比如當前我們是矩形,想要變成圓形,那麼AnimatorParams 就存放了兩種形狀的高度,寬度,圓角弧度,背景色等等。
 public static class AnimatorParams{

        private float fromCornerRadius;
        private float toCornerRadius;

        private int fromHeight;
        private int toHeight;

        private int fromWidth;
        private int toWidth;

        private int fromColor;
        private int toColor;


        private int fromStrokeWidth;
        private int toStrokeWidth;

        private int fromStrokeColor;
        private int toStrokeColor;

        private long duration;


        private DynamicButton mButton;
        private AnimatorBuilder.AnimatorListener mListener;

        public AnimatorParams(DynamicButton mButton){
            this.mButton=mButton;
        }

        public static AnimatorParams build(DynamicButton mButton){
            return new AnimatorParams(mButton);
        }

        public AnimatorParams height(int fromHeight,int toHeight) {
            this.fromHeight = fromHeight;
            this.toHeight = toHeight;
            return this;
        }

        public AnimatorParams cornerRadius(float fromCornerRadius,float toCornerRadius){
            this.fromCornerRadius=fromCornerRadius;
            this.toCornerRadius=toCornerRadius;
            return this;
        }


        public AnimatorParams width(int fromWidth,int toWidth){
            this.fromWidth=fromWidth;
            this.toWidth=toWidth;
            return this;
        }

        public AnimatorParams strokeWidth(int fromStrokeWidth,int toStrokeWidth){
            this.fromStrokeWidth=fromStrokeWidth;
            this.toStrokeWidth=toStrokeWidth;
            return this;
        }


        public AnimatorParams strokeColor(int fromStrokeColor,int toStrokeColor){
            this.fromStrokeColor=fromStrokeColor;
            this.toStrokeColor=toStrokeColor;
            return this;
        }

        public AnimatorParams duration(long duration){
            this.duration=duration;
            return this;
        }

        public AnimatorParams listener(AnimatorListener listener){
            this.mListener=listener;
            return this;
        }

        public AnimatorParams color(int fromColor,int toColor){
            this.fromColor=fromColor;
            this.toColor=toColor;
            return this;
        }

    }
有了這個對象,相信熟悉屬性動畫的同學就知道如何實現動畫效果了:
    public static void startAnimator(final AnimatorParams params){
        ValueAnimator heightAnimator= ValueAnimator.ofInt(params.fromHeight,params.toHeight);
        heightAnimator.addUpdateListener(new ValueAnimator.AnimatorUpdateListener() {
            @Override
            public void onAnimationUpdate(ValueAnimator animation) {
                ViewGroup.LayoutParams lp=params.mButton.getLayoutParams();
                lp.height=(Integer)animation.getAnimatedValue();
                params.mButton.setLayoutParams(lp);
            }
        });

        ValueAnimator widthAnimator=ValueAnimator.ofInt(params.fromWidth,params.toWidth);
        widthAnimator.addUpdateListener(new ValueAnimator.AnimatorUpdateListener() {
            @Override
            public void onAnimationUpdate(ValueAnimator animation) {
                ViewGroup.LayoutParams lp=params.mButton.getLayoutParams();
                lp.width=(Integer)animation.getAnimatedValue();
                params.mButton.setLayoutParams(lp);
            }
        });

        CustomGradientDrawable drawable= (CustomGradientDrawable) params.mButton.getNormalDrawable();
        ObjectAnimator radiusAnimator=ObjectAnimator.ofFloat(drawable,radius,params.fromCornerRadius,params.toCornerRadius);
        ObjectAnimator strokeWidthAnimator=ObjectAnimator.ofInt(drawable, strokeWidth, params.fromStrokeWidth, params.toStrokeWidth);
        ObjectAnimator strokeColorAnimator=ObjectAnimator.ofInt(drawable,strokeColor,params.fromStrokeColor,params.toStrokeColor);
        ObjectAnimator colorAnimaor=ObjectAnimator.ofInt(drawable,color,params.fromColor,params.toColor);
        colorAnimaor.setEvaluator(new ArgbEvaluator());

        AnimatorSet animators=new AnimatorSet();
        animators.setDuration(params.duration);
        animators.play(radiusAnimator).with(strokeColorAnimator).with(strokeWidthAnimator).with(widthAnimator).with(heightAnimator).with(colorAnimaor);
        animators.addListener(new AnimatorListenerAdapter() {
            @Override
            public void onAnimationEnd(Animator animation) {
                super.onAnimationEnd(animation);
                params.mListener.onAnimatorEnd();
            }
        });

        animators.start();
    }
好了,到這裡這個可以變形的Buttom的核心思想介紹完了,由於代碼量還是比較復雜,所以不太好把所有的代碼都貼出來
 【原創】來自遠方的“僵屍之手”,來自遠方僵屍
【原創】來自遠方的“僵屍之手”,來自遠方僵屍來自遠方的“僵屍之手” 最近,安天AVL移動安全和獵豹移動安全實驗室共同截
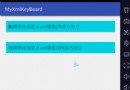 Android使用xml自定義軟鍵盤效果
Android使用xml自定義軟鍵盤效果 Android使用xml自定義軟鍵盤效果原理: 1,軟鍵盤其實是個控件,使用android.inputmethodserve
 VirtualBox下CentOS-6.7上網故障排除
VirtualBox下CentOS-6.7上網故障排除2015/11/2 18:10:43最近需要安裝一台CentOS虛擬機,同事推薦了小巧的VirtualBox來取代“
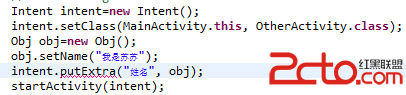 android:Activity數據傳遞之對象(Serializable)
android:Activity數據傳遞之對象(Serializable) Activity數據傳遞之基本數據類型在這篇文章中,我寫了通過putExtra()方法在a