編輯:關於android開發
常用的程序通知,顯示到主頁面的頂部欄。
 1 package com.lixu.tongzhi;
 2
 3 import android.app.Activity;
 4 import android.app.Notification;
 5 import android.app.NotificationManager;
 6 import android.app.PendingIntent;
 7 import android.content.Intent;
 8 import android.os.Bundle;
 9 import android.support.v4.app.NotificationCompat;
10 import android.view.View;
11 import android.view.View.OnClickListener;
12 import android.widget.Button;
13 import android.widget.RemoteViews;
14 import android.widget.Toast;
15
16 public class MainActivity extends Activity {
17
18     private static final int ID = 1987;
19     private static final int REQUEST_CODE = 123;
20
21     @Override
22     protected void onCreate(Bundle savedInstanceState) {
23         super.onCreate(savedInstanceState);
24         setContentView(R.layout.activity_main);
25
26         Button btn1 = (Button) findViewById(R.id.fasong);
27         Button btn2 = (Button) findViewById(R.id.qingchu);
28
29         btn1.setOnClickListener(new OnClickListener() {
30
31             @Override
32             public void onClick(View v) {
33                 send();
34
35                 Toast.makeText(getApplicationContext(), "發送通知成功!", 0).show();
36
37             }
38         });
39
40         btn2.setOnClickListener(new OnClickListener() {
41
42             @Override
43             public void onClick(View v) {
44
45                 delete();
46
47                 Toast.makeText(getApplicationContext(), "清除通知成功!", 0).show();
48
49             }
50         });
51
52     }
53
54     private void send() {
55         // 獲取通知管理器
56         NotificationManager manager = (NotificationManager) getSystemService(NOTIFICATION_SERVICE);
57
58         NotificationCompat.Builder mBuilder = new NotificationCompat.Builder(this);
59         // 設置通知欄圖片
60         mBuilder.setSmallIcon(R.drawable.sdfdf);
61
62         Notification notification = mBuilder.build();
63         // RemoteViews中自定義Notification布局
64
65         RemoteViews cv = new RemoteViews(getApplicationContext().getPackageName(), R.layout.list);
66         // 設置下拉後通知欄圖片
67         cv.setImageViewResource(R.id.image, R.drawable.meimei);
68         // 設置內容
69         cv.setTextViewText(R.id.tv1, "我是小超人");
70         cv.setTextViewText(R.id.tv2, "我是小超人,主人有什麼事情要吩咐。");
71         notification.contentView = cv;
72
73         // 設置通知聲音或者震動或閃光。
74         notification.defaults = Notification.DEFAULT_SOUND | Notification.DEFAULT_VIBRATE;
75         // 通知時間
76         notification.when = System.currentTimeMillis();
77
78         // 需要注意的是,作為選項,此處可以設置MainActivity的啟動模式為singleTop,避免重復新建onCreate()。
79         Intent intent = new Intent(getApplicationContext(), MainActivity.class);
80         // 當用戶點擊通知欄的Notification時候,切換回MainActivity。
81         PendingIntent pi = PendingIntent.getActivity(getApplicationContext(), REQUEST_CODE, intent,
82                 PendingIntent.FLAG_UPDATE_CURRENT);
83         notification.contentIntent = pi;
84
85         // 通過特定id來發送這個通知
86         manager.notify(ID, notification);
87
88     }
89
90     private void delete() {
91         // 獲取通知管理器
92         NotificationManager manager = (NotificationManager) getSystemService(NOTIFICATION_SERVICE);
93         manager.cancel(ID);
94
95     }
96
97 }
需要注意的是,默認Android的Activity為標准模式,即每次都new一個新的Activity出來,不是原先的Activity,在本例中,可以觀察到MainActivity中的onCreate()如果不修改啟動模式,則每次本調用每次TextView顯示的時間不同(遞增),所有為了使用原來的Activity、避免重復new一個新的出來,需要:
在AndroidManifest.xml中修改MainActivity啟動模式為:singleTop

xml文件:
 1 <RelativeLayout xmlns:android="http://schemas.android.com/apk/res/android"
 2     xmlns:tools="http://schemas.android.com/tools"
 3     android:layout_width="match_parent"
 4     android:layout_height="match_parent" >
 5
 6     <Button
 7         android:id="@+id/fasong"
 8         android:layout_width="wrap_content"
 9         android:layout_height="wrap_content"
10         android:layout_alignLeft="@+id/qingchu"
11         android:layout_alignParentTop="true"
12         android:layout_marginTop="56dp"
13         android:text="發送通知" />
14
15     <Button
16         android:id="@+id/qingchu"
17         android:layout_width="wrap_content"
18         android:layout_height="wrap_content"
19         android:layout_below="@+id/fasong"
20         android:layout_centerHorizontal="true"
21         android:layout_marginTop="88dp"
22         android:text="清除通知" />
23
24 </RelativeLayout>
 1 <?xml version="1.0" encoding="utf-8"?>
 2 <RelativeLayout xmlns:android="http://schemas.android.com/apk/res/android"
 3     android:layout_width="match_parent"
 4     android:layout_height="match_parent" >
 5
 6     <ImageView
 7         android:id="@+id/image"
 8         android:layout_width="50dp"
 9         android:layout_height="50dp"
10         android:layout_alignParentLeft="true"
11         android:layout_marginRight="10dp" />
12
13     <TextView
14         android:id="@+id/tv1"
15         android:layout_width="wrap_content"
16         android:layout_height="wrap_content"
17         android:layout_toRightOf="@id/image"
18         android:background="#ff0000" />
19
20     <TextView
21         android:id="@+id/tv2"
22         android:layout_width="wrap_content"
23         android:layout_height="wrap_content"
24         android:layout_below="@id/tv1"
25         android:layout_toRightOf="@id/image"
26         android:background="#00ff00" />
27
28 </RelativeLayout>
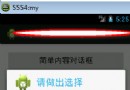
運行效果圖:
 AlertDialog的六種創建方式,alertdialog六種
AlertDialog的六種創建方式,alertdialog六種 AlertDialog的六種創建方式 創建AlertDialog的步驟: 1、創建Aler
 (轉) SpannableString與SpannableStringBuilder,spannablestring
(轉) SpannableString與SpannableStringBuilder,spannablestring前言: 曾經在一些APP中的一些類似“幫助
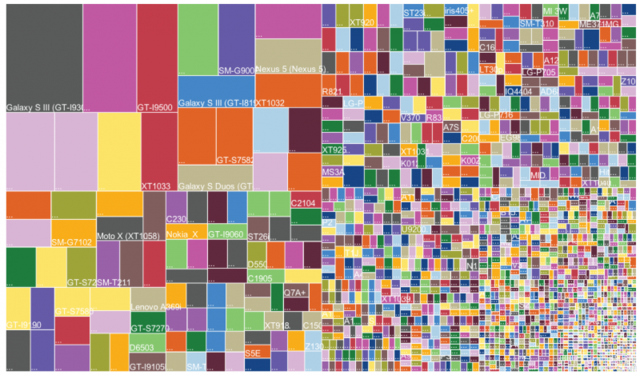 Android屏幕適配全攻略(最權威的官方適配指導)(轉),共大家分享。,android全攻略
Android屏幕適配全攻略(最權威的官方適配指導)(轉),共大家分享。,android全攻略 Android的屏幕適配一直以來都在折磨著我們這些開發者,本篇文章以Goo
 Android M Launcher3主流程源碼淺析
Android M Launcher3主流程源碼淺析 背景 關於Launcher是啥的問題我想這裡就沒必要再強調了。由於一些原因迫使最近開始需要研究一下Launcher3