編輯:關於android開發
上一篇開頭提到了一些可用於磨皮的去噪算法,下面我們實現這些算法並且觀察效果,咱不考慮實時性的問題
本文首先探討的首先是《基於局部均方差相關信息的圖像去噪及其在實時磨皮美容算法中的應用》
該算法利用圖像局部統計特性進行濾波處理,例如NXM像素的灰度圖,首先計算點(i,j)所在窗口內(大小為(2n+1)(2m+1))的平均值m(i,j)

以及均方差:

得到加性去噪後的結果為:

其中:

1.根據原文提出的優化方法,首先是建立兩個積分圖,積分圖的建立算法可以參考這篇文章進行簡單優化。然後即可根據積分圖計算公式中的m值和v值,例如半徑為r的窗口的m(i,j)為Integral(i+r,j+r) + Integral(i-r-1,j-r-1)-Integral(i+r,j-r-1)-Integral(i-r-1,j+r)
void LocalStatisticsSkinSmooth::initIntegral(uint32_t* inputMatrix, int width, int height,int mode){
	LOGE("initIntegral start");
	uint64_t* outputMartix = new uint64_t[width * height];
	uint64_t* outputMartixSqr = new uint64_t[width * height];

	uint64_t *columnSum = new uint64_t[width];
	uint64_t *columnSumSqr = new uint64_t[width];

	int color = ((inputMatrix[0] >> mode) & 0xff);

	columnSum[0] = color;
	columnSumSqr[0] = color * color;

	outputMartix[0] = columnSum[0];
	outputMartixSqr[0] = columnSumSqr[0];

    for(int i = 1;i < width;i++){
    	int color = ((inputMatrix[i] >> mode) & 0xff);

    	columnSum[i] = color;
    	columnSumSqr[i] = color * color;

    	outputMartix[i] = columnSum[i];
    	outputMartix[i] += outputMartix[i-1];
    	outputMartixSqr[i] = columnSumSqr[i];
    	outputMartixSqr[i] += outputMartixSqr[i-1];
    }
    for (int i = 1;i < height; i++){
        int offset = i * width;
        int color = ((inputMatrix[offset] >> mode) & 0xff);

        columnSum[0] += color;
        columnSumSqr[0] += color * color;

        outputMartix[offset] = columnSum[0];
        outputMartixSqr[offset] = columnSumSqr[0];
         // other columns
        for(int j = 1; j < width; j++){
        	int color = ((inputMatrix[offset+j] >> mode) & 0xff);

        	columnSum[j] += color;
        	columnSumSqr[j] += color * color;

        	outputMartix[offset+j] = outputMartix[offset+j-1] + columnSum[j];
        	outputMartixSqr[offset+j] = outputMartixSqr[offset+j-1] + columnSumSqr[j];
        }
    }
    delete[] columnSum;
    delete[] columnSumSqr;
    .....略
    LOGE("initIntegral end");
}
2.然後根據公式計算每個像素的RGB值即可
	for(int i = 0; i < height; i++){
		for(int j = 0; j < width; j++){
			// x(i,j) = (1 - k) * m(i,j) + k*x(x,j)
			ARGB RGB;
			BitmapOperation::convertIntToArgb(jniBitmap->_storedBitmapPixels[i*width+j],&RGB);
			if (RGB.red > 20 && RGB.green > 40 && RGB.blue > 50){
				color = ((jniBitmap->_storedBitmapPixels[i*width+j] >> mode) & 0xff);
				int iMax = i + radius >= height ? height - 1 : i + radius;
				int jMax = j + radius >= width ? width - 1 :j + radius;
				int iMin = i - radius <= 0 ? 0 : i - radius;
				int jMin = j - radius <= 0 ? 0 : j - radius;

				int square = (iMax - iMin + 1)*(jMax - jMin + 1);

				float m = (mMartix[iMax*width+jMax]
						+ (jMin>0 && iMin>0 ? mMartix[(iMin-1)*width+(jMin-1)]:0)
						- (jMin>0 ? mMartix[iMax*width+(jMin-1)]:0)
						- (iMin>0 ? mMartix[(iMin-1)*width+jMax]:0)) / square;

				float v = (mMartixSqr[iMax*width+jMax]
						+ (jMin>0 && iMin>0 ? mMartixSqr[(iMin-1)*width+(jMin-1)] :0)
						- (jMin>0 ? mMartixSqr[iMax*width+(jMin-1)]:0)
						- (iMin>0 ? mMartixSqr[(iMin-1)*width+jMax]:0)) / square - m*m;
				float k = v / (v + sigema);
				color = (uint8_t)((1.0f - k) * m + k * color);
				...將color賦值給需要的數據
			}
		}
	}
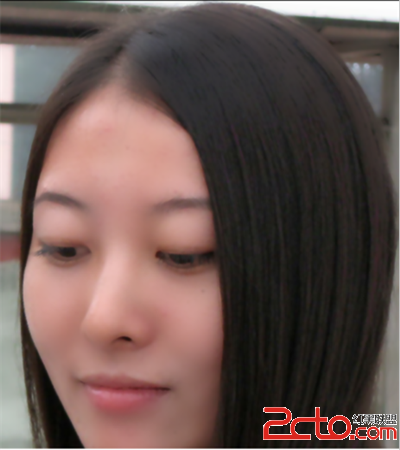

接下來可對圖片進行二次修改,修改對比度,對皮膚進行美白等操作。
 MaterialRefreshLayout,swiperefreshlayout
MaterialRefreshLayout,swiperefreshlayout 以上就介紹了比SwipeRefreshLayout更漂亮和強大的下拉刷新控
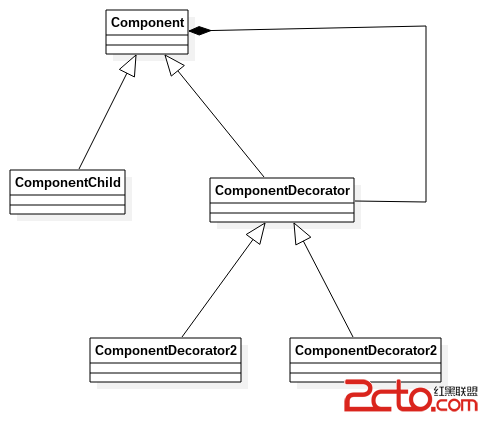 Android源碼裝飾模式---ContextWrapper
Android源碼裝飾模式---ContextWrapper 如果說Android源碼中哪個地方裝飾模式應用的最明顯的話,那肯定是非ContextWrapper莫屬了
 Android pull解析xml文件,androidpull解析xml
Android pull解析xml文件,androidpull解析xml本文介紹android中使用pull來解析xml文件 先自己寫一個xml文件,存一些天氣信息 &
 學習Android從0開始之開發工具篇-Android studio詳解
學習Android從0開始之開發工具篇-Android studio詳解 Android studio詳解 我們古人又雲:工欲善其事,必先利其器。 1、android s