編輯:高級開發
使用 SmsManager 發送短信
使用內置 Intent 發送短信
SmsManager管理,例如在給定的移動設備將數據發送到的SMS操作。可以創建此對象調用靜態方法SmsManager.getDefault() 如下:
SmsManager smsManager = SmsManager.getDefault();
創建 SmsManager 對象之後,可以使用 sendDataMessage() 方法指定的手機號碼發送短信,如下:
smsManager.sendTextMessage("phoneNo", null, "SMS text", null, null);
除了上述方法外,SmsManager類可供選擇的其他幾個重要的函數。下面列出了這些方法:
下面的示例演示如何在實際中使用 SmsManager 對象給定的手機號碼發送短信。
要嘗試這個例子中,需要實際配備了最新 Android OS 的移動設備,否則仿真器可能無法正常工作。
以下是修改的主活動文件 src/com.yiibai.sendsmsdemo/MainActivity.java 的內容
package com.example.sendsmsdemo; import android.os.Bundle; import android.app.Activity; import android.telephony.SmsManager; import android.util.Log; import android.view.Menu; import android.view.View; import android.widget.Button; import android.widget.EditText; import android.widget.Toast; public class MainActivity extends Activity { Button sendBtn; EditText txtphoneNo; EditText txtMessage; @Override protected void onCreate(Bundle savedInstanceState) { super.onCreate(savedInstanceState); setContentView(R.layout.activity_main); sendBtn = (Button) findViewById(R.id.btnSendSMS); txtphoneNo = (EditText) findViewById(R.id.editTextPhoneNo); txtMessage = (EditText) findViewById(R.id.editTextSMS); sendBtn.setOnClickListener(new View.OnClickListener() { public void onClick(View view) { sendSMSMessage(); } }); } protected void sendSMSMessage() { Log.i("Send SMS", ""); String phoneNo = txtphoneNo.getText().toString(); String message = txtMessage.getText().toString(); try { SmsManager smsManager = SmsManager.getDefault(); smsManager.sendTextMessage(phoneNo, null, message, null, null); Toast.makeText(getApplicationContext(), "SMS sent.", Toast.LENGTH_LONG).show(); } catch (Exception e) { Toast.makeText(getApplicationContext(), "SMS faild, please try again.", Toast.LENGTH_LONG).show(); e.printStackTrace(); } } @Override public boolean onCreateOptionsMenu(Menu menu) { // Inflate the menu; this adds items to the action bar if it is present. getMenuInflater().inflate(R.menu.main, menu); return true; } }
下面是 res/layout/activity_main.xml 文件的內容:
<LinearLayout xmlns:android="http://schemas.android.com/apk/res/android" android:layout_width="fill_parent" android:layout_height="fill_parent" android:orientation="vertical" > <TextView android:id="@+id/textViewPhoneNo" android:layout_width="wrap_content" android:layout_height="wrap_content" android:text="@string/phone_label" /> <EditText android:id="@+id/editTextPhoneNo" android:layout_width="fill_parent" android:layout_height="wrap_content" android:inputType="phone"/> <TextView android:id="@+id/textViewMessage" android:layout_width="wrap_content" android:layout_height="wrap_content" android:text="@string/sms_label" /> <EditText android:id="@+id/editTextSMS" android:layout_width="fill_parent" android:layout_height="wrap_content" android:inputType="textMultiLine"/> <Button android:id="@+id/btnSendSMS" android:layout_width="fill_parent" android:layout_height="wrap_content" android:text="@string/send_sms_label"/> </LinearLayout>
下面文件 res/values/strings.xml 的內容中定義兩個新的常量:
<?xml version="1.0" encoding="utf-8"?> <resources> <string name="app_name">SendSMSDemo</string> <string name="action_settings">Settings</string> <string name="hello_world">Hello world!</string> <string name="phone_label">Enter Phone Number:</string> <string name="sms_label">Enter SMS Message:</string> <string name="send_sms_label">Send SMS</string> </resources>
以下是AndroidManifest.xml 文件的默認內容:
<?xml version="1.0" encoding="utf-8"?> <manifest xmlns:android="http://schemas.android.com/apk/res/android" package="com.yiibai.sendsmsdemo" android:versionCode="1" android:versionName="1.0" > <uses-sdk android:minSdkVersion="8" android:targetSdkVersion="17" /> <uses-permission android:name="android.permission.SEND_SMS" /> <application android:allowBackup="true" android:icon="@drawable/ic_launcher" android:label="@string/app_name" android:theme="@style/AppTheme" > <activity android:name="com.yiibai.sendsmsdemo.MainActivity" android:label="@string/app_name" > <intent-filter> <action android:name="android.intent.action.MAIN" /> <category android:name="android.intent.category.LAUNCHER" /> </intent-filter> </activity> </application> </manifest>
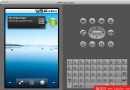
我們嘗試運行 SendSMSDemo 應用程序。Eclipse的AVD上安裝的應用程序,並啟動它,如果一切的設置和應用代碼都沒有問題,它會顯示以下模擬器窗口:
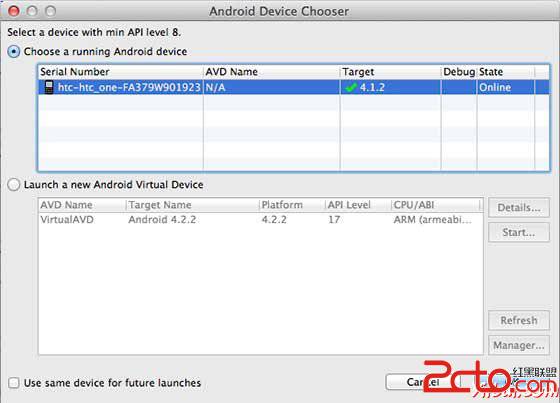
選擇移動設備作為一個選項,然後檢查移動設備,這將顯示以下畫面:
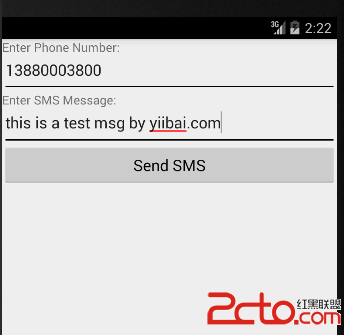
現在可以輸入手機號碼及文本消息並發送。最後點擊"Send SMS"按鈕發送短信。請確保GSM連接工作正常,以及提供正確的短信收件人。
可以把一些短信用逗號分隔,在程序中把它解析為一個數組的字符串,最後可以使用一個循環來發送消息給所有給定的手機號碼。下一節將學習如何使用現有的 SMS 客戶端發送短信。
發送短信通過調用Android內置短信功能,可以使用Android的Intent。以下部分說明使用 Intent 對象發送短信的功能。
使用ACTION_VIEW 動作啟動 Android 設備上安裝 SMS 客戶端。以下是簡單的語法來創建一個 Intent 來使用 ACTION_VIEW 動作
Intent smsIntent = new Intent(Intent.ACTION_VIEW);
要發送的短信需要使用SetData()方法指定 smsto: 作為URI和數據類型將使用 setType() 方法如下vnd.android-dir/mms-sms:
smsIntent.setData(Uri.parse("smsto:")); smsIntent.setType("vnd.android-dir/mms-sms");
Android已經內置支持添加電話號碼和短信發送短信如下:
smsIntent.putExtra("address" , new String("0123456789;3393993300")); smsIntent.putExtra("sms_body" , "Test SMS to Angilla");
這裡address 和sms_body是大小寫敏感的,應以小字符指定。可以指定一個以上的號碼在單串,但由分號(;) 隔開。
下面的示例演示如何在實際使用Intent對象啟動SMS客戶端發送短信給定的收件人。
要嘗試這個例子中,需要實際配備了最新的 Android OS的移動設備,否則仿真器可能無法正常工作。
以下是修改主活動文件 src/com.yiibai.sendsmsdemo/MainActivity.java 的內容
package com.example.sendsmsdemo; import android.net.Uri; import android.os.Bundle; import android.app.Activity; import android.content.Intent; import android.util.Log; import android.view.Menu; import android.view.View; import android.widget.Button; import android.widget.Toast; public class MainActivity extends Activity { @Override protected void onCreate(Bundle savedInstanceState) { super.onCreate(savedInstanceState); setContentView(R.layout.activity_main); Button startBtn = (Button) findViewById(R.id.sendSMS); startBtn.setOnClickListener(new View.OnClickListener() { public void onClick(View view) { sendSMS(); } }); } protected void sendSMS() { Log.i("Send SMS", ""); Intent smsIntent = new Intent(Intent.ACTION_VIEW); smsIntent.setData(Uri.parse("smsto:")); smsIntent.setType("vnd.android-dir/mms-sms"); smsIntent.putExtra("address" , new String ("0123456789")); smsIntent.putExtra("sms_body" , "Test SMS to Angilla"); try { startActivity(smsIntent); finish(); Log.i("Finished sending SMS...", ""); } catch (android.content.ActivityNotFoundException ex) { Toast.makeText(MainActivity.this, "SMS faild, please try again later.", Toast.LENGTH_SHORT).show(); } } @Override public boolean onCreateOptionsMenu(Menu menu) { // Inflate the menu; this adds items to the action bar if it is present. getMenuInflater().inflate(R.menu.main, menu); return true; } }
下面是 res/layout/activity_main.xml 文件的內容:
<LinearLayout xmlns:android="http://schemas.android.com/apk/res/android" android:layout_width="fill_parent" android:layout_height="fill_parent" android:orientation="vertical" > <Button android:id="@+id/sendSMS" android:layout_width="fill_parent" android:layout_height="wrap_content" android:text="@string/compose_sms"/> </LinearLayout>
下面文件 res/values/strings.xml 的內容中定義兩個新的常量:
<iframe frameborder="0" height="15" id="aswift_1" width="728"></iframe> <iframe frameborder="0" height="15" id="aswift_2" width="728"></iframe><?xml version="1.0" encoding="utf-8"?> <resources> <string name="app_name">SendSMSDemo</string> <string name="hello_world">Hello world!</string> <string name="action_settings">Settings</string> <string name="compose_sms">Compose SMS</string> </resources>
以下是AndroidManifest.xml 文件的默認內容:
<?xml version="1.0" encoding="utf-8"?> <manifest xmlns:android="http://schemas.android.com/apk/res/android" package="com.yiibai.sendsmsdemo" android:versionCode="1" android:versionName="1.0" > <uses-sdk android:minSdkVersion="8" android:targetSdkVersion="17" /> <application android:allowBackup="true" android:icon="@drawable/ic_launcher" android:label="@string/app_name" android:theme="@style/AppTheme" > <activity android:name="com.yiibai.sendsmsdemo.MainActivity" android:label="@string/app_name" > <intent-filter> <action android:name="android.intent.action.MAIN" /> <category android:name="android.intent.category.LAUNCHER" /> </intent-filter> </activity> </application> </manifest>
我們嘗試運行 SendSMSDemo 應用程序。 Eclipse AVD安裝的應用程序,並啟動它,如果一切設置和應用都沒有問題,它會顯示以下模擬器窗口:
選擇移動設備作為一個選項,然後檢查移動設備,這將顯示以下畫面:
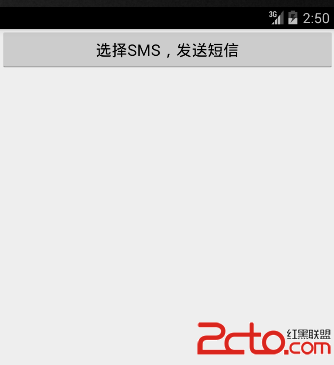
現在使用Compose SMS“按鈕推出Android內置的SMS客戶端,如下圖所示:
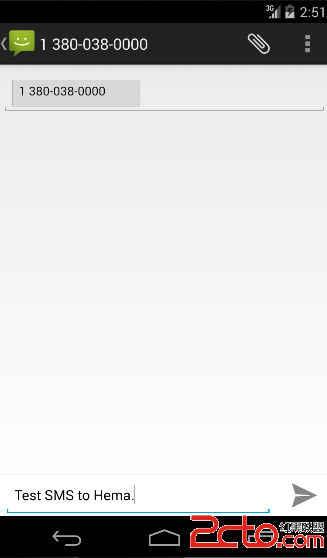
可以修改默認字段最後使用發送短信按鈕(標有紅色矩形)提到收件人發送短信。
 述說強大的Android手機平台發展史
android手機平台強大之處還有許多,在這裡我們先涉及一些android操作系統的基本特性,許多的功能在在咱們國內是不可能實現了,不過目前已經支持中文的語音搜索還是看
 Android用戶界面設計:框架布局
框架布局是將控件組織在android程序的用戶界面中最簡單的布局類型之一。理解布局對於良好的android程序設計來說是非常重要的。在這個教程裡,你將學到所有關於框架布
 探秘與眾不同的Android智能手機
android智能手機為開發者提供了新的API功能,其中包括同步功能,藍牙功能等,谷歌還發布了android2.0的更新全表,一位探險愛好者小丁對記者表示。對於開發人員
 Adobe AIR即將登陸Android平台
最近,關於Adobe在android平台上動作頻頻。昨天我們報道了Android版Flash 10.1發布 全面支持android 2.2的消息,今天又有消息稱,Ado