編輯:高級開發
本教程介紹了如何使用位置服務在應用程序來獲取當前的位置,得到周期性位置更新,查找地址等
Location對象代表一個地理位置可包括緯度,經度,時間戳和其它信息,如重力,高度和速度。有以下重要的方法在使用Location對象位置的具體信息:
要獲得目前的位置,需要創建一個位置的 LocationClient 對象,將它連接到位置服務使用connect()方法,然後調用其 getLastLocation() 方法。此方法返回最近的位置Location對象的形式:其中包含緯度和經度坐標和其他信息,如上面所述。要在活動中有基於位置的功能,將需要實現兩個接口:
GooglePlayServicesClient.ConnectionCallbacks
GooglePlayServicesClient.OnConnectionFailedListener
這些接口提供了以下重要的,需要在活動類實現回調方法:
應該創在建客戶活動類onCreate()方法中調用獵取位置,然後將其連接在onStart(),讓位置服務維持目前的位置,而活動是完全可見。斷開客戶端onStop()方法,這樣應用程序是不可見的,位置服務不是維持在目前的位置。這在很大程度上有助於節省電池電量。
如果願意的位置更新,那麼除了上面提到的接口,需要實現LocationListener 接口,該接口提供了以下回調方法,需要在活動類實現:
LocationRequest對象的位置從LocationClient更新服務質量(QoS),setter方法可以用它來處理QoS。
例如,如果應用需要較准確位置,它應該創建一個位置請求 setPriority(int) 設置 PRIORITY_HIGH_ACCURACY和setInterval(long) 為5秒。還可以使用更大的間隔和/或其他優先如PRIORITY_LOW_POWER 要求“城市” 的級別精度或PRIORITY_BALANCED_POWER_ACCURACY為“塊”級別的精度。
活動應該考慮刪除在所有位置請求進入後台時(例如 onPause()),或者至少交換請求到一個更大的間隔和降低質量以節省電力消耗。
Location對象可以使用 Geocoder.getFromLocation() 方法來獲得一個地址,對於一個給定的緯度和經度。這種方法是同步的,可能要花很長的時間來完成其工作,所以應該調用AsyncTask類的 doInBackground() 方法。
AsyncTask必須要使用的子類和子類會覆蓋 doInBackground(Params....)方法中執行任務UI線程上的後台計算完成後,當 onPostExecute(Result) 方法被調用顯示結果。還有一個更重要的方法在AyncTask execute(Params... params),此方法使用指定的參數執行任務。
檢查下面的例子中,我們如何使用 AynchTask 在任何 Android 應用程序完成工作的主要任務,而不會干擾後台。
下面的示例演示如何在實際使用位置服務在應用程序來獲取當前位置、等效地址等等。這個例子中,需要實際配備最新的 Android OS 移動設備,否則仿真器可能無法正常工作。
在繼續之前有位置在Android應用程序的支持,NEET設置谷歌播放服務SDK使用以下簡單的步驟:
在Eclipse(使用ADT),選擇 Window > Android SDK Manager
在Windows中,雙擊SDK Manager.exe 請通過在Android SDK目錄的根目錄
在Mac或Linux打開一個終端並導航到工具/目錄下在Android SDK目錄下,然後執行Android SDK
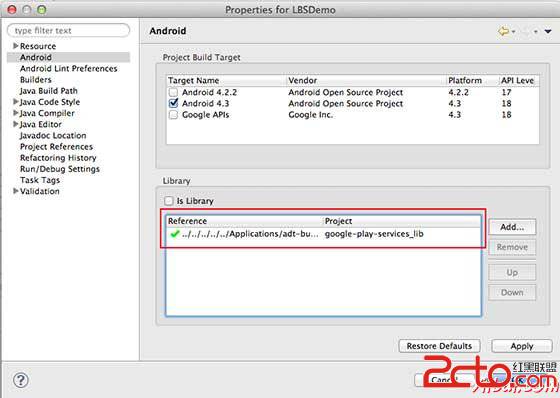
讓我們在項目中添加引用谷歌Play服務。右鍵單擊該項目,並選擇Build Path > Configure Build Path > Android >,然後單擊“Add ”按鈕,將顯示要添加的谷歌Play service_liboption,只要雙擊就可以了,這將增加所需的庫的引用,將有窗口如下所示:
以下是內容的修改主活動文件 src/com.yiibai.lbsdemo/MainActivity.java
package com.example.lbsdemo; import java.io.IOException; import java.util.List; import java.util.Locale; import com.google.android.gms.common.ConnectionResult; import com.google.android.gms.common.GooglePlayServicesClient; import com.google.android.gms.location.LocationClient; import android.content.Context; import android.location.Address; import android.location.Geocoder; import android.location.Location; import android.os.AsyncTask; import android.os.Bundle; import android.support.v4.app.FragmentActivity; import android.util.Log; import android.view.View; import android.widget.Button; import android.widget.TextView; import android.widget.Toast; public class MainActivity extends FragmentActivity implements GooglePlayServicesClient.ConnectionCallbacks, GooglePlayServicesClient.OnConnectionFailedListener { LocationClient mLocationClient; private TextView addressLabel; private TextView locationLabel; private Button getLocationBtn; private Button disconnectBtn; private Button connectBtn; @Override protected void onCreate(Bundle savedInstanceState) { super.onCreate(savedInstanceState); setContentView(R.layout.activity_main); locationLabel = (TextView) findViewById(R.id.locationLabel); addressLabel = (TextView) findViewById(R.id.addressLabel); getLocationBtn = (Button) findViewById(R.id.getLocation); getLocationBtn.setOnClickListener(new View.OnClickListener() { public void onClick(View view) { displayCurrentLocation(); } }); disconnectBtn = (Button) findViewById(R.id.disconnect); disconnectBtn.setOnClickListener(new View.OnClickListener() { public void onClick(View view) { mLocationClient.disconnect(); locationLabel.setText("Got disconnected...."); } }); connectBtn = (Button) findViewById(R.id.connect); connectBtn.setOnClickListener(new View.OnClickListener() { public void onClick(View view) { mLocationClient.connect(); locationLabel.setText("Got connected...."); } }); // Create the LocationRequest object mLocationClient = new LocationClient(this, this, this); } @Override protected void onStart() { super.onStart(); // Connect the client. mLocationClient.connect(); locationLabel.setText("Got connected...."); } @Override protected void onStop() { // Disconnect the client. mLocationClient.disconnect(); super.onStop(); locationLabel.setText("Got disconnected...."); } @Override public void onConnected(Bundle dataBundle) { // Display the connection status Toast.makeText(this, "Connected", Toast.LENGTH_SHORT).show(); } @Override public void onDisconnected() { // Display the connection status Toast.makeText(this, "Disconnected. Please re-connect.", Toast.LENGTH_SHORT).show(); } @Override public void onConnectionFailed(ConnectionResult connectionResult) { // Display the error code on failure Toast.makeText(this, "Connection Failure : " + connectionResult.getErrorCode(), Toast.LENGTH_SHORT).show(); } public void displayCurrentLocation() { // Get the current location's latitude & longitude Location currentLocation = mLocationClient.getLastLocation(); String msg = "Current Location: " + Double.toString(currentLocation.getLatitude()) + "," + Double.toString(currentLocation.getLongitude()); // Display the current location in the UI locationLabel.setText(msg); // To display the current address in the UI (new GetAddressTask(this)).execute(currentLocation); } /*
    * Following is a subclass of AsyncTask which has been used to get
    * address corresponding to the given latitude & longitude.
    */ private class GetAddressTask extends AsyncTask<Location, Void, String>{ Context mContext; public GetAddressTask(Context context) { super(); mContext = context; } /*
       * When the task finishes, onPostExecute() displays the address.
       */ @Override protected void onPostExecute(String address) { // Display the current address in the UI addressLabel.setText(address); } @Override protected String doInBackground(Location... params) { Geocoder geocoder = new Geocoder(mContext, Locale.getDefault()); // Get the current location from the input parameter list Location loc = params[0]; // Create a list to contain the result address List<Address> addresses = null; try { addresses = geocoder.getFromLocation(loc.getLatitude(), loc.getLongitude(), 1); } catch (IOException e1) { Log.e("LocationSampleActivity", "IO Exception in getFromLocation()"); e1.printStackTrace(); return ("IO Exception trying to get address"); } catch (IllegalArgumentException e2) { // Error message to post in the log String errorString = "Illegal arguments " + Double.toString(loc.getLatitude()) + " , " + Double.toString(loc.getLongitude()) + " passed to address service"; Log.e("LocationSampleActivity", errorString); e2.printStackTrace(); return errorString; } // If the reverse geocode returned an address if (addresses != null && addresses.size() > 0) { // Get the first address Address address = addresses.get(0); /*
            * Format the first line of address (if available),
            * city, and country name.
            */ String addressText = String.format( "%s, %s, %s", // If there's a street address, add it address.getMaxAddressLineIndex() > 0 ? address.getAddressLine(0) : "", // Locality is usually a city address.getLocality(), // The country of the address address.getCountryName()); // Return the text return addressText; } else { return "No address found"; } } }// AsyncTask class }
Following will be the content of res/layout/activity_main.xml file:
<LinearLayout xmlns:android="http://schemas.android.com/apk/res/android" android:layout_width="fill_parent" android:layout_height="fill_parent" android:orientation="vertical" > <Button android:id="@+id/getLocation" android:layout_width="fill_parent" android:layout_height="wrap_content" android:text="@string/get_location"/> <Button android:id="@+id/disconnect" android:layout_width="fill_parent" android:layout_height="wrap_content" android:text="@string/disconnect"/> <Button android:id="@+id/connect" android:layout_width="fill_parent" android:layout_height="wrap_content" android:text="@string/connect"/> <TextView android:id="@+id/locationLabel" android:layout_width="wrap_content" android:layout_height="wrap_content"/> <TextView android:id="@+id/addressLabel" android:layout_width="wrap_content" android:layout_height="wrap_content"/> </LinearLayout>
 谷歌中國推出基於Android平台拼音輸入法
支持軟/硬鍵盤輸入基於android平台拼音輸入法支持軟/硬鍵盤輸入,更能夠充分發揮 QWERTY 全鍵盤的打字優勢。同時,基於android平台拼音輸入法桌面產品中的
 Android手機系統市場份額所在?
但是當用戶選購android手機系統時也難免會注意到手機的操作系統,就不知“安致”這個名字能否被廣大手機用戶認可了,業界猜測該商標為android的中文商標。盡管and
 跨平台開發:初探PhoneGap移動開發框架(1)
隨著Google的android手機和蘋果的iPhone手機的逐漸普及,越來越多開發者加入到移動應用開發的大軍當中。目前移動終端中的冠亞軍android,應用是基於Ja
 圖解 Android 廣播機制(2)
做出相應的處理,比如掛掉電話、比如靜音等等。 Demo 分析: 下面通過一個小DEMO 來講解一下廣播在android 中如何編寫,在Demo中我們設置了一個按鈕為