編輯:高級開發
Windows版本的android NDK下載鏈接 http://dl.google.com/android/ndk/android-ndk-1.5_r1-Windows.zip 文件大小為21.46MB
The Android NDK provides tools that allow Android application developers to embed components that make use of native code in their Android applications. (提供了一個工具允許android程序開發人員嵌入組件利用本地代碼在一個android應用程序中)
Android applications run in the Dalvik virtual Machine. The NDK allows developers to implement parts of their applications using native-code languages such as C and C++. This can provide benefits to certain classes of applications, in the form of reuse of existing code and in some cases increased speed. (android應用程序運行在Dalvik虛擬機上面,NDK允許開發人員實現部分的代碼使用本地語言比如C和C++)
The NDK provides:
This release of the NDK supports the ARMv5TE Machine instruction set and provides stable headers for libc (the C library), libm (the Math library), the JNI interface, and other librarIEs.
The NDK will not benefit most applications. As a developer, you will need to balance its benefits against its drawbacks; notably, using native code does not result in an automatic performance increase, but does always increase application complexity. Typical good candidates for the NDK are self-contained, CPU-intensive Operations that don't allocate much memory, such as signal processing, physics simulation, and so on. Simply re-coding a method to run in C usually does not result in a large performance increase. The NDK can, however, can be an effective way to reuse a large corpus of existing C/C++ code. (NDK不適合大多數程序,作為卡開發人員你將需要權衡使用本地代碼的性能提高,但是可能會使其增加程序的復雜性,典型的是針對CPU敏感操作可以不需要分配太多的內存,例如信號處理,屋裡模擬以及簡單的算法描述等等使用C,主要是幫助移植一些現成的C/C++代碼庫)
Please note that the NDK does not enable you to develop native-only applications. android's primary runtime remains the Dalvik virtual Machine.(NDK不能緊緊開發使用本地代碼的程序,最終主要運行在Dalvik這個Java虛擬機上,同時android123表示它將不會支持完整的框架,也就是說無法描述UI,我們可以通過本地代碼生成一個so文件類似Windows下的Dll文件進行執行,比如在處理PDF和Office文件上將會有質的改變從性能角度上講)
The NDK includes a set of cross-toolchains (compilers, linkers, etc..) that can generate native ARM binarIEs on Linux, OS X, and Windows (with Cygwin) platforms.
It provides a set of system headers for stable native APIs that are guaranteed to be supported in all later releases of the platform:
The NDK also provides a build system that lets you work efficIEntly with your sources, without having to handle the toolchain/platform/CPU/ABI details. You create very short build files to describe which sources to compile and which android application will use them — the build system compiles the sources and places the shared librarIEs directly in your application project.
Important: With the exception of the libraries listed above, native system librarIEs in the android 1.5 platform are not stable and may change in future platform versions. Your applications should only make use of the stable native system librarIEs provided in this NDK.
The NDK package includes a set of documentation that describes the capabilities of the NDK and how to use it to create shared librarIEs for your android applications. In this release, the documentation is provided only in the downloadable NDK package. You can find the documentation in the <ndk>/docs/ directory. Included are these files:
Additionally, the package includes detailed information about the "bionic" C library provided with the android platform that you should be aware of, if you are developing using the NDK. You can find the documentation in the <ndk>/docs/system/libc/ directory:
The NDK includes two sample Android applications that illustrate how to use native code in your android applications:
hello-jni — A simple application that loads a string from a native method implemented in a shared library and then displays it in the application UI. two-libs — A simple application that loads a shared library dynamically and calls a native method provided by the library. In this case, the method is implemented in a static library that is imported by the shared library. For more information, see Using the Sample Applications.
The sections below describe the system and software requirements for using the android NDK, as well as platform compatibility considerations that affect appplications using librarIEs produced with the NDK.
<uses-library> element in its manifest file, with the attribute android:minSdkVersion="3". Installing the NDK on your development computer is straightforward and involves extracting the NDK from its download package and running a host-setup script.
Before you get started make sure that you have downloaded the latest Android SDK and upgraded your applications and environment as needed. The NDK will not work with older versions of the android SDK. Also, take a moment to revIEw the System and Software Requirements for the NDK, if you haven't already.
To install the NDK, follow these steps:
android-ndk-<version>. You can rename the NDK directory if necessary and you can move it to any location on your computer. This documentation refers to the NDK directory as <ndk>. <ndk>/build/host-setup.sh
If the script completes successfully, it prints a "Host setup complete." message. If it fails, it prints instructions that you can follow to correct any problems.
Once you have run the host-setup script, you are ready start working with the NDK.
Once you've installed the NDK successfully, take a few minutes to read the documentation included in the NDK. You can find the documentation in the <ndk>/docs/ directory. In particular, please read the OVERVIEW.TXT document completely, so that you understand the intent of the NDK and how to use it.
Here's the general outline of how you work with the NDK tools:
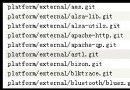
<ndk>/sources/<my_src>/.... If you want, you can place a symlink to your sources, rather than the sources themselves. The sources you reference here are not strictly associated with a specific shared library or android application. Instead, they are Accessible to any build configuration and can be used to produce any number of shared librarIEs that can be used by any android application. <ndk>/sources/<my_src>/android.mk to describe your native sources to the NDK build system <ndk>/aPPS/<my_app>/Application.mk to describe your Android application and native sources it needs to the NDK build system. This file sets up the link between an android SDK application project and any number of shared librarIEs defined in the <ndk>/sources/ folder and it specifIEs the path to the application project that will receive the shared library built from the sources. $ make APP=<my_app>
The build tools copy the stripped, shared librarIEs needed by your application to the proper location in the application's project directory.
For complete information on all of the steps listed above, please see the documentation included with the NDK package.
The NDK includes two sample applications that illustrate how to use native code in your android applications:
hello-jni — A simple application that loads a string from a native method implemented in a shared library and then displays it in the application UI. two-libs — A simple application that loads a shared library dynamically and calls a native method provided by the library. In this case, the method is implemented in a static library imported by the shared library. For each sample, the NDK includes an Android application project, as well as the corresponding C source code and the necessary android.mk and Application.mk files. The application projects are provided in <ndk>/aPPS/<app_name>/project/ and the C source for each application is provided in <ndk>/sources/samples/<library>/.
Once you have installed the NDK, you can build the shared librarIEs from the NDK by using these commands from the root of the NDK directory:
$ make APP=hello-jni — compiles <ndk>/sources/samples/hello-jni/hello-jni.c and outputs a shared library to <ndk>/aPPS/hello-jni/project/libs/armeabi/libhello-jni.so. $ make APP=two-libs — compiles <ndk>/sources/samples/two-libs/second.c and first.c and outputs a shared library to <ndk>/aPPS/two-libs/project/libs/armeabi/libtwolib-second.so. Next, build the sample android applications that use the shared librarIEs:
<ndk>/aPPS/<app_name>/project/. Then, set up an AVD, if necessary, and build/run the application in the emulator. For more information about creating a new android project in Eclipse, see Developing in Eclipse. android tool to create the build file for each of the sample projects at <ndk>/aPPS/<app_name>/project/. Then set up an AVD, if necessary, build your project in the usual way, and run it in the emulator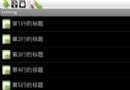 Android開發:實現帶圖片和checkbox的listview
項目要用到一個listvIEw,要求是可以顯示圖片,後面還有有復選框。先新建一個MyAdapter類,繼承自BaseAdapter。在MyAdapter中實現對數據的綁
 Android事件處理
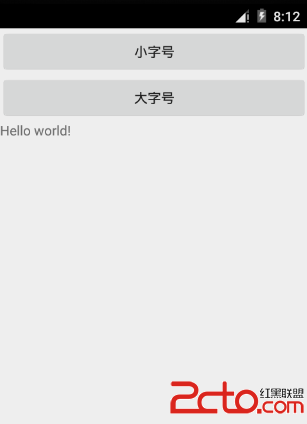
事件是一種有用來收集用戶與應用程序互動數據的互動組件,如按鍵或觸摸屏等放置事件,因為每個事件從Android框架維護事件隊列先入先出(FIFO)基礎上的隊列。可以在程序中
 深度剖析Android 手機性能
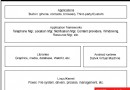
Google於2007年11月5日宣布發布android 手機,這款手機是基於Linux內核的一款操作系統,谷歌將繼續努力,讓這些服務變得更好,同時也將添加更有吸引力的
 Android 3.0 正遭遇無程序可用的尴尬
android 3.0是谷歌用來進軍平板市場的利器,但在iPad發布會上,由於應用稀少發展後勁不足而被史蒂夫·喬布斯(Steve Paul Jobs)特地提出來嘲笑。i