編輯:初級開發
37.LinearLayout8
在菜單裡可以動態改變LinearLayout的布局

原布局:
1: <?xml version="1.0" encoding="utf-8"?> 2: 3: <!-- 4: Demonstrates a simple linear layout. The layout fills the screen, with the 5: children stacked from the top. 6: --> 7: <FrameLayout XMLns:android="http://schemas.android.com/apk/res/android" 8: android:layout_width="fill_parent" 9: android:layout_height="fill_parent"10: android:padding="30dip">11: <LinearLayout12: android:id="@+id/layout"13: android:orientation="vertical"14: android:background="@drawable/blue"15: android:layout_width="fill_parent"16: android:layout_height="fill_parent"17: android:padding="30dip">18: 19: <TextView20: android:background="@drawable/box"21: android:layout_width="wrap_content"22: android:layout_height="wrap_content"23: android:text="@string/linear_layout_8_c"/>24: 25: <TextView26: android:background="@drawable/box"27: android:layout_width="wrap_content"28: android:layout_height="wrap_content"29: android:text="@string/linear_layout_8_b"/>30: 31: <TextVIEw32: android:background="@drawable/box"33: android:layout_width="wrap_content"34: android:layout_height="wrap_content"35: android:text="@string/linear_layout_8_c"/>36: 37: </LinearLayout>38: 39: </FrameLayout>40: 菜單的onOptionsItemSelected方法:
1: @Override 2: public boolean onOptionsItemSelected(MenuItem item) { 3: switch (item.getItemId()) { 4: 5: case VERTICAL_ID: 6: mLinearLayout.setOrientation(LinearLayout.VERTICAL); 7: return true; 8: case HORIZONTAL_ID: 9: mLinearLayout.setOrIEntation(LinearLayout.HORIZONTAL);10: return true;11: 12: case TOP_ID:13: mLinearLayout.setVerticalGravity(Gravity.TOP);14: return true;15: case MIDDLE_ID:16: mLinearLayout.setVerticalGravity(Gravity.CENTER_VERTICAL);17: return true;18: case BOTTOM_ID:19: mLinearLayout.setVerticalGravity(Gravity.BOTTOM);20: return true;21: 22: case LEFT_ID:23: mLinearLayout.setHorizontalGravity(Gravity.LEFT);24: return true;25: case CENTER_ID:26: mLinearLayout.setHorizontalGravity(Gravity.CENTER_HORIZONTAL);27: return true;28: case RIGHT_ID:29: mLinearLayout.setHorizontalGravity(Gravity.RIGHT);30: return true;31: 32: }33: return super.onOptionsItemSelected(item);34: }
38.LinearLayout9 下面的Button一直在屏幕的底部

布局:
Button一直在屏幕的底部主要是因為第16行的android:layout_weight="1.0"
1: <?xml version="1.0" encoding="utf-8"?> 2: 3: <!-- 4: Demonstrates a simple linear layout. The layout fills the screen, with the 5: children stacked from the top. 6: --> 7: 8: <LinearLayout XMLns:android="http://schemas.android.com/apk/res/android" 9: android:orientation="vertical"10: android:layout_width="fill_parent"11: android:layout_height="fill_parent">12: 13: <ListVIEw android:id="@+id/list"14: android:layout_width="fill_parent"15: android:layout_height="wrap_content"16: android:layout_weight="1.0" />17: 18: <Button19: android:layout_width="fill_parent"20: android:layout_height="wrap_content"21: android:text="@string/linear_layout_9_button" />22: 23: </LinearLayout>
39.LinearLayout10

第一個條的布局:
1: <LinearLayout 2: android:layout_width="fill_parent" 3: android:layout_height="wrap_content" 4: android:addStatesFromChildren="true" 5: android:gravity="center_vertical" 6: android:paddingRight="0dip" 7: android:background="@android:drawable/edit_text"> 8: 9: <!--10: TextView label goes at the left.11: -->12: <TextVIEw13: android:layout_width="wrap_content"14: android:layout_height="wrap_content"15: android:text="@string/linear_layout_10_from"16: android:textColor="?android:attr/textColorSecondary"17: android:textAppearance="?android:attr/textAppearanceLargeInverse"18: />19: 20: <!--21: EditText goes in between.22: -->23: <EditText24: android:layout_width="wrap_content"25: android:layout_height="wrap_content"26: android:layout_weight="1"27: android:singleLine="true"28: android:background="@null"29: />30: 31: <!--32: The button goes at the right.33: -->34: <ImageButton35: style="@android:style/Widget.Button.Inset"36: android:src="@android:drawable/star_big_on"37: android:layout_width="wrap_content"38: android:layout_height="wrap_content"39: android:layout_marginTop="2dip"40: android:layout_marginRight="2dip"41: android:layout_marginBottom="2dip"42: android:padding="10dip"43: />44: 45: </LinearLayout>
40.RelativeLayout1 相對布局

布局:
注意:第18行android:layout_alignParentTop="true"
第27行android:layout_alignParentBottom="true"
第36,37行android:layout_above="@id/vIEw2" android:layout_below="@id/vIEw1"
1: <?xml version="1.0" encoding="utf-8"?> 2: 3: 4: <!-- 5: Demonstrates stretching a view to fill the space between two other vIEws 6: --> 7: 8: <RelativeLayout XMLns:android="http://schemas.android.com/apk/res/android" 9: android:layout_width="fill_parent"10: android:layout_height="fill_parent">11: 12: <!-- view1 goes on top -->13: <TextView14: android:id="@+id/view1"15: android:background="@drawable/red"16: android:layout_width="fill_parent"17: android:layout_height="wrap_content"18: android:layout_alignParentTop="true"19: android:text="@string/relative_layout_1_top"/>20: 21: <!-- view2 goes on the bottom -->22: <TextView23: android:id="@+id/view2"24: android:background="@drawable/green"25: android:layout_width="fill_parent"26: android:layout_height="wrap_content"27: android:layout_alignParentBottom="true"28: android:text="@string/relative_layout_1_bottom"/>29: 30: <!-- view3 stretches betweeen view1 and view2 -->31: <TextView32: android:id="@+id/view3"33: android:background="@drawable/yellow"34: android:layout_width="fill_parent"35: android:layout_height="0dip"36: android:layout_above="@id/view2"37: android:layout_below="@id/vIEw1"38: android:text="@string/relative_layout_1_center"/>39: 40: </RelativeLayout>
41.ScrollView2 一共64個TextVIEw和button

布局:
1: <?xml version="1.0" encoding="utf-8"?> 2: 3: 4: <!-- Demonstrates scrolling with a ScrollView. --> 5: 6: <ScrollVIEw XMLns:android="http://schemas.android.com/apk/res/android" 7: android:layout_width="fill_parent" 8: android:layout_height="wrap_content" 9: android:scrollbars="none">10: 11: <LinearLayout12: android:id="@+id/layout"13: android:orientation="vertical"14: android:layout_width="fill_parent"15: android:layout_height="wrap_content">16: 17: <TextView18: android:layout_width="fill_parent"19: android:layout_height="wrap_content"20: android:text="@string/scroll_vIEw_2_text_1"/>21: 22: <Button23: android:layout_width="fill_parent"24: android:layout_height="wrap_content"25: android:text="@string/scroll_view_2_button_1"/>26: 27: </LinearLayout>28: </ScrollView>在OnCreat()裡動態填加 VIEw
1: protected void onCreate(Bundle savedInstanceState) { 2: super.onCreate(savedInstanceState); 3: setContentView(R.layout.scroll_view_2); 4: 5: LinearLayout layout = (LinearLayout) findViewById(R.id.layout); 6: for (int i = 2; i < 64; i++) { 7: TextView textView = new TextView(this); 8: textView.setText("Text View " + i); 9: LinearLayout.LayoutParams p = new LinearLayout.LayoutParams(10: LinearLayout.LayoutParams.FILL_PARENT,11: LinearLayout.LayoutParams.WRAP_CONTENT12: );13: layout.addView(textView, p);14: 15: Button buttonView = new Button(this);16: buttonView.setText("Button " + i);17: layout.addView(buttonVIEw, p);18: }19: }
42.TableLayout1
TableLayout裡由<TableRow><TableRow/>組成

布局:
1: <?xml version="1.0" encoding="utf-8"?> 2: 3: <TableLayout XMLns:android="http://schemas.android.com/apk/res/android" 4: android:layout_width="fill_parent" 5: android:layout_height="fill_parent"> 6: 7: <TableRow> 8: <TextView 9: android:text="@string/table_layout_1_star"10: android:padding="3dip" />11: <TextView12: android:text="@string/table_layout_1_open"13: android:padding="3dip" />14: <TextView15: android:text="@string/table_layout_1_open_shortcut"16: android:padding="3dip" />17: </TableRow>18: 19: <TableRow>20: <TextView21: android:text="@string/table_layout_1_triple_star"22: android:padding="3dip" />23: <TextView24: android:text="@string/table_layout_1_save"25: android:padding="3dip" />26: <TextView27: android:text="@string/table_layout_1_save_shortcut"28: android:padding="3dip" />29: </TableRow>30: 31: <TableRow>32: <TextView33: android:text="@string/table_layout_1_star"34: android:padding="3dip" />35: <TextView36: android:text="@string/table_layout_1_quit"37: android:padding="3dip" />38: <TextVIEw39: android:text="@string/table_layout_1_quit_shortcut"40: android:padding="3dip" />41: </TableRow>42: </TableLayout>43:
43.TableLayout2

布局:在空的地方不加控件
1: <?xml version="1.0" encoding="utf-8"?> 2: 3: <TableLayout XMLns:android="http://schemas.android.com/apk/res/android" 4: android:layout_width="fill_parent" 5: android:layout_height="fill_parent"> 6: 7: <TableRow> 8: <Button 9: android:text="@string/table_layout_2_open" />10: <TextView11: android:text="@string/table_layout_2_path_1"12: android:padding="3dip" />13: </TableRow>14: <TableRow>15: <Button16: android:text="@string/table_layout_2_save_all"/>17: </TableRow>18: <TableRow>19: <Button20: android:text="@string/table_layout_2_save"21: android:visibility="invisible" />22: <TextVIEw23: android:text="@string/table_layout_2_path_2"24: android:padding="3dip" />25: </TableRow>26: </TableLayout>27:
44.TableLayout4此表格布局一行中的兩個TextVIEw分布在左右兩端

布局:
注意:關鍵在第7行和第15行,android:stretchColumns="1" android:gravity="right"
1: <?xml version="1.0" encoding="utf-8"?> 2: 3: <!-- Stretch some columns --> 4: <TableLayout XMLns:android="http://schemas.android.com/apk/res/android" 5: android:layout_width="fill_parent" 6: android:layout_height="fill_parent" 7: android:stretchColumns="1"> 8: 9: <TableRow>10: <TextView11: android:text="@string/table_layout_4_open"12: android:padding="3dip" />13: <TextView14: android:text="@string/table_layout_4_open_shortcut"15: android:gravity="right"16: android:padding="3dip" />17: </TableRow>18: 19: <TableRow>20: <TextView21: android:text="@string/table_layout_4_save"22: android:padding="3dip" />23: <TextVIEw24: android:text="@string/table_layout_4_save_shortcut"25: android:gravity="right"26: android:padding="3dip" />27: </TableRow>28: </TableLayout>29:
45.TableLayout5

布局:
注意:第7行和第15行
還有橫線的畫法:
39: <VIEw40: android:layout_height="2dip"41: android:background="#FF909090" /> 1: <?xml version="1.0" encoding="utf-8"?> 2: 3: <!-- Stretch some columns --> 4: <TableLayout XMLns:android="http://schemas.android.com/apk/res/android" 5: android:layout_width="fill_parent" 6: android:layout_height="fill_parent" 7: android:stretchColumns="1"> 8: 9: <TableRow>10: <TextView11: android:text="@string/table_layout_5_open"12: android:padding="3dip" />13: <TextView14: android:text="@string/table_layout_5_open_shortcut"15: android:gravity="right"16: android:padding="3dip" />17: </TableRow>18: 19: <TableRow>20: <TextView21: android:text="@string/table_layout_5_save"22: android:padding="3dip" />23: <TextView24: android:text="@string/table_layout_5_save_shortcut"25: android:gravity="right"26: android:padding="3dip" />27: </TableRow>28: 29: <TableRow>30: <TextView31: android:text="@string/table_layout_5_save_as"32: android:padding="3dip" />33: <TextView34: android:text="@string/table_layout_5_save_as_shortcut"35: android:gravity="right"36: android:padding="3dip" />37: </TableRow>38: 39: <View40: android:layout_height="2dip"41: android:background="#FF909090" />42: 43: <TableRow>44: <TextView45: android:text="@string/table_layout_5_import"46: android:padding="3dip" />47: </TableRow>48: 49: <TableRow>50: <TextView51: android:text="@string/table_layout_5_export"52: android:padding="3dip" />53: <TextView54: android:text="@string/table_layout_5_export_shortcut"55: android:gravity="right"56: android:padding="3dip" />57: </TableRow>58: 59: <View60: android:layout_height="2dip"61: android:background="#FF909090" />62: 63: <TableRow>64: <TextVIEw65: android:text="@string/table_layout_5_quit"66: android:padding="3dip" />67: </TableRow>68: </TableLayout>69:
46.TableLayout6

布局:
注意:第12行的12: android:layout_column="1" 聲明它在表格的第1列
1: <?xml version="1.0" encoding="utf-8"?> 2: 3: 4: <!-- Stretch some columns --> 5: <TableLayout XMLns:android="http://schemas.android.com/apk/res/android" 6: android:layout_width="fill_parent" 7: android:layout_height="fill_parent" 8: android:stretchColumns="1"> 9: 10: <TableRow>11: <TextView12: android:layout_column="1"13: android:text="@string/table_layout_6_open"14: android:padding="3dip" />15: <TextView16: android:text="@string/table_layout_6_open_shortcut"17: android:gravity="right"18: android:padding="3dip" />19: </TableRow>20: 21: <TableRow>22: <TextView23: android:layout_column="1"24: android:text="@string/table_layout_6_save"25: android:padding="3dip" />26: <TextView27: android:text="@string/table_layout_6_save_shortcut"28: android:gravity="right"29: android:padding="3dip" />30: </TableRow>31: 32: <TableRow>33: <TextView34: android:layout_column="1"35: android:text="@string/table_layout_6_save_as"36: android:padding="3dip" />37: <TextView38: android:text="@string/table_layout_6_save_as_shortcut"39: android:gravity="right"40: android:padding="3dip" />41: </TableRow>42: 43: <View44: android:layout_height="2dip"45: android:background="#FF909090" />46: 47: <TableRow>48: <TextView49: android:text="@string/table_layout_6_x"50: android:padding="3dip" />51: <TextView52: android:text="@string/table_layout_6_import"53: android:padding="3dip" />54: </TableRow>55: 56: <TableRow>57: <TextView58: android:text="@string/table_layout_6_x"59: android:padding="3dip" />60: <TextView61: android:text="@string/table_layout_6_export"62: android:padding="3dip" />63: <TextView64: android:text="@string/table_layout_6_export_shortcut"65: android:gravity="right"66: android:padding="3dip" />67: </TableRow>68: 69: <View70: android:layout_height="2dip"71: android:background="#FF909090" />72: 73: <TableRow>74: <TextVIEw75: android:layout_column="1"76: android:text="@string/table_layout_6_quit"77: android:padding="3dip" />78: </TableRow>79: </TableLayout>80:
47.TableLayout7 下面的按鈕可以隱藏表格的某行
布局:
注意:第12行android:collapseColumns="2" 表明隱藏第2列
1: <?xml version="1.0" encoding="utf-8"?> 2: 3: <LinearLayout XMLns:android="http://schemas.android.com/apk/res/android" 4: android:orientation="vertical" 5: android:layout_width="fill_parent" 6: android:layout_height="fill_parent"> 7: <TableLayout 8: android:id="@+id/menu" 9: android:layout_width="fill_parent"10: android:layout_height="wrap_content"11: android:stretchColumns="1"12: android:collapseColumns="2">13: 14: <TableRow>15: <TextView16: android:layout_column="1"17: android:text="@string/table_layout_7_open"18: android:padding="3dip" />19: <TextView20: android:text="@string/table_layout_7_open_shortcut"21: android:gravity="right"22: android:padding="3dip" />23: </TableRow>24: 25: <TableRow>26: <TextView27: android:layout_column="1"28: android:text="@string/table_layout_7_save"29: android:padding="3dip" />30: <TextView31: android:text="@string/table_layout_7_save_shortcut"32: android:gravity="right"33: android:padding="3dip" />34: </TableRow>35: 36: <TableRow>37: <TextView38: android:layout_column="1"39: android:text="@string/table_layout_7_save_as"40: android:padding="3dip" />41: <TextView42: android:text="@string/table_layout_7_save_as_shortcut"43: android:gravity="right"44: android:padding="3dip" />45: </TableRow>46: 47: <View48: android:layout_height="2dip"49: android:background="#FF909090" />50: 51: <TableRow>52: <TextView53: android:text="@string/table_layout_7_x"54: android:padding="3dip" />55: <TextView56: android:text="@string/table_layout_7_import"57: android:padding="3dip" />58: </TableRow>59: 60: <TableRow>61: <TextView62: android:text="@string/table_layout_7_x"63: android:padding="3dip" />64: <TextView65: android:text="@string/table_layout_7_export"66: android:padding="3dip" />67: <TextView68: android:text="@string/table_layout_7_export_shortcut"69: android:gravity="right"70: android:padding="3dip" />71: </TableRow>72: 73: <VIEw74: android:layout_height="2dip"75: android:background="#FF909090" />76: </TableLayout>77: 78: <LinearLayout79: android:layout_width="wrap_content"80: android:layout_height="wrap_content">81: <Button82: android:id="@+id/toggle2"83: android:layout_width="wrap_content"84: android:layout_height="wrap_content"85: android:text="@string/table_layout_7_toggle_checkmarks" />86: <Button87: android:id="@+id/toggle1"88: android:layout_width="wrap_content"89: android:layout_height="wrap_content"90: android:text="@string/table_layout_7_toggle_shortcuts" />91: </LinearLayout>92: </LinearLayout>93: 兩個按鈕事件:
1: final TableLayout table = (TableLayout) findViewById(R.id.menu); 2: Button button = (Button) findViewById(R.id.toggle1); 3: button.setOnClickListener(new Button.OnClickListener() { 4: public void onClick(View v) { 5: mShortcutsCollapsed = !mShortcutsCollapsed; 6: table.setColumnCollapsed(2, mShortcutsCollapsed); 7: } 8: }); 9: button = (Button) findViewById(R.id.toggle2);10: button.setOnClickListener(new Button.OnClickListener() {11: public void onClick(VIEw v) {12: mCheckmarksCollapsed = !mCheckmarksCollapsed;13: table.setColumnCollapsed(0, mCheckmarksCollapsed);14: }15: });
48.TableLayout8 按鈕可以設置Stretch

按鈕事件:
1: final TableLayout table = (TableLayout) findViewById(R.id.menu);2: Button button = (Button) findViewById(R.id.toggle);3: button.setOnClickListener(new Button.OnClickListener() {4: public void onClick(VIEw v) {5: mStretch = !mStretch;6: table.setColumnStretchable(1, mStretch);7: }8: });
49.TableLayout9


按鈕事件:
1: final TableLayout table = (TableLayout) findViewById(R.id.menu);2: Button button = (Button) findViewById(R.id.toggle);3: button.setOnClickListener(new Button.OnClickListener() {4: public void onClick(VIEw v) {5: mShrink = !mShrink;6: table.setColumnShrinkable(0, mShrink);7: }8: });setColumnShrinkable的解釋:
Makes the given column shrinkable or not. When a row is too wide, the table can reclaim extra space from shrinkable columns.
Calling this method requests a layout Operation.
50.TableLayout10

布局:
注意:android:stretchColumns="1" 才有拉申效果
1: <?xml version="1.0" encoding="utf-8"?> 2: 3: <TableLayout XMLns:android="http://schemas.android.com/apk/res/android" 4: android:layout_width="fill_parent" 5: android:layout_height="fill_parent" 6: android:stretchColumns="1"> 7: 8: <TableRow> 9: <TextView10: android:text="@string/table_layout_10_user"11: android:textStyle="bold"12: android:gravity="right"13: android:padding="3dip" />14: 15: <EditText android:id="@+id/username"16: android:text="@string/table_layout_10_username_text"17: android:padding="3dip"18: android:scrollHorizontally="true" />19: </TableRow>20: 21: <TableRow>22: <TextVIEw23: android:text="@string/table_layout_10_password"24: android:textStyle="bold"25: android:gravity="right"26: android:padding="3dip" />27: 28: <EditText android:id="@+id/password"29: android:text="@string/table_layout_10_password_text"30: android:passWord="true"31: android:padding="3dip"32: android:scrollHorizontally="true" />33: </TableRow>34: 35: <TableRow36: android:gravity="right">37: 38: <Button android:id="@+id/cancel"39: android:text="@string/table_layout_10_cancel" />40: 41: <Button android:id="@+id/login"42: android:text="@string/table_layout_10_login" />43: </TableRow>44: </TableLayout>45:
51.TableLayout11

布局:
注意:第6行和第37行
1: <?xml version="1.0" encoding="utf-8"?> 2: 3: <TableLayout XMLns:android="http://schemas.android.com/apk/res/android" 4: android:layout_width="fill_parent" 5: android:layout_height="wrap_content" 6: android:stretchColumns="1"> 7: 8: <TableRow> 9: <TextView10: android:layout_column="1"11: android:text="@string/table_layout_7_open"12: android:padding="3dip" />13: <TextView14: android:text="@string/table_layout_7_open_shortcut"15: android:gravity="right"16: android:padding="3dip" />17: </TableRow>18: 19: <TableRow>20: <TextView21: android:layout_column="1"22: android:text="@string/table_layout_7_save"23: android:background="#FF00FF00"24: android:padding="3dip" />25: <TextView26: android:text="@string/table_layout_7_save_shortcut"27: android:gravity="right"28: android:padding="3dip" />29: </TableRow>30: 31: <TableRow>32: <!-- Horizontally centers the content of the cell -->33: <TextView34: android:layout_column="1"35: android:text="@string/table_layout_7_save_as"36: android:background="#FFFF0000"37: android:layout_gravity="center_horizontal"38: android:padding="3dip" />39: <TextView40: android:text="@string/table_layout_7_save_as_shortcut"41: android:background="#FFFF00FF"42: android:gravity="right"43: android:padding="3dip" />44: </TableRow>45: 46: <View47: android:layout_height="2dip"48: android:background="#FF909090" />49: 50: <TableRow>51: <TextView52: android:text="@string/table_layout_7_x"53: android:padding="3dip" />54: <TextView55: android:text="@string/table_layout_7_import"56: android:padding="3dip" />57: </TableRow>58: 59: <TableRow>60: <View61: android:layout_height="68dip"62: android:background="#FF909090" />63: <!-- Aligns the content of the cell to the bottom right -->64: <TextView65: android:text="@string/table_layout_7_export"66: android:background="#FFFF0000"67: android:layout_gravity="right|bottom"68: android:padding="3dip" />69: <TextView70: android:text="@string/table_layout_7_export_shortcut"71: android:background="#FF00FFFF"72: android:gravity="right"73: android:padding="3dip" />74: </TableRow>75: 76: <VIEw77: android:layout_height="2dip"78: android:background="#FF909090" />79: </TableLayout>80:
52.TableLayout12

布局:
注意:第26行android:layout_span="2"表明這個TextVIEw跨2個格
1: <?xml version="1.0" encoding="utf-8"?> 2: 3: 4: <TableLayout XMLns:android="http://schemas.android.com/apk/res/android" 5: android:layout_width="fill_parent" 6: android:layout_height="wrap_content"> 7: 8: <TableRow> 9: <TextView10: android:text="@string/table_layout_12_a"11: android:background="#FFFF0000"12: android:padding="3dip" />13: <TextView14: android:text="@string/table_layout_12_b"15: android:background="#FF00FF00"16: android:padding="3dip" />17: <TextView18: android:text="@string/table_layout_12_c"19: android:background="#FF0000FF"20: android:padding="3dip" />21: </TableRow>22: 23: <TableRow>24: <TextView25: android:text="@string/table_layout_12_d"26: android:layout_span="2"27: android:gravity="center_horizontal"28: android:background="#FF0000FF"29: android:padding="3dip" />30: <TextView31: android:text="@string/table_layout_12_e"32: android:background="#FF00FF00"33: android:padding="3dip" />34: </TableRow>35: 36: <TableRow>37: <TextView38: android:text="@string/table_layout_12_f"39: android:background="#FFFF00FF"40: android:padding="3dip" />41: <TextView42: android:text="@string/table_layout_12_g"43: android:background="#FF00FF00"44: android:padding="3dip" />45: <TextView46: android:text="@string/table_layout_12_h"47: android:background="#FFFF0000"48: android:padding="3dip" />49: </TableRow>50: 51: <TableRow>52: <TextView53: android:text="@string/table_layout_12_a"54: android:background="#FF00FF00"55: android:padding="3dip" />56: <TextView57: android:text="@string/table_layout_12_b"58: android:layout_span="2"59: android:gravity="center_horizontal"60: android:background="#FF0000FF"61: android:padding="3dip" />62: </TableRow>63: 64: <TableRow>65: <TextVIEw66: android:text="@string/table_layout_12_g"67: android:layout_span="3"68: android:gravity="center_horizontal"69: android:background="#FFC0C0C0"70: android:padding="3dip" />71: </TableRow>72: </TableLayout>73:
53.List4 在List裡又從新設置了一個LinearLayout布局

源碼:見List4
1: public void onCreate(Bundle savedInstanceState) {2: super.onCreate(savedInstanceState);3: 4: // Use our own list adapter5: setListAdapter(new SpeechListAdapter(this));6: }
54.List5
![]() 為沒能點的空白
為沒能點的空白

源碼:第22行的方法isEnabled為判斷是否為分隔符
1: public void onCreate(Bundle savedInstanceState) { 2: super.onCreate(savedInstanceState); 3: 4: setListAdapter(new MyListAdapter(this)); 5: } 6: 7: private class MyListAdapter extends BaseAdapter { 8: public MyListAdapter(Context context) { 9: mContext = context;10: }11: 12: public int getCount() {13: return mStrings.length;14: }15: 16: @Override17: public boolean areAllItemsEnabled() {18: return false;19: }20: 21: @Override22: public boolean isEnabled(int position) {23: return !mStrings[position].startsWith("-");24: }25: 26: public Object getItem(int position) {27: return position;28: }29: 30: public long getItemId(int position) {31: return position;32: }33: 34: public View getView(int position, View convertView, ViewGroup parent) {35: TextView tv;36: if (convertView == null) {37: tv = (TextVIEw) LayoutInflater.from(mContext).inflate(38: android.R.layout.simple_expandable_list_item_1, parent, false);39: } else {40: tv = (TextView) convertVIEw;41: }42: tv.setText(mStrings[position]);43: return tv;44: }45: 46: private Context mContext;47: }48: 49: private String[] mStrings = { "----------", "----------", "Abbaye de Belloc",50: "Abbaye du Mont des Cats", "Abertam", "----------", "Abondance",51: "----------", "Ackawi", "Acorn", "Adelost", "Affidelice au Chablis",52: "Afuega'l Pitu", "Airag", "----------", "Airedale", "Aisy Cendre",53: "----------", "Allgauer Emmentaler", "Alverca", "Ambert",54: "American Cheese", "Ami du Chambertin", "----------", "----------",55: "Anejo Enchilado", "Anneau du Vic-Bilh", "Anthoriro", "----------",56: "----------" };
55.List6 此為ListActivity,在把個List中顯示標題,當點擊List選項時彈出內容

思路:
55.1.
在OnCreate方法裡給ListActivity設置了一個Adapter,SpeechListAdapter
1: @Override2: public void onCreate(Bundle savedInstanceState) {3: super.onCreate(savedInstanceState);4: 5: // Use our own list adapter6: setListAdapter(new SpeechListAdapter(this));7: }55.2
SpeechListAdapter是繼承自BaseAdapter,此Adapter由一個mTitles+mDialogue組成,由Boolean 變量mExpanded來控制Adapter是否顯示mDialogue的內容,此核心代碼如下:
1: /** 2: * Make a SpeechView to hold each row. 3: * 4: * @see android.widget.ListAdapter#getView(int, android.view.VIEw, 5: * android.view.ViewGroup) 6: */ 7: public View getView(int position, View convertView, ViewGroup parent) { 8: SpeechView sv; 9: if (convertView == null) {10: sv = new SpeechView(mContext, mTitles[position], mDialogue[position],11: mExpanded[position]);12: } else {13: sv = (SpeechView) convertView;14: sv.setTitle(mTitles[position]);15: sv.setDialogue(mDialogue[position]);16: sv.setExpanded(mExpanded[position]);17: }18: 19: return sv;20: }21: 22: public void toggle(int position) {23: mExpanded[position] = !mExpanded[position];24: notifyDataSetChanged();//Notifies the attached View that the underlying data has been changed and it should refresh itself.25: }55.3 為adapter自定義VIEw
在getView中把postion,convertView傳給了一個SpeechView對象,此SpeechView為一個線性布局Linearlayout中有兩個子TextVIEw,代碼如下
1: private class SpeechView extends LinearLayout { 2: public SpeechView(Context context, String title, String dialogue, 3: boolean expanded) { 4: super(context); 5: 6: this.setOrientation(VERTICAL); 7: 8: // Here we build the child views in code. They could also have 9: // been specifIEd in an XML file.10: 11: mTitle = new TextView(context);12: mTitle.setText(title);13: addView(mTitle, new LinearLayout.LayoutParams(LayoutParams.FILL_PARENT,14: LayoutParams.WRAP_CONTENT));15: 16: mDialogue = new TextView(context);17: mDialogue.setText(dialogue);18: addView(mDialogue, new LinearLayout.LayoutParams(19: LayoutParams.FILL_PARENT, LayoutParams.WRAP_CONTENT));20: 21: mDialogue.setVisibility(expanded ? VISIBLE : GONE);22: }23: 24: /**25: * Convenience method to set the title of a SpeechView26: */27: public void setTitle(String title) {28: mTitle.setText(title);29: }30: 31: /**32: * Convenience method to set the dialogue of a SpeechVIEw33: */34: public void setDialogue(String words) {35: mDialogue.setText(Words);36: }37: 38: /**39: * Convenience method to expand or hide the dialogue40: */41: public void setExpanded(boolean expanded) {42: mDialogue.setVisibility(expanded ? VISIBLE : GONE);43: }44: 45: private TextView mTitle;46: private TextVIEw mDialogue;47: }55.4 實現List被單擊單件
1: @Override2: protected void onListItemClick(ListView l, View v, int position, long id) {3: ((SpeechListAdapter) getListAdapter()).toggle(position);4: }它用到了adapter中的一個方法,通知VIEw有更改使其更新
1: public void toggle(int position) {2: mExpanded[position] = !mExpanded[position];3: notifyDataSetChanged();//Notifies the attached VIEw that the underlying data has been changed and it should refresh itself.4: }
56.List8 此例也為ListActivity 。當點擊 New photo時,在下面動態的填加圖片List

從布局中可以看出在LineraLayout中兩個按鈕下面是一個FrameLayout,當有內容時顯示ListView,當無內容時顯示TextVIEw
注意:第34行<ListVIEw android:id="@android:id/list" 表明這個ListVIEw為ListActivity的List
1: <?xml version="1.0" encoding="utf-8"?> 2: 3: <LinearLayout XMLns:android="http://schemas.android.com/apk/res/android" 4: android:orientation="vertical" 5: android:layout_width="fill_parent" 6: android:layout_height="fill_parent"> 7: 8: <LinearLayout 9: android:orientation="horizontal"10: android:layout_width="fill_parent" 11: android:layout_height="wrap_content">12: 13: <Button android:id="@+id/add"14: android:layout_width="wrap_content" 15: android:layout_height="wrap_content"16: android:text="@string/list_8_new_photo"/>17: 18: <Button android:id="@+id/clear"19: android:layout_width="wrap_content" 20: android:layout_height="wrap_content"21: android:text="@string/list_8_clear_photos"/>22: 23: </LinearLayout>24: 25: <!-- The frame layout is here since we will be showing either26: the empty view or the list view. -->27: <FrameLayout28: android:layout_width="fill_parent" 29: android:layout_height="0dip"30: android:layout_weight="1" >31: <!-- Here is the list. Since we are using a ListActivity, we32: have to call it "@android:id/list" so ListActivity will33: find it -->34: <ListView android:id="@android:id/list"35: android:layout_width="fill_parent" 36: android:layout_height="fill_parent"37: android:drawSelectorOnTop="false"/>38: 39: <!-- Here is the view to show if the list is emtpy -->40: <TextVIEw android:id="@+id/empty"41: android:layout_width="fill_parent" 42: android:layout_height="fill_parent"43: android:text="@string/list_8_no_photos"/>44: 45: </FrameLayout>46: 47: </LinearLayout>在OnCreate裡創建了一個PhotoAdaper(自定義類)
1: // Use a custom layout file 2: setContentView(R.layout.list_8); 3: 4: // Tell the list view which view to display when the list is empty 5: getListView().setEmptyView(findViewById(R.id.empty));//當adapter為空時顯示的View 6: 7: // Set up our adapter 8: mAdapter = new PhotoAdapter(this); 9: setListAdapter(mAdapter);10: PhotoAdaper為繼承BaseAdapter的ImageView,即list裡顯示一個ImageVIEw
1: public View getView(int position, View convertView, ViewGroup parent) { 2: // Make an ImageView to show a photo 3: ImageView i = new ImageView(mContext); 4: 5: i.setImageResource(mPhotos.get(position)); 6: i.setAdjustViewBounds(true);//保持圖片比例 7: i.setLayoutParams(new AbsListView.LayoutParams(LayoutParams.WRAP_CONTENT, 8: LayoutParams.WRAP_CONTENT)); 9: // Give it a nice background10: i.setBackgroundResource(R.drawable.picture_frame);11: return i;12: }在OnCreate裡設置兩個按鈕事件來填加,清空ImageVIEw
1: // Wire up the clear button to remove all photos 2: Button clear = (Button) findViewById(R.id.clear); 3: clear.setOnClickListener(new View.OnClickListener() { 4: 5: public void onClick(View v) { 6: mAdapter.clearPhotos(); 7: } 8: }); 9: 10: // Wire up the add button to add a new photo11: Button add = (Button) findViewById(R.id.add);12: add.setOnClickListener(new View.OnClickListener() {13: 14: public void onClick(VIEw v) {15: mAdapter.addPhotos();16: }17: });在PhotoAdaper裡有兩個方法用於填加,清空mPhotos,mPhotos為一個ArrayList
1: public void clearPhotos() { 2: mPhotos.clear(); 3: notifyDataSetChanged(); 4: } 5: 6: public void addPhotos() { 7: int whichPhoto = (int) Math 8: .round(Math.random() * (mPhotoPool.length - 1)); 9: int newPhoto = mPhotoPool[whichPhoto];10: mPhotos.add(newPhoto);11: notifyDataSetChanged();12: }
57.list10

源碼就這些:
1: @Override 2: public void onCreate(Bundle savedInstanceState) { 3: super.onCreate(savedInstanceState); 4: 5: setListAdapter(new ArrayAdapter<String>(this, 6: android.R.layout.simple_list_item_single_choice, GENRES)); 7: 8: final ListView listView = getListView(); 9: 10: listView.setItemsCanFocus(false);11: listView.setChoiceMode(ListVIEw.CHOICE_MODE_SINGLE);//設置選擇行為,此為單選12: }
 Android手機通過USB線共享電腦的網絡上網
本人嘗試,裡面提供得軟件在索愛x8上失敗了 提示說不能網絡共享 。看來自己編譯x8迫在眉睫啊 (有幸下載到了x8得源代碼。。。)--------------------
 jocky配置使用
4、點ok後,將在項目的根目錄下生成一個jocky_build.XML文件,事實上是一個ant build文件。打開這個文件,作適當修改<?XML version
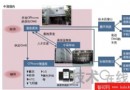 Android系OPhone,中國開發瞄准世界
圖2:OPhone的水平分工體制通信運營商中國移動占據主導。軟件開發和終端開發由播思通訊和各終端廠商負責。日本的窗口為鵬開科技。(圖:播思通訊的圖片。佐佐木陽拍攝,中國
 Android調試技巧之Eclipse行號和Logcat
很多初入Android的開發者可能會發現經常遇到Force Close或ANR這樣的問題,一般我們通過android系統的錯誤日志打印工具Logcat可以看到出錯的內容