編輯:Android技術基礎
本節給大家帶來的是Android給我們提供的顯示時間的幾個控件,他們分別是: TextClock,AnalogClock,Chronometer,另外其實還有個過時的DigitalClock就不講解了! 好的,開始本節內容!
TextClock是在Android 4.2(API 17)後推出的用來替代DigitalClock的一個控件!
TextClock可以以字符串格式顯示當前的日期和時間,因此推薦在Android 4.2以後使用TextClock。
這個控件推薦在24進制的android系統中使用,TextClock提供了兩種不同的格式, 一種是在24進制中顯示時間和日期,另一種是在12進制中顯示時間和日期。大部分人喜歡默認的設置。
可以通過調用:TextClock提供的is24HourModeEnabled()方法來查看,系統是否在使用24進制時間顯示! 在24進制模式中:
另外他給我們提供了下面這些方法,對應的還有get方法:
其實更多的時間我們是花在時間形式定義上,就是裡面這個CharSequence! 這裡提供下常用的寫法以及結果:
<TextClock
        android:layout_width="wrap_content"
        android:layout_height="wrap_content"
        android:format12Hour="MM/dd/yy h:mmaa"/>
    <TextClock
        android:layout_width="wrap_content"
        android:layout_height="wrap_content"
        android:format12Hour="MMM dd, yyyy h:mmaa"/>
    <TextClock
        android:layout_width="wrap_content"
        android:layout_height="wrap_content"
        android:format12Hour="MMMM dd, yyyy h:mmaa"/>
    <TextClock
        android:layout_width="wrap_content"
        android:layout_height="wrap_content"
        android:format12Hour="E, MMMM dd, yyyy h:mmaa"/>
    <TextClock
        android:layout_width="wrap_content"
        android:layout_height="wrap_content"
        android:format12Hour="EEEE, MMMM dd, yyyy h:mmaa"/>
    <TextClock
        android:layout_width="wrap_content"
        android:layout_height="wrap_content"
        android:format12Hour="Noteworthy day: 'M/d/yy"/>
運行結果:
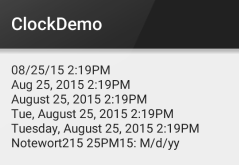
PS:另外minsdk 要大於或者等於17哦!
就是下圖這種:

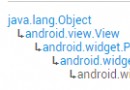
官網中我們可以看到這樣三個屬性:
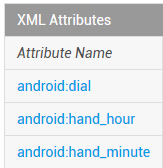
依次是:表背景,表時針,分時針的圖片,我們可以自行定制:
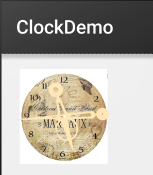
示例代碼如下:
<AnalogClock
        android:layout_width="100dp"
        android:layout_height="100dp"
        android:dial="@mipmap/ic_c_bg"
        android:hand_hour="@mipmap/zhen_shi"
        android:hand_minute="@mipmap/zhen_fen" />
運行結果:
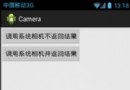
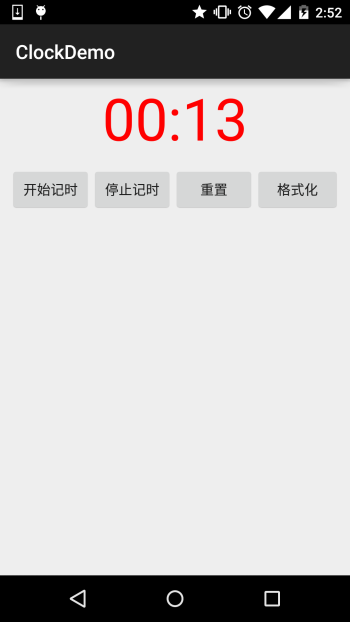
如題,就是一個簡單的計時器,我們直接上使用示例吧:
使用示例:
實現代碼:
布局代碼:
<LinearLayout xmlns:android="http://schemas.android.com/apk/res/android"
    xmlns:tools="http://schemas.android.com/tools"
    android:layout_width="match_parent"
    android:layout_height="match_parent"
    android:orientation="vertical"
    tools:context=".MainActivity">


    <Chronometer
        android:id="@+id/chronometer"
        android:layout_width="fill_parent"
        android:layout_height="wrap_content"
        android:gravity="center"
        android:textColor="#ff0000"
        android:textSize="60dip" />

    <LinearLayout
        android:layout_width="fill_parent"
        android:layout_height="wrap_content"
        android:layout_margin="10dip"
        android:orientation="horizontal">

        <Button
            android:id="@+id/btnStart"
            android:layout_width="fill_parent"
            android:layout_height="wrap_content"
            android:layout_weight="1"
            android:text="開始記時" />

        <Button
            android:id="@+id/btnStop"
            android:layout_width="fill_parent"
            android:layout_height="wrap_content"
            android:layout_weight="1"
            android:text="停止記時" />

        <Button
            android:id="@+id/btnReset"
            android:layout_width="fill_parent"
            android:layout_height="wrap_content"
            android:layout_weight="1"
            android:text="重置" />

        <Button
            android:id="@+id/btn_format"
            android:layout_width="wrap_content"
            android:layout_height="wrap_content"
            android:text="格式化" />
    </LinearLayout>

</LinearLayout>
MainActivity.java
public class MainActivity extends AppCompatActivity implements View.OnClickListener,Chronometer.OnChronometerTickListener{

    private Chronometer chronometer;
    private Button btn_start,btn_stop,btn_base,btn_format;

    @Override
    protected void onCreate(Bundle savedInstanceState) {
        super.onCreate(savedInstanceState);
        setContentView(R.layout.activity_main);
        initView();
    }

    private void initView() {
        chronometer = (Chronometer) findViewById(R.id.chronometer);
        btn_start = (Button) findViewById(R.id.btnStart);
        btn_stop = (Button) findViewById(R.id.btnStop);
        btn_base = (Button) findViewById(R.id.btnReset);
        btn_format = (Button) findViewById(R.id.btn_format);

        chronometer.setOnChronometerTickListener(this);
        btn_start.setOnClickListener(this);
        btn_stop.setOnClickListener(this);
        btn_base.setOnClickListener(this);
        btn_format.setOnClickListener(this);

    }

    @Override
    public void onClick(View v) {
        switch (v.getId()){
            case R.id.btnStart:
                chronometer.start();// 開始計時
                break;
            case R.id.btnStop:
                chronometer.stop();// 停止計時
                break;
            case R.id.btnReset:
                chronometer.setBase(SystemClock.elapsedRealtime());// 復位
                break;
            case R.id.btn_format:
                chronometer.setFormat("Time:%s");// 更改時間顯示格式
                break;
        }
    }

    @Override
    public void onChronometerTick(Chronometer chronometer) {
        String time = chronometer.getText().toString();
        if(time.equals("00:00")){
            Toast.makeText(MainActivity.this,"時間到了~",Toast.LENGTH_SHORT).show();
        }
    }
}
運行截圖:
本節跟大家簡單的介紹了TextClock,AnalogClock,Chronometer這三個組件,從篇幅就可以看出 其實這幾個東西用得並不多,幾乎是沒用過...知道下就好,用法也超簡單... 就這樣吧,本節就到這裡~謝謝
 第28章、列表視圖ListView之一(從零開始學Android)
在android開發中ListView是比較常用的組件,它以列表的形式展示具體內容,並且能夠根據數據的長度自適應顯示。一、簡單應用 1、打開“res/lay
 第104章、Android訪問WebService(從零開始學Android)
天氣預報、手機歸屬地查詢……,包括與SQL SERVER數據庫遠程交互都可以通過Web Service搞定。准備工作:(1)第一步,下載定位A
 2.3.8 SeekBar(拖動條)
本節引言:本節我們繼續來學習Android的基本UI控件中的拖動條——SeekBar,相信大家對他並不陌生,最常見的地方就是音樂播放器或者視頻播放器
 8.4.1 Android動畫合集之幀動畫
本節引言:從本節開始我們來探究Android中的動畫,畢竟在APP中添加上一些動畫,會讓我們的應用變得很炫,比如最簡單的關開Activity,當然自